63
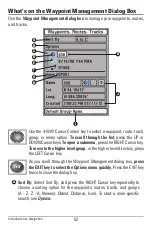
Options:
Provides a submenu so that you can set the default group, create
new navigation items (groups, waypoints, routes), and select and edit
several items at once. Select Search By to search by Name, Distance,
Date, Icon, or Icon Category. The Options menu will also change to show
related menus such as Save or Paste.
Scroll and View:
Press the UP or DOWN Cursor keys to browse through
the full list of saved waypoints, routes, tracks, and groups. The selected
item is highlighted in white.
Waypoint Icon:
The blue circle icon is the default waypoint icon.
Waypoint names are alphanumeric and begin with WP. You can also
change the icon, waypoint name, add it to a route, and more. If the
waypoint is saved with a snapshot or recording file, see the Snapshot and
Recording View on your control head to view the snapshot or recording.
Track Icon:
Track names are saved with a date and time stamp, and
certain track information can be edited (see
Edit your Waypoints, Routes,
Tracks, and Groups
).
Route Icon:
Route names are alphanumeric and begin with R. To change
the Route name and its waypoints, see
Edit your Waypoints, Routes,
Tracks, and Groups
.
Directory:
Shows the directory structure and the currently selected group.
The illustration shows GP001 as the selected group.
Arrows:
When arrows are displayed on a menu option, additional
information or submenus are available. If the arrow points to the right,
press the RIGHT Cursor key. If the arrow points to the left, press the LEFT
Cursor key to move up to the higher level group directory.
Information:
Displays the default group where all new waypoints, routes,
and tracks will be saved. In this illustration, Home is the default group.
This field also changes to display instructions.
Data Window:
As you scroll, the selected item’s information is displayed
at the bottom of the Waypoint Management dialog box.
Submenu:
After an item is selected, press the RIGHT Cursor key to view
the submenu.
B
J
K
H
E
D
C
I
G
F
Introduction to Navigation


