background image

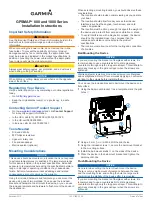
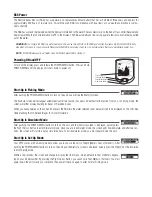
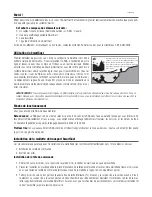
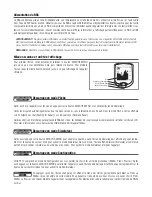
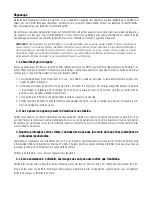
Understanding the On-Screen Images 

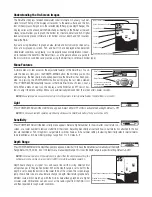
The SmartCast displays received underwater sonar information in an easy to under-
stand format. The top of the display corresponds to the water surface, and the bot-
tom of the display corresponds to the selected Depth Range (see Depth Range). The
display varies as the area under the RSS changes. Reeling in the RSS at a slow and
steady rate will allow you to graph the bottom for structure, detail and fish. Digital
readouts provide precise information for bottom contour, depth and fish locations
below the RSS.

If you are using SmartCast to graph an area, terrain and bottom composition varia-
tions are displayed on-screen. Fish and bait fish are displayed when detected.
Underwater conditions vary greatly, so some experience and interpretation is need-
ed to realize all the benefits of the SmartCast – use the picture above as a guide to
the most common conditions and practice using the SmartCast over known bottom types. 
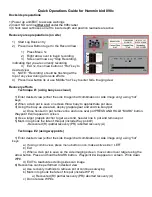
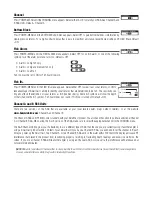
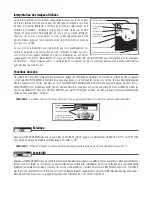
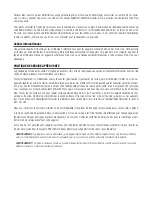
Menu Features

A simple menu system accesses the adjustable features of the SmartCast. To acti-
vate the menu system, press the POWER-MENU button; the first time you do this
after power up, the Sensitivity menu will appear. Once the SmartCast has been pow-
ered on, pressing the POWER-MENU button will display the last menu viewed.
Press POWER-MENU repeatedly to access other SmartCast menu choices, one at a
time. When a menu choice is on the display, use the RIGHT and LEFT Cursor but-
tons to adjust the menu settings. Menus are automatically removed from the screen after several seconds.

NOTE:

Menu settings are not saved in memory. All settings return to factory defaults when the SmartCast is turned off.

Light

Press POWER-MENU until the LIGHT menu appears. Select either OFF or ON to activate the backlight. Default = OFF

NOTE:

Continuous backlight operation significantly decreases the SmartCast’s battery life by as much as 60%.
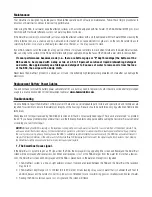
Sensitivity

Press POWER-MENU until the Sens-itivity menu appears. Select a higher number to show smaller sonar returns on-
screen, or a lower number to remove clutter from the screen. Adjusting Sensitivity also affects how sonar returns not attached to the bot-
tom are identified as Fish ID Symbols. Larger returns will be shown as fish at a lower setting. Increasing Sensitivity selects smaller returns
to be identified as fish. Sensitivity settings range from 1 to 5. Default = 3
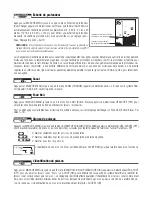
Depth Range

Press POWER-MENU until the Depth Range menu appears. Select AUTO to have the SmartCast automatically set the Depth
Range. Select 10,15, 20, 30, 60 or 100 feet to set a manual depth range. This locks the depth range to a specific setting. Default = AUTO

NOTE:

In manual operation, if the water depth is greater than the depth range setting, the

bottom will not be visible on-screen. Select AUTO to return to automatic operation.

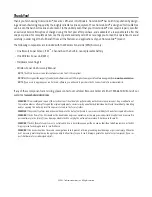
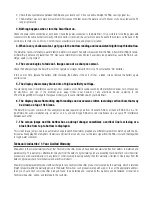
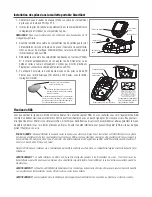
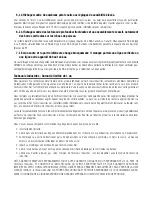
Depth Scale changes or signal loss will cause lines with missing detail and/or
abrupt changes in the graphed bottom. When the Depth range is set to AUTO, the
depth is set to keep the bottom in the lower third of the screen. The screen image
jump shown here is due to an automatic change in depth. New returns graphed at a
different scale will not match up with the historic data already graphed at a higher
or lower scale. Vertical lines can also occur as the radio signal from the RSS is lost
and then regained in rough water conditions.
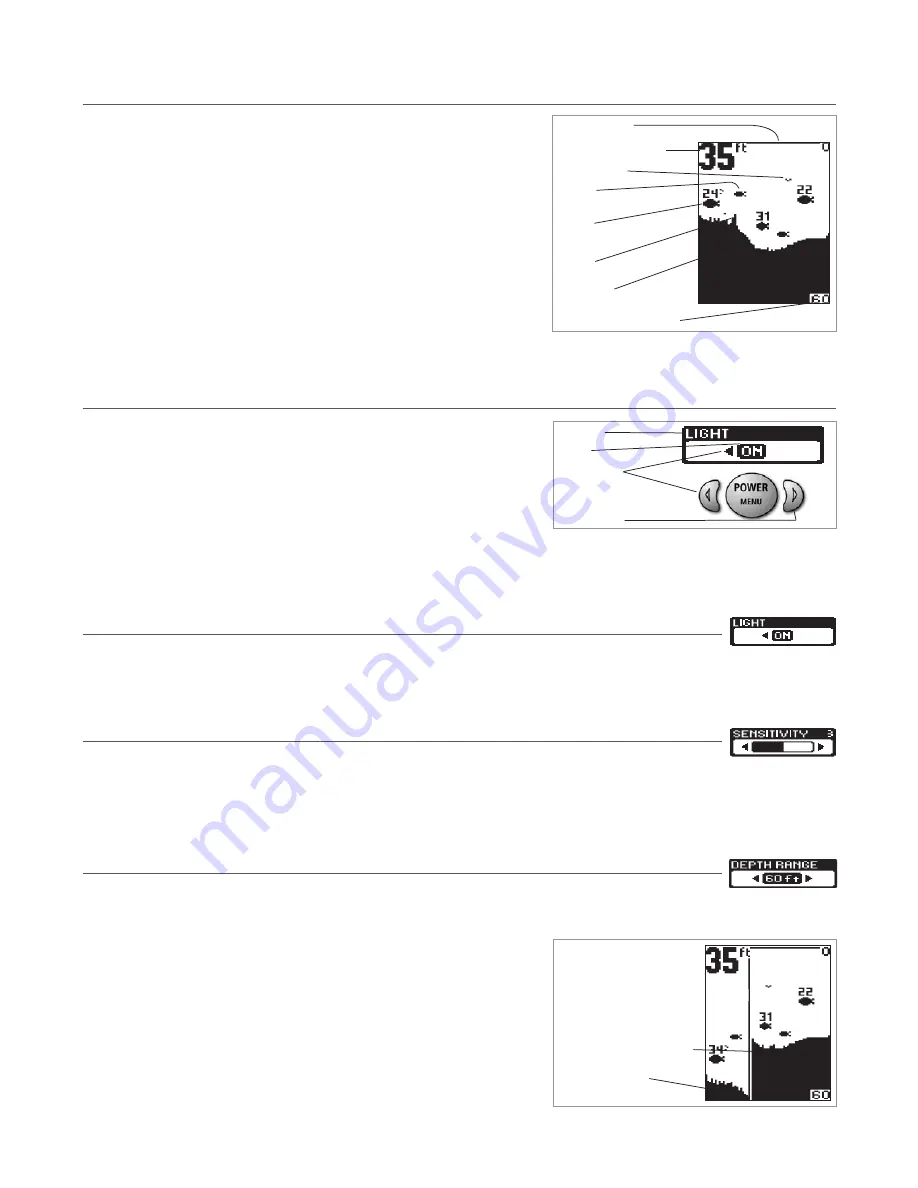
Water Surface Line

Depth – Measured at the RSS

Fish ID+

Fish Icon

Possible Bait Fish

Structure

Depth Contour

Depth Range (maximum 100 feet)
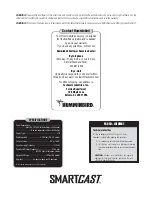
Menu Title

Setting

Button Changes 

A button has no function when
the corresponding menu arrow
is not displayed

Graphed sonar history at a
different range setting

Depth Change or temporary signal loss

Summary of Contents for RF10 SmartCast

Page 1: ...foot only Operational Modes The RSS can be used in two distinct ways Sonar Graph The RSS can be used to create a sonar graph of the bottom Cast the RSS into the water beyond an area of interest Retri...

Page 2: ...possibility of breaking your line if you use light test pound line on your reel The RSS is positively buoyant is buoyant under its own weight plus 0 2 ounces of bait and lead weight The maximum amoun...

Page 3: ...Start Up screen will disappear automatically after two seconds have passed without further action from you In Fishing mode the screen will either display Waiting for Sonar or Received Sonar When you h...

Page 4: ...ON to activate the backlight Default OFF NOTE Continuous backlight operation significantly decreases the SmartCast s battery life by as much as 60 Sensitivity Press POWER MENU until the Sens itivity m...

Page 5: ...Units There are two versions of the RSS that are available at your local tackle dealer major outdoor retailers or at the website www humminbird com Channel A and Channel B The Channel A RSS unit RF40...

Page 6: ...rself There are no user serviceable parts inside and special tools and techniques are required for assembly to ensure the waterproof integrity of the housings Repairs should be performed only by autho...

Page 7: ...6 mHz range 433 mHz range for European models could cause interference with your SmartCast 6 The display shows fluctuating depth readings and excessive clutter including vertical bars that may be draw...

Page 8: ...addition a letter describing the problem you are experiencing along with your name address and daytime telephone number must be included so that we can contact you about your repair if necessary Inte...

Page 9: ...oved Area of bottom coverage equals twice the current depth Contact Humminbird Your Humminbird accessory is designed for trouble free operation and is backed by a one year warranty If you have any que...

Page 10: ...er un relev sonar du fond Lancez le RSS dans l eau au del de la zone qui vous int resse En r cup rant le RSS lentement et sans coups vous obtiendrez un affichage refl tant les structures les poissons...

Page 11: ...enterez le risque de casser la ligne si vous utilisez un fil plus fin sur le moulinet Le RSS flotte il porte son propre poids plus 6 grammes 0 2 onces pour l app t et les plombs Le RSS accepte au maxi...

Page 12: ...yant sur le bouton MARCHE MENU vous obtenez l cran de d marrage Cet cran dispara t automatiquement au bout de deux secondes sans intervention de votre part Dans le mode P che l cran affichera soit En...

Page 13: ...MARCHE MENU pour acc der aux autres options de menu SmartCast une par une Lorsqu une option de menu est affich e utilisez les boutons de d placement de curseur DROIT et GAUCHE pour ajuster les r glage...

Page 14: ...al A Fond Noir Appuyez sur MARCHE MENU jusqu ce que le menu Fond Noir Bottom Black appar aisse S lectionnez D SACTIV OFF pour obtenir les donn es de duret du fond en affichant les retours secondaires...

Page 15: ...es avec un linge humect d eau douce Les broches Wet Switch du RSSTM doivent tre rinc es l eau douce apr s voir t expos es l eau sal e pour viter la corrosion Si le SmartCast est en contact avec des e...

Page 16: ...ment votre propre poignet vous risquez de perdre la r ception L chelle de profondeur du SmartCast va de 0 6 m tre 30 m tres 2 100 pieds Des lectures irr guli res peuvent se produire si la profondeur e...

Page 17: ...ompter de la date d achat initial pour les produits m caniques et lectriques Nous rempla ons gratuitement tout produit Techsonic Industries non couvert par cette garantie qui est renvoy port pr pay pe...

Page 18: ...ue les nouvelles unit s en produc tion Vous n aurez probablement jamais utiliser notre remarquable politique de service apr s vente mais il est plaisant de savoir que nous soutenons nos produits avec...

Page 19: ...vantes Par t l phone du lundi au vendredi de 8 h 16h30 heure normale du Centre 334 687 0503 Par courrier lectronique nous devrions normalement r pondre votre courriel en de de trois jours ouvrables cu...

Reviews: