background image

14

42408-01  •  06/29/10  •  Hunter Fan Company

7 • Completing Your Installation With or Without a Bowl Light Fixture (Continued)

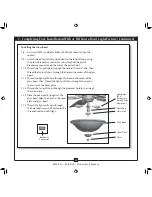
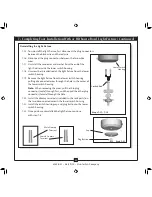
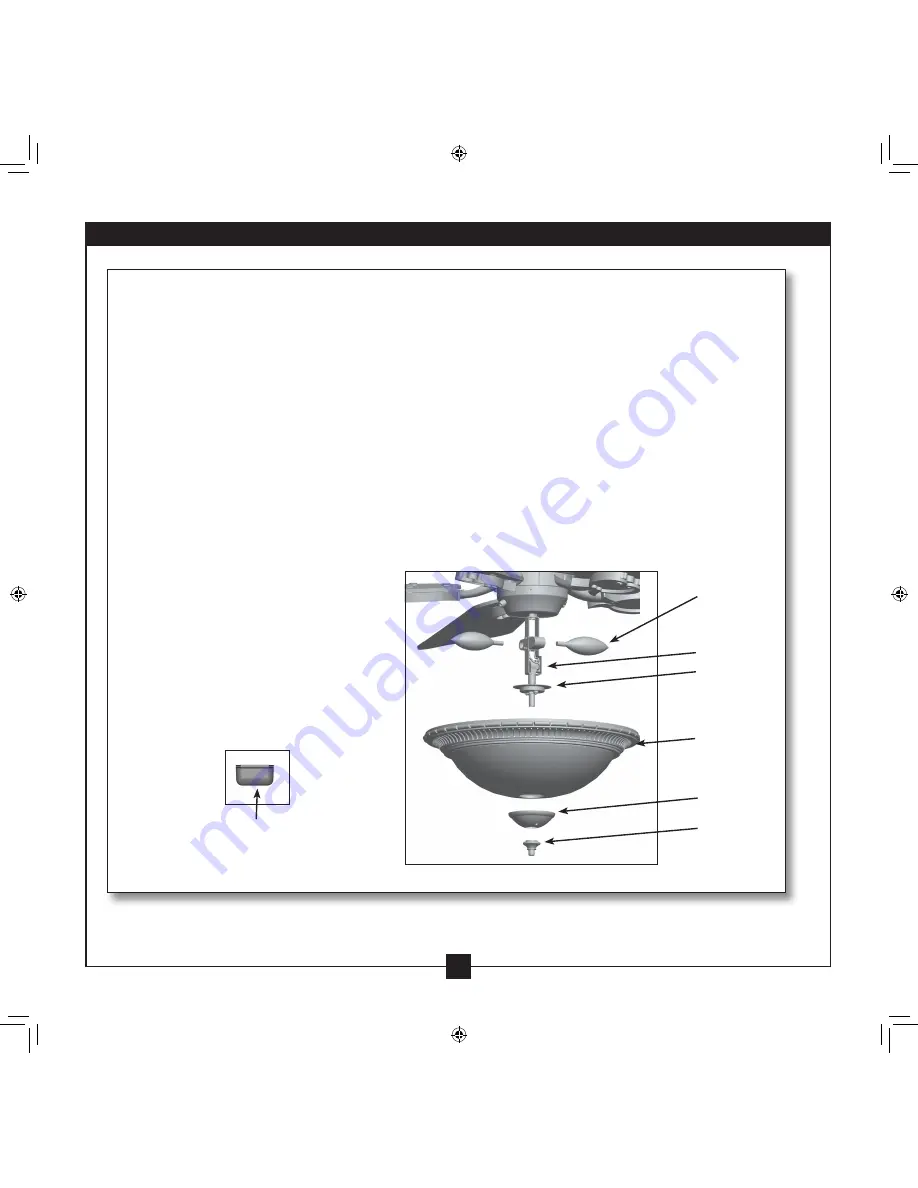
Installing the Glass Bowl

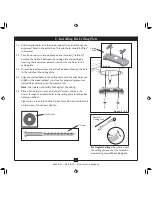
7-8.  First install B10 candelabra bulbs (60 Watt Maximum) into the  

sockets. 

7-9.  Attach the extra pull chain (included) to the fan pull chain using 

the plastic breakaway connector. (You may find the plastic 
breakaway connector on the end of the extra chain.)

7-10.  Thread the fan pull chain through the hole in the metal disk. Then, 

thread the fan pull chain through the hole in the center of the glass 
bowl.

7-11.  Thread the light pull chain through the hole in the center of the 

glass bowl. Then, Thread the light pull chain throught the hole in 
the center of the cover plate.

7-12.  Thread the fan pull chain through the grommet hole in the side of 

the cover plate.

7-13.  Place the cover plate up against the 

glass bowl. Align the holes in the cover 
plate and glass bowl.

7-14.  Thread the light pull chain through 

the finial and screw the finial onto the 
threaded rod end until tight.

Breakaway 

Connector

Light Bulbs 


(B10 

Candelabra 

Base 60 Watt 

Maximum)

Metal Rod
Metal Disk

Glass Bowl

Cover Plate

Finial

Summary of Contents for 22390

Page 1: ...ce also attach your receipt or a copy of your receipt to the manual __________________________________________ Model Name __________________________________________ Model No __________________________...

Page 2: ...possible electrical shock before installing your fan disconnect the power by turning off the circuit breakers to the outlet box and associated wall switch location If you cannot lock the circuit brea...

Page 3: ...e if the site is acceptable and safe for your new Hunter fan If you cannot check off every item prepare a new fan site as described on this page Fan Support System Fan attaches directly to building st...

Page 4: ...outlet box plus two 8 x 1 1 2 wood screws and washers available from any hardware store or electrical supply house 4 2 Orient the outlet box so that both the inner and outer holes in the box align wi...

Page 5: ...cluded with each product For quiet and optimum performance of your Hunter fan use only Hunter speed controls For ceilings higher than 8 feet you can purchase Hunter extension downrods All Hunter fans...

Page 6: ...lectric drill with 9 64 bit Standard screwdriver magnetic tip recommended Phillips head screwdriver magnetic tip recommended Wrench or pliers Ladder height dependent upon installation site CheckingYou...

Page 7: ...n the slotted holes in the ceiling plate with the pilot holes you drilled in the wood support structure For proper alignment use slotted holes directly across from each other Note The isolators should...

Page 8: ...ep 3 5 CAUTION The adapter has a special coating on the threads Do not remove this coating the coating prevents the downrod from unscrewing Once assembled do not remove the downrod 3 3 Place the low p...

Page 9: ...o the green ground wire grounding from the ceiling plate and the green ground wire from the fan 4 4 Connect the white wire grounded from the ceiling to the white wire grounded from the fan 4 5 Connect...

Page 10: ...e the ceiling plate tabs 5 4 Partially install another canopy screw into the hole between the two ceiling plate tabs Securely tighten both screws 5 5 Using both hands push the canopy trim ring up to t...

Page 11: ...s the blades may appear slightly loose after screws are tightened This is normal 6 3 Remove the blade mounting screws and rubber shipping bumpers from the motor Note Some blade mounting screws are ins...

Page 12: ...of the housing 7 3 Align the keyhole slots in the housing with the housing assembly screws 7 4 Turn the housing counterclockwise until the housing assembly screws are firmly situated in the narrow en...

Page 13: ...connection could cause improper operation and damage to the product 7 7 Place the lower switch housing assembly over the upper switch housing Align the side screw holes in the upper and lower switch h...

Page 14: ...thread the fan pull chain through the hole in the center of the glass bowl 7 11 Thread the light pull chain through the hole in the center of the glass bowl Then Thread the light pull chain throught...

Page 15: ...ower switch housing 7 19 Remove the light fixture from the lower switch housing pulling disconnected wires through the hole in the center of the lower switch housing Note When removing the wires pull...

Page 16: ...otation in warm weather to cool the room with a direct breeze In winter having the fan draw air upward clockwise blade rotation will distribute the warmer air trapped at the ceiling around the room wi...

Page 17: ...and instructions to balance the fan 2 Tighten all blade iron screws 3 Turn power off support fan very carefully and check that the hanger ball is properly seated Problem Lights shut off suddenly but f...

Reviews: