background image

43042-01  02/21/2008

21


Warranty

© 2008 Hunter Fan Company

Hunter Fan Company

Bath Exhaust Fan

LiMiTED WarranTY

Hunter Fan Company makes the following limited warranty to the original user or consumer purchaser of this Hunter 

bath  

exhaust fan:

If any part of your Hunter bath exhaust fan (except for glass fixtures and light bulbs) fails at any time within one year 

afterthe date of sale to you due to a defect in material or workmanship, we will repair or, at our option, replace the 

defective part free of charge for parts and labor performed at our nearest service center or at our service Depart-

ment in Memphis, Tennessee.  after this one-year period, you will be responsible for all parts and labor costs for 

repairs on the bath exhaust fan except for motor repairs as provided below.

If your Hunter bath exhaust fan motor fails at any time within five years after the date of sale to you due to a defect 

in material or workmanship, labor and materials to repair the defect will be provided free of charge at our nearest 

service center or our service Department in Memphis, Tennessee.  if no replacement part can be provided, we 

will, at our option, either refund the actual purchase price of your bath exhaust fan or provide a replacement free of 

charge. After this five-year period, you will be responsible for all parts and labor costs for repairs on all parts of the 

bath exhaust fan.  

iF THE oriGinaL UsEr or ConsUMEr pUrCHasEr CEasEs To oWn THE Fan, THis WarranTY anD 

anY iMpLiED WarranTY WHiCH THEn rEMains in EFFECT, inCLUDinG BUT noT LiMiTED To anY iM-

pLiED WarranTY oF MErCHanTaBiLiTY or FiTnEss For a parTiCULar pUrposE, arE VoiDED. no 

WarranTY, EXprEss or iMpLiED, inCLUDinG anY WarranTY oF MErCHanTaBiLiTY or FiTnEss For 

a parTiCULar pUrposE, is MaDE in rEspECT oF GLass FiXTUrEs or LiGHT BULBs or THE FinisH 

on anY METaL porTion oF THE BaTH EXHaUsT Fan.

THis WarranTY is in LiEU oF aLL oTHEr EXprEss WarranTiEs. THE DUraTion oF anY iMpLiED 

WarranTY, inCLUDinG, BUT noT LiMiTED To, anY iMpLiED WarranTY oF MErCHanTaBiLiTY or FiT-

nEss For a parTiCULar pUrposE, in rEspECT To anY HUnTEr Fan BaTH EXHaUsT Fan MoTor or 

oTHEr Fan parT, is EXprEssLY LiMiTED To THE pErioD oF THE EXprEss WarranTY sET ForTH 

aBoVE For sUCH MoTors or oTHEr parTs.

This warranty is voided if your Hunter bath exhaust fan is not purchased and installed in the U.s.a. This warranty 

excludes and does not cover defects, malfunctions or failures of any Hunter bath exhaust fan which were caused 

by repairs by persons not authorized by us, use of parts or accessories not authorized by us, mishandling, improper 

installation, modifications or damage to the Hunter bath exhaust fan while in your possession, or unreasonable use, 

including failure to provide reasonable and necessary maintenance.

To obtain servicing, contact the nearest Hunter authorized service center of the Hunter Fan Company service De-

partment, 2500 Frisco avenue, Memphis, Tennessee 38114. please contact us before shipping your bath exhaust 

fan to us. if we authorize you to ship it to us, you will be responsible for all insurance and freight or other transpor-

tation charges to our factory or service center. We will return your Hunter bath exhaust fan freight prepaid. Your 

Hunter bath exhaust fan should be properly packed to avoid damage in transit since we will not be responsible for 

any such damage. proof of purchase is required when requesting warranty service. The purchaser must present the 

sales receipt or other document that establishes proof of purchase.

in no EVEnT sHaLL HUnTEr Fan CoMpanY BE LiaBLE For ConsEQUEnTiaL or inCiDEnTaL DaM-

aGEs.

soME sTaTEs Do noT aLLoW LiMiTaTions on HoW LonG an iMpLiED WarranTY LasTs or THE EX-

CLUsion or LiMiTaTion oF inCiDEnTaL or ConsEQUEnTiaL DaMaGEs so THE aBoVE LiMiTaTion or 

EXCLUsions MaY noT appLY To YoU.

THE WarranTY GiVEs YoU spECiFiC LEGaL riGHTs anD YoU MaY aLso HaVE oTHEr riGHTs WHiCH 

VarY FroM sTaTE To sTaTE. 

E

n

GL
is

H

Summary of Contents for 43042-01

Page 1: ...43042 01 02 21 2008 1 Français Consulter la page 45 ENGLISH See page 2 Español Vea la página 23 82048 Turino Bath Ventilator with Light READ and SAVE THESE INSTRUCTIONS I n s t a l l a t i o n G u i d e ...

Page 2: ...le codes and standards including fire rated construction 4 Sufficient air is needed for proper combustion and exhausting of gasses through the flue chimney of fuel burning equipment to prevent backdrafting Follow the heating equipment manufac turer s guideline and safety standards such as those published by the National Fire Prevention Association NFPA and the American Society for Heating Refriger...

Page 3: ...3242 07 133 I H 74508 03 133 98037 01 000 x2 O 97960 01 000 M 75729 01 000 P 77535 01 000 Check all the parts If damaged call 1 888 830 1326 for replacements Tools Needed Estimated assembly time 30 to 60 minutes Included B C 3 8 Cable Connector Extra Screws I x2 NOTE Strain relief cable connector must be installed Not Included ENGLISH ...

Page 4: ...he pre loaded screw tip covers Back out the pre loaded screw tips until flush with the side of the housing Remove packing material Turn off the power source Before Installation Loosen screws NOTE Remove all packing materials before installation 1 2 3 5 6 4 H H I E ENGLISH ...

Page 5: ...ring cover screw Remove the wiring cover Choose Installation Option For New Construction attaching to joist fo to step A11 page 6 For New Construction suspended between joists go to step B11 page 8 For Existing Construction accessible from above go to step C11 page 11 For Existing Construction accessible only from below go to step D11 page 15 8 F 9 E 10 B C ENGLISH ...

Page 6: ...the bottom edge of the joist based on the thickness of your sheetrock New Construction attaching to joist Screw pre loaded screws into joist or framing A14 F A Fan Motor Light 2 Pin Black Ground Green Bare Copper White Black Main Switch 1 AC In Black Switch 2 AC In Black Light Option White White 3 Pin Option Fan Main Light Together ENGLISH ...

Page 7: ...o position Make sure the wires are not pinched between the motor and the housing Secure the motor by tightening the 2 screws Turn on the power source Connect 4 duct and vent to the outside Tape joints If ducting does not fit securely an adapter may need to be purchased Install the wiring cover plate Make sure all wiring connections are inside the box or under the wiring cover plate ENGLISH ...

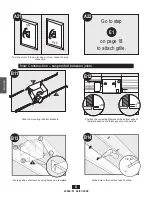
Page 8: ...w Construction suspended between joists Position the correct depth mark at the bottom edge of the joist based on the thickness of your sheetrock Drill a hole in the center of each outline Test the motor If the motor does not run check the plug connection A22 E1 Go to step on page 18 to attach grille A21 B11 B13 B14 B12 D E E ON OFF ENGLISH ...

Page 9: ...leaving space between the screw head and the joist Screws are not provided Attach the rails onto the screws B15 B16 B17 B18 B19 F A Fan Motor Light 2 Pin Black Ground Green Bare Copper White Black Main Switch 1 AC In Black Switch 2 AC In Black Light Option White White 3 Pin Option Fan Main Light Together ENGLISH ...

Page 10: ...hed between the motor and the housing Turn on the power source Secure the motor by tightening the 2 screws Connect 4 duct and vent to the outside Tape joints If ducting does not fit securely an adapter may need to be purchased Install the wiring cover plate Make sure all wiring connections are inside the box or under the wiring cover plate B20 B22 B24 B22 B25 B21 F G H I H ENGLISH ...

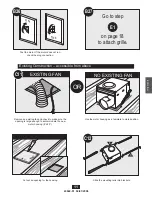
Page 11: ...isting fan and check to make sure the opening is large enough to accommodate the new motor housing 8 x 8 5 Cut out an opening for the housing Use the motor housing as a template to mark position Slide the mounting rails into brackets Test the motor If the motor does not run check the plug connection E D ON OFF EXISTING FAN NO EXISTING FAN ENGLISH ...

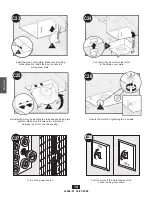
Page 12: ...utline Insert screws leaving space between the screw head and the joist Screws are not provided Attach the rails onto the screws Tighten screws Position the correct depth mark at the bottom edge of the joist based on the thickness of your sheetrock Mark position of screws by using holes as a template ENGLISH ...

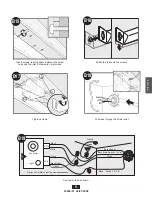
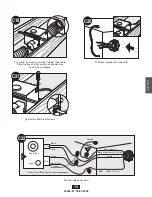
Page 13: ... If ducting does not fit securely an adapter may need to be purchased Pull wires through the strain relief Connect wires as shown C22 F A Fan Motor Light 2 Pin Black Ground Green Bare Copper White Black Main Switch 1 AC In Black Switch 2 AC In Black Light Option White White 3 Pin Option Fan Main Light Together ENGLISH ...

Page 14: ...ll the wiring cover plate Make sure all wiring connections are inside the box or under the wiring cover plate Reinstall the motor by inserting the tabs and pushing up into position Make sure the wires are not pinched between the motor and the housing Connect wiring from motor the motor to the wiring cover plate C23 C25 C26 F H I G C24 H C27 C28 C28 ON OFF ENGLISH ...

Page 15: ... to make sure the opening is large enough to accommodate the new motor housing 8 x 8 5 Move the housing into position above the ceiling Attach existing ducting to duct connector Tape joints If ducting does not fit securely an adapter may need to be purchased D11 D12 D14 D13 E C29 E1 Go to step on page 18 to attach grille EXISTING FAN ENGLISH ...

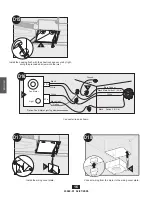
Page 16: ...tch 1 AC In Black Switch 2 AC In Black Light Option White White 3 Pin Option Fan Main Light Together Connect wiring from the motor to the wiring cover plate Install the wiring cover plate Install the housing flush with the sheetrock and secure by tight ening the pre loaded screws into the joist Connect wires as shown ENGLISH ...

Page 17: ...est the motor If the motor does not run check the plug con nection Turn on the power source Reinstall the motor by inserting the tabs and pushing up into position Make sure the wires are not pinched between the mo tor and the housing Secure the motor by tightening the 2 screws ON OFF ENGLISH ...

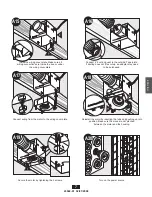
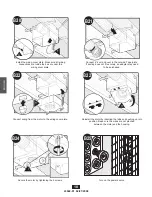
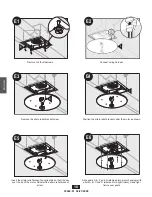
Page 18: ...nto light fixture Slide light fixture over posts Remove the strain relief bracket screw Position the strain relief bracket under the motor as shown Insert the strain relief bracket s dog leg tab so that it hooks over the lip of the motor Reinstall the strain relief bracket screw Remove the thumbscrews Connect wiring harness ENGLISH ...

Page 19: ...ew glass stop into position Screw Finial into position Complete Attach thumbscrews WARNING To reduce the risk of electrical shock all 4 thumbscrews MUST be properly installed Install 2 Max 60 Watt A15 bulbs Not Included E7 E10 E9 E11 E12 E8 N O M P ENGLISH ...

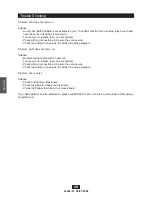
Page 20: ... it matches the wiring diagram Problem Light does not come on Solution Replace the light bulb with a new bulb Turn power on replace fuse or reset breaker Check all plug connections to be sure they are secure Check the wiring to make sure it matches the wiring diagram Problem Fan is noisy Solution Check and tighten all fasteners Check the glass to make sure it is secure Check the flapper to make su...

Page 21: ... THIS WARRANTY IS IN LIEU OF ALL OTHER EXPRESS WARRANTIES THE DURATION OF ANY IMPLIED WARRANTY INCLUDING BUT NOT LIMITED TO ANY IMPLIED WARRANTY OF MERCHANTABILITY OR FIT NESS FOR A PARTICULAR PURPOSE IN RESPECT TO ANY HUNTER FAN BATH EXHAUST FAN MOTOR OR OTHER FAN PART IS EXPRESSLY LIMITED TO THE PERIOD OF THE EXPRESS WARRANTY SET FORTH ABOVE FOR SUCH MOTORS OR OTHER PARTS This warranty is voided...

Reviews: