background image

www.HunterFan.com

1.888.830.1326

Ceiling Bracket (continued)

Preparation

1.888.830.1326

www.HunterFan.com

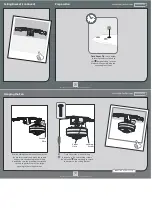
Time Saver Tip:  

Get a helper 

to insert grommets, found in 

the        hardware bag, into the 

blades while you’re doing the 

next couple of steps. 

5

M0047-01 • 11/26/12 • 

© Hunter Fan Company

www.HunterFan.com

1.888.830.1326

6

M0047-01 • 11/26/12 • 

© Hunter Fan Company

Hanging the Fan

While holding the wires out of the way, lift 

the motor assembly and place the square 

hanger into the opening in the ceiling 

bracket. Be sure the ground wire attached 

to the hanger faces out of the large 

opening in the ceiling bracket.

Ground 

Wire

 Note:

 Fan style may vary.

Locking 

Screw

Once the motor is in the ceiling 

bracket, use the two locking screws 

found in the       hardware bag to secure 

the motor to the ceiling bracket.

Screw 
Hole

Summary of Contents for 51060

Page 1: ...hes from blade tip to nearest wall or obstruction 7 feet from bottom edge of blade to the oor w 1 To reduce the risk of re electrical shock or personal injury mount fan directly from building structur...

Page 2: ...the circuit breakers to the outlet box associated with the wall switch location Turn Power 4 Use wood screws included when securing to support structure with approved electrical outlet box Drill 9 64...

Page 3: ...88 830 1326 6 M0047 01 11 26 12 Hunter Fan Company Hanging the Fan While holding the wires out of the way lift the motor assembly and place the square hanger into the opening in the ceiling bracket Be...

Page 4: ...from the fan Connect the white wire grounded from the ceiling to the white wire from the fan Using an orange wire connector from the hardware bag connect the 3 grounding wires green green yellow stri...

Page 5: ...o prevent scratching Cleaning agents may damage the nishes www HunterFan com 1 888 830 1326 Feed the wire plug through the center hole of the upper switch housing then wrap keyhole slots around the sc...

Page 6: ...Turn Power Align the notches in the sides of the lower switch housing with the screws on the upper switch housing Twist the lower switch housing clockwise to lock into place Install the third switch...

Page 7: ...heck to see if any of the blades are cracked If so replace all of the blades Fan doesn t work Make sure power switch is on Pull the pull chain to make sure it is on Push the motor reversing switch rml...

Reviews: