background image

5

Figure 3

This plug has a safety feature. It 
contains a safety device (fuse) that 
should not be removed. Discard 
product if the attachment plug is 

damaged. To reduce the risk of fire, 

electric shock and personal injury, 
DO NOT remove, replace, repair or 
tamper with the originally supplied 
plug. If the Fan does not function 
properly, it may be due to the safety 
device incorporated in this plug.              
If the fuse fails, it is generally 
due to a short circuit or circuit 
overload. Replace the fuse as 
per the instructions below. 

If the 

replacement fuse fails, immediately 
unplug the unit and contact our 
technical support department for 
assistance. 

Fuse Replacement:


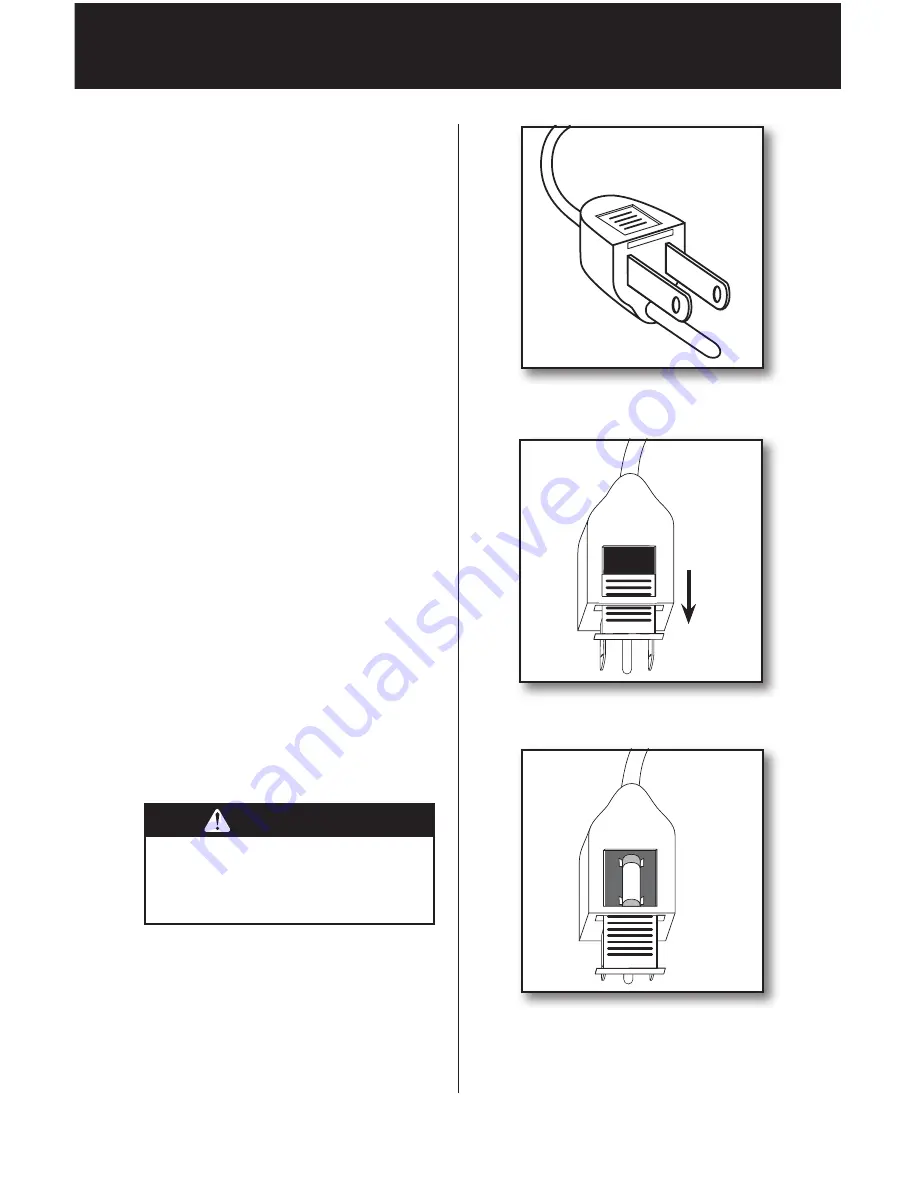
1. 

To replace the fuse, first turn the 

unit it off and unplug it from the 

wall. Locate the door on top of 

the plug. Figure 1.

2.  Slide the door on top of the plug 

towards the blades. Figure 2.

3.  Carefully remove the fuse from 

the clips holding it on the top and 

bottom. Figure 3.

4.  Gently push the fuse back into 

the pins that will hold it in place.

Note:

 If the fuse is not seated properly, 

the unit will not function.

5.  Slide the Door back over the fuse 

box in the plug.

6.  Plug the fan back in and 

resume use.

FUSED PLUG

Figure 4

Figure 5

Electrical Hazard!

 Only replace with 

a fuse type and rating matching what 

was removed from the product.

  WARNING

Summary of Contents for 90401

Page 1: ...Owner s Guide ClassicTable Fan ClassicTable Fan 44832 01 20130103 2013 Hunter Fan Co Oscillating Fan Owner s Manual Models 90401 90402 ClassicTable Fan English ...

Page 2: ...vision is necessary when any appliance is used by or near children 10 NEVER insert fingers pencils or any other objects through the grill when the fan is running 11 DO NOT operate any appliance with a damaged cord or plug after the appliance malfunctions or has been dropped or damaged in any manner 12 To disconnect grip plug and pull from wall outlet NEVER yank on cord 13 ALWAYS use on a dry surfa...

Page 3: ...m fan before operating Thank you for choosing the Hunter Classic Table Fan This manual gives you complete instructions for using your fan Here are some the features you will enjoy with your fan An attractive design that enhances any decor A powerful Hunter motor for maximum air flow Three speeds to adjust your comfort level Before using your fan record the following information for your records an...

Page 4: ...INE CORD SAFETY TIPS 1 NEVER pull or yank on the cord or the appliance 2 To insert plug grasp it firmly and guide it into the outlet 3 To disconnect the appliance grasp the plug and remove it from the outlet 4 Before each use inspect the line cord for cuts and or abrasion marks If any are found the appliance should be serviced and the line cord replaced Please return it to our Service Department o...

Page 5: ... immediately unplug the unit and contact our technical support department for assistance Fuse Replacement 1 To replace the fuse first turn the unit it off and unplug it from the wall Locate the door on top of the plug Figure 1 2 Slide the door on top of the plug towards the blades Figure 2 3 Carefully remove the fuse from the clips holding it on the top and bottom Figure 3 4 Gently push the fuse b...

Page 6: ... source before plugging it into the power source 3 Turn the fan ON or OFF by moving the power speed lever The power should always be OFF before unplugging the fan 4 To select the speed move the power speed lever from OFF to the desired speed setting O off I low II medium III high 5 To make the fan oscillate push the oscillation knob down To stop oscillating pull the oscillation knob up The oscilla...

Page 7: ... these vents 3 DO NOT immerse the fan in water or any other liquid CLEANING GRILL AND BLADE 1 Turn the fan off and unplug from the electrical outlet 2 Disassemble grills by carefully removing the screw on the bottom of the ring See Figure 4 3 Remove the ring 4 Use a dry or slightly damp lint free cloth to clean the fan 5 Use a soft slightly damp cloth to wipe the remaining fan parts 6 DO NOT allow...

Page 8: ...ged in 5 NEVER wrap the cord tightly around the fan 6 DO NOT put any stress on the cord where it enters the fan as it could cause the cord to break PROBLEM Fan will not oscillate SOLUTION Push down on knob on top of motor housing to activate oscillation If you have tried these troubleshooting solutions and still have trouble call 1 888 830 1326 For CAN 1 866 268 1936 or visit our Web site at http ...

Page 9: ...ES TO OWN THE FAN THIS WARRANTY AND ANY IMPLIED WARRANTY WHICH THEN REMAINS IN EFFECT INCLUDING BUT NOT LIMITED TO ANY IMPLIED WARRANTY OF MERCHANTABILITY OR FITNESS FOR A PARTICULAR PURPOSE ARE VOIDED NO WARRANTY EXPRESSEDORIMPLIED INCLUDING ANY WARRANTY OF MERCHANTABILITY OR FITNESS FOR A PARTICULAR PURPOSE IS MADE IN RESPECT TO THE GLASS GLOBES OR LIGHT BULBS OR THE FINISH ON ANY METAL PORTION ...

Page 10: ...damage Proof of purchase is required when requesting warranty service The purchaser must present sales receipt or other document that establishes proof of purchase IN NO EVENT SHALL HUNTER FAN COMPANY BE LIABLE FOR CONSEQUENTIAL OR INCIDENTAL DAMAGES SOME STATES DO NOT ALLOW LIMITATIONS ON HOW LONG AN IMPLIED WARRANTY LASTS OR THE EXCLUSION OR LIMITATION OF INCIDENTAL OR CONSEQUENTIAL DAMAGES SO T...

Reviews: