background image

FUSED PLUG

5

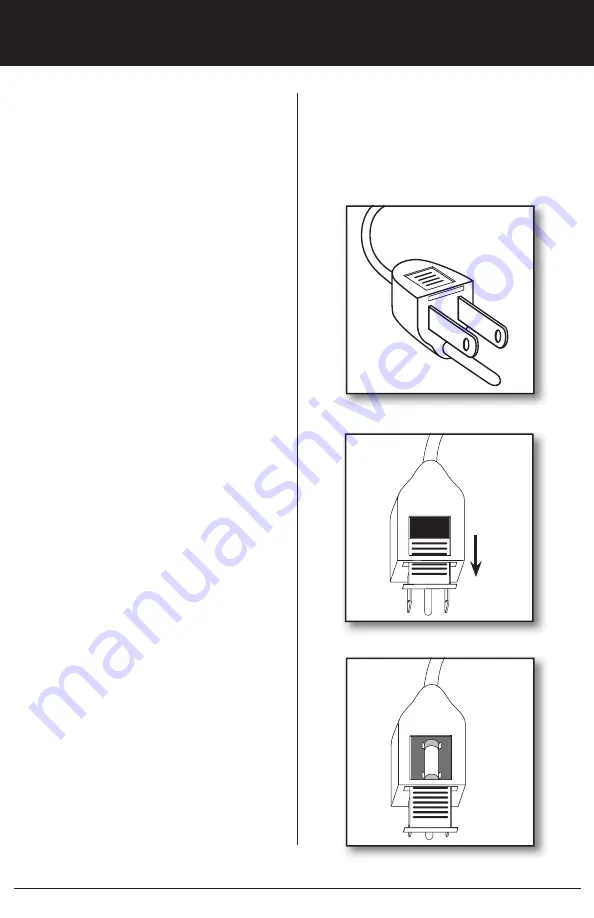
Figure 3

Figure 4

Figure 5

Fuse Replacement:

1.

2.

Slide the door on top of the plug 

3.

Carefully remove the fuse from 
the clips holding it on the top and 

Warning! Electrical Hazard!

Only

replace with a fuse type and rating
matching what was removed from the
product. If the product fails a second time,
immediately unplug it and contact our 
technical support at 1-888-880-3267.
4.

Gently push the fuse back into 
the pins that will hold it in place.

Note:

If the fuse is not seated properly,

the unit will not function.
5.

box in the plug.

Grasp plug and remove from the 
receptacle or other outlet device. 
Do not unplug by pulling on cord. 
Locate the door on top of the plug. 
Figure 3.

bottom. Risk of fire. Replace fuse 
only with 5 Amp, 125 Volt fuse. 
Figure 5.

Slide the door back over the fuse 

towards the blades. Figure 4.

61809-01   R20211020

This product uses overload protection 
(fuse). A blown fuse indicates an overload 
or short-circuit situation. If the fuse blows, 
unplug the product from the outlet. Discard 
product if the attachment plug is damaged. 
To reduce the risk of fire, electric shock 
and personal injury, DO NOT remove, 
replace, repair or tamper with the originally
supplied plug. If the fan does not function 
properly, it may be due to the safety 
device incorporated in this plug.

If the fuse fails, it is generally due to a 
short circuit or circuit overload. Replace 
the fuse as per the instructions below 
(follow product marking for proper fuse 
rating) and check the product. 

If the 

replacement fuse fails, a short-circuit 
may be present and immediately 
unplug the unit and contact our 
technical support department for 
assistance.

6.

Plug the fan back in and resume
use.

Risk of fire. Do not replace attachment 
plug. Contains a safety device (fuse) that 
should not be removed. Discard product 
if the attachment plug is damaged.

Summary of Contents for 90600

Page 1: ...English Owner s Guide High Performance High Performance Oscillating Fan Owner s Guide Models 90600 90602 90603 90604 High Performance 61809 01 20211020 ...

Page 2: ...or examination and or repair 12 To disconnect grip plug and pull from wall outlet NEVER yank on cord 13 ALWAYS use on a dry surface 14 This product is intended for household use only and not for commercial or industrial use 15 DO NOT operate fan in the presence of explosive and or 16 DO NOT place fan or any parts any other heating appliances 17 DO NOT use near curtains plants window treatments etc...

Page 3: ...re all shipping materials are removed from fan before operating Thank you for choosing the Hunter Table Fan This manual gives you complete instructions for using your fan Here are some of the features you will enjoy with your fan An attractive design that enhances any decor A powerful Hunter motor for Three speeds to adjust your comfort level Before installing your fan record the following informa...

Page 4: ... adapter if your electrical outlet can accommodate the grounding pin GROUNDING LINE CORD SAFETY TIPS 1 NEVER pull or yank on the cord or the appliance 2 and guide it into the outlet 3 To disconnect the appliance grasp the plug and remove it from the outlet 4 Before each use inspect the line cord for cuts and or abrasion marks If any are found the appliance should be serviced and the line cord repl...

Page 5: ... Figure 4 61809 01 R20211020 This product uses overload protection fuse A blown fuse indicates an overload or short circuit situation If the fuse blows unplug the product from the outlet Discard product if the attachment plug is damaged To reduce the risk of fire electric shock and personal injury DO NOT remove replace repair or tamper with the originally supplied plug If the fan does not function...

Page 6: ...ines are completely between the top tabs Figure 7 Then place the rear grill against the motor housing and line up the four tabs on the back of the grill to the four screw holes on the front of the motor 3 To attach the rear grill to the motor housing partially install the four grill mounting screws Tighten all four screws Figure 8 4 Loosen the screw on the back of the blade assembly Figure 9a Slid...

Page 7: ...t grill by aligning the Hunter logo on the grill hub so it is horizontal and parallel to the floor Figure 11 7 Mount the front grill to the rear grill tighten the grills using the grill locking screw and nut at the bottom of the grill Figure 12 8 Secure the grills completely together by snapping the 4 grill clips into place Figure 13 61809 01 R20211020 9a ...

Page 8: ...ower should always be OFF before unplugging the fan 4 To select the speed turn the Power Speed Control knob from OFF to the desired speed setting O off I Low II Medium III High 5 To control the upward and loosen the screw on the side of the fan housing neck Adjust to the desired angle and tighten the screw Handle Oscillation Knob Motor Housing Up Down Adjustment Screw Base Power Speed Control Knob...

Page 9: ...removing the screw on the 3 Pull up the 4 clips from the rear grill to remove the front grill 4 Use a dry or slightly damp lint free cloth to clean the fan 5 Use a soft slightly damp cloth to wipe the remaining fan parts 6 DO NOT allow water or any other liquid to get into the motor housing or base 7 Reassemble the fan after blades and grills have dried completely Align the grills replace the scre...

Page 10: ...UTION TECHNICAL SUPPORT Loosen the screw on the side of the fan neck Adjust to the desired angle and tighten the screw 10 n a f e h t f o e l g n a e h t t s u j d a t o n n a C r o t o m f o p o t n o b o n k e h t n w o d h s u P If you need any assistance with setup operation or parts for your new Hunter portable fan please call us Our technical support staff is ready to help We are open 24 hou...

Page 11: ...NTY OF MERCHANTABILITY OR FITNESS FOR A PARTICULAR PURPOSE IS MADE IN RESPECT TO THE GLASS GLOBES OR LIGHT BULBS OR THE FINISH ON ANY METAL PORTION OF THE FAN THIS WARRANTY IS IN LIEU OF ALL OTHER EXPRESS WARRANTIES THE DURATION OF ANY IMPLIED WARRANTY INCLUDING BUT WARRANTY OF MERCHANTABILITY OR FITNESS FOR A PARTICULAR PURPOSE IN RESPECT TO ANY HUNTER FAN MOTOR OR OTHER FAN PART IS EXPRESSLY LIM...

Page 12: ...ANTY GIVES YOU 980 Cobb Place Boulevard NW Suite 100 Kennesaw GA 30144 Service Department 980 Cobb Place Boulevard NW Suite 100 Kennesaw GA 30144 Please contact us before shipping your fan to us If we authorize you to ship it to us you will be responsible for all insurance and freight or other transportation charges to our factory service center We will return your Hunter Fan freight prepaid Your ...

Reviews: