Hunter e36 • Getting Underway
13.4
WARNING
!
!
In order to prevent premature starter failure, do not
continuously crank engine starters for more than 10
seconds.
5. As the engines warm, the temp gauge will start to rise.
Watch the gauge and make sure that the engines do not
run hot.
6. Once the engines come up to operating temp (check
manufacturer’s recommendations for correct tempera-
ture), move the shift lever to Fwd and Reverse to make
sure that the transmission will engage.
7. Now, shut down the engines and recheck your oil and
transmission fluid levels.
WARNING
!
!
DO NOT remove cooling system filter cap when en-
gine is hot. Allow to cool and then remove pressure
cap slowly, allowing pressure to vent. Hot coolant
under pressure may discharge violently.
WARNING
!
!
Exhaust gasses contain Carbon Monoxide. This is
a poisonous gas and can cause death. Shut down
engines immediately, if any exhaust leaks are de-
tected.
Important: Always be careful when starting the engines. Use
common sense and good judgment. Shut down the engines
immediately if you observe any unsafe operating conditions.
Important: If engine fails to start within 10 seconds, release
switch. Allow starter motor to cool for at least 60 seconds, then
try starting the engine again.
Note: Should there be a problem with the battery voltage level,
see the section in this chapter for emergency operation.
13.3 Getting Underway
WARNING
!
!
Before ever pulling away from the dock, make sure
that the shore power cord and the fresh water hoses
are disconnected.
Check that the fresh water tanks are full.
Verify that you have up to date fire extinguisher and
flares.
Make sure you have the required safety equipment for
your passengers.
After engines reach operating temperature, accelerate
the engines to 2000 RPM’s. Check that voltmeters read
13 to 14.5 volts.
Check wind, tide, and current to determine the best way
to maneuver your boat away from the dock. Cast off
mooring lines.
Shift your boat’s engine into forward or reverse, depend-
ing on whether you want to move the bow or the stern
away from the dock first. Your engines should be running
at a slow speed as you move away from the dock.
Once your boat is in open water, you can safely acceler-
ate to cruising speed. Advance throttle to setting which
provides your desired engine speed (RPM’s).
13.3.1 Getting Ready to Sail
Note: This is not intended to provide a complete guide on sail-
ing! The ‘art’ of managing a sailboat in all weather, tidal and
day/night conditions can not even be taught by reading even the
best instruction book. If you are not proficient in handling sail
boats please refrain from handling this boat and obtain profes-
sional training and certificates of which some might be required
for you to navigate this boat in certain areas or countries.
The following is a simple guide only:
1. Install the battens in the mainsail and install the main-
sail onto the boom from the forward end. Remove the
stop pin or open the sail gate in the mast and install the
luff slides into the track on the back of the spar. Reinstall
the stop pin or close the sail gate to prevent the slides
from falling back out again. Pack the sail into the sailpack
lazyjack system on your boom or furl it into the mast care-
Summary of Contents for e36
Page 1: ...V2 062012 Operator s Manual e 36 ...
Page 2: ......
Page 9: ...V2 062012 Introduction e 36 Chapter 1 ...
Page 14: ...Hunter e36 Introduction 1 6 Notes ...
Page 15: ...Documents Forms e 36 Chapter 2 and V2 062012 ...
Page 26: ...Hunter e36 Documents and Forms Maintenance Log Date Maintenance Performed Hourmeter 2 12 ...
Page 27: ...Hunter e36 Documents and Forms 2 13 Date Maintenance Performed Hourmeter Maintenance Log ...
Page 33: ...Hunter e36 Documents and Forms 2 19 Spare Parts List ...
Page 34: ...Hunter e36 Documents and Forms Dates of practice drills and onboard safety inspections 2 20 ...
Page 35: ...Hunter e36 Documents and Forms 2 21 My personal preferences for maintenance items safety gear ...
Page 36: ...Hunter e36 Documents and Forms Notes 2 22 ...
Page 37: ...V2 062012 Limited Warranty e 36 Chapter 3 ...
Page 38: ...This Page Intentionally Left Blank Hunter Limited Warranty 3 2 ...
Page 47: ...Boating Safety e 36 Chapter 4 V2 062012 ...
Page 65: ...Deck Hardware Hunter e36 Boating Safety 4 19 ...
Page 67: ...Hunter e36 Boating Safety 4 21 Notes ...
Page 68: ...Hunter e36 Boating Safety 4 22 Notes ...
Page 69: ...V2 062012 Fuel Systems e 36 Chapter 5 ...
Page 75: ...Fig 5 7 A Quick Fuel Filter Reference Hunter e36 Fuel Systems 5 7 ...
Page 82: ...Notes Hunter e36 Fuel Systems 5 14 ...
Page 83: ...V2 062012 Underwater Gear e 36 Chapter 6 ...
Page 92: ...Hunter e36 Underwater Gear 6 10 Notes ...
Page 93: ...V2 062012 DC Electric Systems e 36 Chapter 7 ...
Page 103: ...Hunter e36 DC Electric 7 11 7 8 BASIC DC POWER SUPPLY SYSTEM DIAGRAM ...
Page 104: ...Hunter e36 DC Electric 7 12 Notes ...
Page 106: ...Hunter e36 DC Electric 7 14 Notes ...
Page 107: ...V2 062012 AC Electric Systems e 36 Chapter 8 ...
Page 115: ...Hunter e36 AC Electric Systems 8 9 7 8 AC DC Electric Power Supply Diagram ...
Page 116: ...Hunter e36 AC Electric Systems 8 10 This Page Intentionally Left Blank ...
Page 117: ...Hunter e36 AC Electric Systems 8 11 Notes ...
Page 118: ...Hunter e36 AC Electric Systems 8 12 Notes ...
Page 119: ...V2 062012 Water Systems e 36 Chapter 9 ...
Page 126: ...Hunter e36 Water Systems 9 8 This Page Intentionally Left Blank ...
Page 128: ...Hunter e36 Water Systems 9 10 This Page Intentionally Left Blank ...
Page 129: ...Hunter e36 Water Systems 9 11 Notes ...
Page 130: ...Hunter e36 Water Systems 9 12 Notes ...
Page 131: ...V2 062012 Waste Systems e 36 Chapter 10 ...
Page 137: ...Hunter e36 Waste and Sanitation Systems 10 7 ...
Page 140: ...This Page Intentionally Left Blank Hunter e36 Waste and Sanitation Systems 10 10 ...
Page 141: ...Sump Pump Layout Grey Water Hunter e36 Waste and Sanitation Systems 10 11 ...
Page 142: ...This Page Intentionally Left Blank Hunter e36 Waste and Sanitation Systems 10 12 ...
Page 144: ...Hunter e36 Waste and Sanitation Systems 10 14 Notes ...
Page 145: ...V2 062012 Engines Transmissions e 36 Chapter 11 and ...
Page 154: ...Hunter e36 Engines and Transmissions 11 10 This Page Intentional Left Blank ...
Page 155: ...V2 062012 Sails Rigging e 36 Chapter 12 and ...
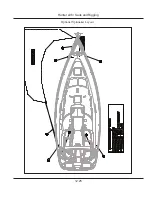
Page 162: ...Hunter e36 Sails and Rigging 12 8 Standing Rigging Details Standard ...
Page 163: ...Hunter e36 Sails and Rigging 12 9 Standing Rigging Details Furling ...
Page 164: ...Hunter e36 Sails and Rigging 12 10 Mast Upper Spreader Tip Details H A B C D E F G ...
Page 165: ...Hunter e36 Sails and Rigging 12 11 C A B D E F G H J K I Mast Lower Spreader Tip Details ...
Page 166: ...Hunter e36 Sails and Rigging 12 12 Standing Rigging Details ...
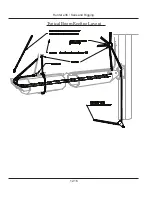
Page 170: ...Hunter e36 Sails and Rigging 12 16 Typical Boom Reefing Layout ...
Page 171: ...Hunter e36 Sails and Rigging 12 17 Rope Vang Details Standard Vang Details ...
Page 172: ...Hunter e36 Sails and Rigging 12 18 Rigid Vang Details Optional Vang Details ...
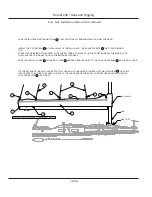
Page 175: ...Hunter e36 Sails and Rigging 12 21 JIB LINE TIES OFF ON CLEAT Jib Furling Line Layout ...
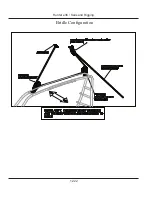
Page 176: ...Hunter e36 Sails and Rigging 12 22 Bridle Configuration ...
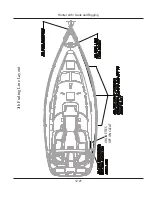
Page 179: ...Hunter e36 Sails and Rigging 12 25 Optional Spinnaker Layout ...
Page 180: ...Hunter e36 Sails and Rigging 12 26 Notes ...
Page 181: ...V2 062012 Getting Underway e 36 Chapter 13 ...
Page 188: ...Hunter e36 Getting Underway 13 8 Notes ...
Page 189: ...V2 062012 Maintenance e 36 Chapter 14 ...
Page 202: ...Notes Hunter e36 Maintenance 14 14 ...
Page 203: ...Exterior Lifting Points Hunter e36 Maintenance 14 15 ...
Page 204: ...Hunter e36 Maintenance 14 16 This Page Intentionally Left Blank ...

