Hunter e36 • Maintenance
14.10
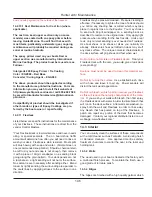
on board to allow good air circulation around them. Hang
life preserver and other equipment to prevent mildew.
* Remove any detachable and valuable equipment and
electronics.
** Prepare Exterior of Boat for Storage:
* Sand the hull bottom and apply at least one coat of
anti-fouling paint.
Note: This coat of paint must be applied during winterization or
before the beginning of a new boating season. Check with your
dealer for information about the paint you should use.
* Apply a coat of wax to the entire boat. Put rust inhibitor
on all metal parts.
* Cover the boat with a tarpaulin or mooring cover. If the
boat is stored outside, you may need to place supports
under the cover to shore up pockets where rain or snow
can collect.
14.6.3 Draining Your Boat
Your boat has bilge pumps for draining water from the
bilges. Some compartments in the bilge may not drain
completely because of the position of the boat. Pump
these compartments out then use a sponge to remove all
remaining water.
Procedures for draining and winterizing the fresh water
system are in this section under the “Preparing for
Storage” heading.
14.6.4 Supporting Your Boat During Storage
A cradle is the ideal support for your boat whenever
it is not in the water. Properly designed and located,
the cradle will support the boat under the main frames.
Support at these points is essential for preventing dam-
age to the hull.
If a cradle is not available, the boat may be supported on
two or three timbers across a boat well or on another firm
footing substantial enough to keep the boat level. The
timbers and the foundation must be substantial enough
to prevent any change in shape while supporting the
boat during storage. The weight carried by the supports
should be evenly divided, the keel should carry a share
of it.
Store the boat with the bow up so any accumulation of
moisture will run off.
14.7 Fitting out after Storage
If the hull was not painted during winterizing, sand and
pain the hull bottom before removing the boat from its
cradle.
Before launching your boat, do not load unneeded equip-
ment, furniture, and personal items until the launch and
final checkout are complete.
14.7.1 Pre-Launch Checkout
** Before placing your boat in the water, check and per-
form the following:
* Check all anchor lines and gear and replace, if neces-
sary.
* Check all through hull fittings to make sure they are
clean. Make sure all drain plugs are installed. Check
all strut and through hull hardware for damage and tight-
ness. Repair or adjust as needed.
* Check propellers and propeller shafts for proper instal-
lation and tightness. Clean propeller and shafts. Check
shaft play in strut bearing. Replace bearing if play is
excessive.
* Check shaft alignment. Refer to the engine owner’s
manual or check with your boat dealer for details.
* Clean battery terminal posts and cable terminals with
a wire brush or bronze wool. Install batteries and attach
cables. After cable posts are tightened down, coat posts
with oil or Vaseline to keep out air and acid. Check all
wiring connections and contacts for corrosion and tight-
ness.
* Check all seacocks for easy operation. Check the
condition of all hoses.
* Check operation of bilge pumps in manual and auto-
matic modes. Check operation of shower sump pumps.
* Check all bilge blowers for proper operation.
* Check operation of all DC circuits.
* Launch your boat.
Summary of Contents for e36
Page 1: ...V2 062012 Operator s Manual e 36 ...
Page 2: ......
Page 9: ...V2 062012 Introduction e 36 Chapter 1 ...
Page 14: ...Hunter e36 Introduction 1 6 Notes ...
Page 15: ...Documents Forms e 36 Chapter 2 and V2 062012 ...
Page 26: ...Hunter e36 Documents and Forms Maintenance Log Date Maintenance Performed Hourmeter 2 12 ...
Page 27: ...Hunter e36 Documents and Forms 2 13 Date Maintenance Performed Hourmeter Maintenance Log ...
Page 33: ...Hunter e36 Documents and Forms 2 19 Spare Parts List ...
Page 34: ...Hunter e36 Documents and Forms Dates of practice drills and onboard safety inspections 2 20 ...
Page 35: ...Hunter e36 Documents and Forms 2 21 My personal preferences for maintenance items safety gear ...
Page 36: ...Hunter e36 Documents and Forms Notes 2 22 ...
Page 37: ...V2 062012 Limited Warranty e 36 Chapter 3 ...
Page 38: ...This Page Intentionally Left Blank Hunter Limited Warranty 3 2 ...
Page 47: ...Boating Safety e 36 Chapter 4 V2 062012 ...
Page 65: ...Deck Hardware Hunter e36 Boating Safety 4 19 ...
Page 67: ...Hunter e36 Boating Safety 4 21 Notes ...
Page 68: ...Hunter e36 Boating Safety 4 22 Notes ...
Page 69: ...V2 062012 Fuel Systems e 36 Chapter 5 ...
Page 75: ...Fig 5 7 A Quick Fuel Filter Reference Hunter e36 Fuel Systems 5 7 ...
Page 82: ...Notes Hunter e36 Fuel Systems 5 14 ...
Page 83: ...V2 062012 Underwater Gear e 36 Chapter 6 ...
Page 92: ...Hunter e36 Underwater Gear 6 10 Notes ...
Page 93: ...V2 062012 DC Electric Systems e 36 Chapter 7 ...
Page 103: ...Hunter e36 DC Electric 7 11 7 8 BASIC DC POWER SUPPLY SYSTEM DIAGRAM ...
Page 104: ...Hunter e36 DC Electric 7 12 Notes ...
Page 106: ...Hunter e36 DC Electric 7 14 Notes ...
Page 107: ...V2 062012 AC Electric Systems e 36 Chapter 8 ...
Page 115: ...Hunter e36 AC Electric Systems 8 9 7 8 AC DC Electric Power Supply Diagram ...
Page 116: ...Hunter e36 AC Electric Systems 8 10 This Page Intentionally Left Blank ...
Page 117: ...Hunter e36 AC Electric Systems 8 11 Notes ...
Page 118: ...Hunter e36 AC Electric Systems 8 12 Notes ...
Page 119: ...V2 062012 Water Systems e 36 Chapter 9 ...
Page 126: ...Hunter e36 Water Systems 9 8 This Page Intentionally Left Blank ...
Page 128: ...Hunter e36 Water Systems 9 10 This Page Intentionally Left Blank ...
Page 129: ...Hunter e36 Water Systems 9 11 Notes ...
Page 130: ...Hunter e36 Water Systems 9 12 Notes ...
Page 131: ...V2 062012 Waste Systems e 36 Chapter 10 ...
Page 137: ...Hunter e36 Waste and Sanitation Systems 10 7 ...
Page 140: ...This Page Intentionally Left Blank Hunter e36 Waste and Sanitation Systems 10 10 ...
Page 141: ...Sump Pump Layout Grey Water Hunter e36 Waste and Sanitation Systems 10 11 ...
Page 142: ...This Page Intentionally Left Blank Hunter e36 Waste and Sanitation Systems 10 12 ...
Page 144: ...Hunter e36 Waste and Sanitation Systems 10 14 Notes ...
Page 145: ...V2 062012 Engines Transmissions e 36 Chapter 11 and ...
Page 154: ...Hunter e36 Engines and Transmissions 11 10 This Page Intentional Left Blank ...
Page 155: ...V2 062012 Sails Rigging e 36 Chapter 12 and ...
Page 162: ...Hunter e36 Sails and Rigging 12 8 Standing Rigging Details Standard ...
Page 163: ...Hunter e36 Sails and Rigging 12 9 Standing Rigging Details Furling ...
Page 164: ...Hunter e36 Sails and Rigging 12 10 Mast Upper Spreader Tip Details H A B C D E F G ...
Page 165: ...Hunter e36 Sails and Rigging 12 11 C A B D E F G H J K I Mast Lower Spreader Tip Details ...
Page 166: ...Hunter e36 Sails and Rigging 12 12 Standing Rigging Details ...
Page 170: ...Hunter e36 Sails and Rigging 12 16 Typical Boom Reefing Layout ...
Page 171: ...Hunter e36 Sails and Rigging 12 17 Rope Vang Details Standard Vang Details ...
Page 172: ...Hunter e36 Sails and Rigging 12 18 Rigid Vang Details Optional Vang Details ...
Page 175: ...Hunter e36 Sails and Rigging 12 21 JIB LINE TIES OFF ON CLEAT Jib Furling Line Layout ...
Page 176: ...Hunter e36 Sails and Rigging 12 22 Bridle Configuration ...
Page 179: ...Hunter e36 Sails and Rigging 12 25 Optional Spinnaker Layout ...
Page 180: ...Hunter e36 Sails and Rigging 12 26 Notes ...
Page 181: ...V2 062012 Getting Underway e 36 Chapter 13 ...
Page 188: ...Hunter e36 Getting Underway 13 8 Notes ...
Page 189: ...V2 062012 Maintenance e 36 Chapter 14 ...
Page 202: ...Notes Hunter e36 Maintenance 14 14 ...
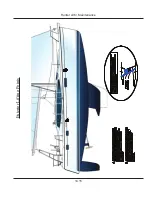
Page 203: ...Exterior Lifting Points Hunter e36 Maintenance 14 15 ...
Page 204: ...Hunter e36 Maintenance 14 16 This Page Intentionally Left Blank ...


