6
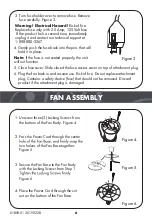
1. Unscrew three (3) Locking Screws from
the bottom of the Fan Body. Figure 4.
2. Pass the Power Cord through the center
two halves of the Fan Base together.
Figure 5.
3. Secure the Fan Base to the Fan Body
with the Locking Screws from Step 1.
Figure 6.
4. Place the Power Cord through the cut
out on the bottom of the Fan Base.
Warning! Electrical Hazard!
Risk of fire.
Replace fuse only with 2.5 Amp, 125 Volt fuse.
If the product fails a second time, immediately
unplug it and contact our technical support at
1-888-880-3267.
FAN ASSEMBLY
Figure 3.
Figure 4.
Figure 5.
Figure 6.
4. Gently push the fuse back into the pins that will
hold it in place.
Note:
If the fuse is not seated properly, the unit
will not function.
5. Close fuse cover. Slide closed the fuse access cover on top of attachment plug.
6. Plug the fan back in and resume use. Risk of fire. Do not replace attachment
plug. Contains a safety device (fuse) that should not be removed. Discard
product if the attachment plug is damaged.
61805-01 20190228
3. Turn fuse holder over to remove fuse. Remove
fuse carefully. Figure 3.


