background image

8

1886

1886

Ceiling Bracket

Downrod

Hanging Fan

Wiring

Canopy

Blades

Light

Remote

Troubleshooting

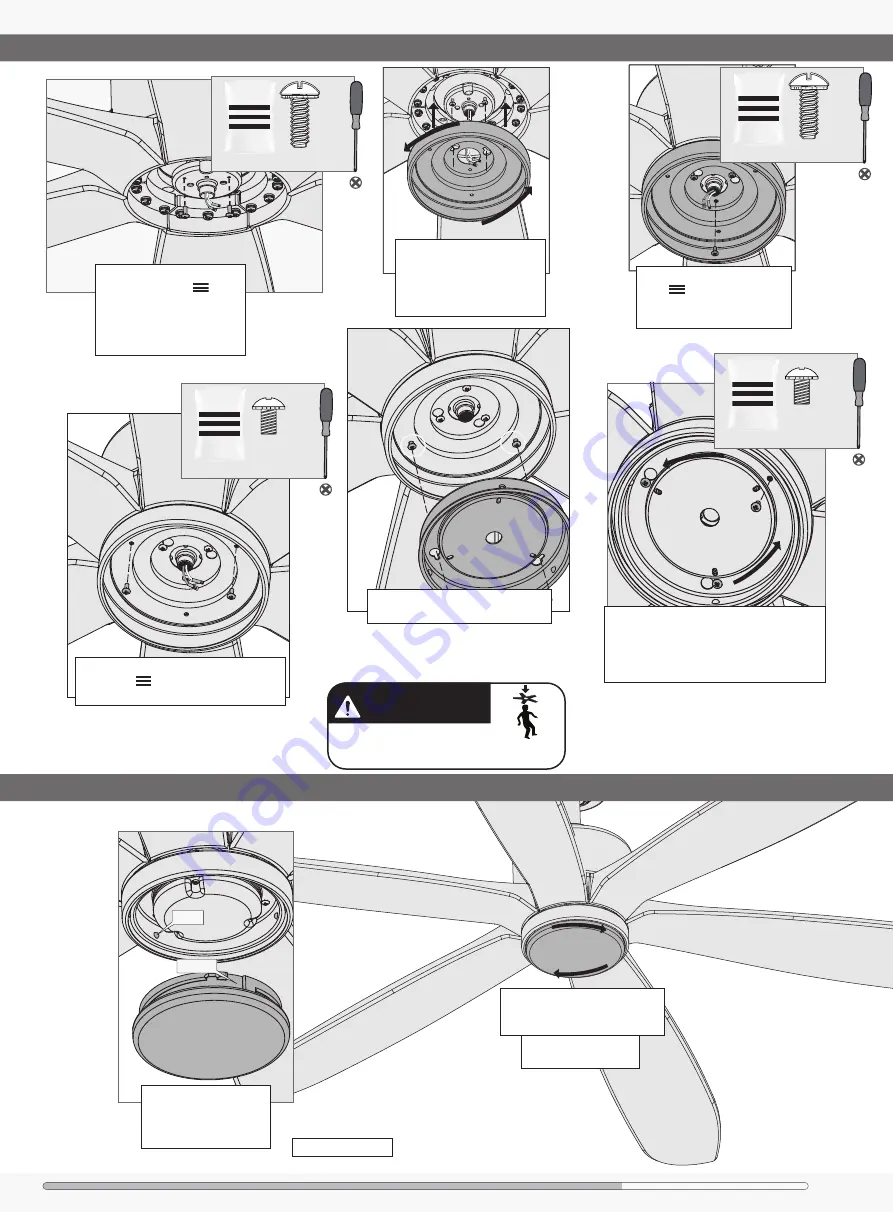
Installing the Glass

Lift the cap and align 
the notches in the globe 
with the tabs in the lower 
switch housing.

NOTE: Check to ensure 
proper engagement.

Attach the cap by lifting and 
turning clockwise one third of a 
full turn of the cap until it stops. 

Notch

Tab

Assembling the LIght Kit

Insert the third screw, found 
in the 

 hardware bag, into 

place and then tighten all three 
screws.

Partially install two assembly 
screws, found in the 


hardware bag, halfway into 
the motor housing as shown. 
It does not matter which two 
screw holes you choose.

Feed the wire plug through the 
center hole of the upper switch 
housing, then wrap keyhole 
slots around the screws and 
twist counterclockwise.

WARNING

FAN FALL HAZARD

Make sure all screws are tight to secure 

the light fixture.

2 of 3

Light Kit Screw

bag

1 of 3

Light Kit Screw

bag

Partially install two of the assembly screws 
found in the 

 bag. It does not matter 

which two screw holes you choose. 

Turn the lower switch housing 
counterclockwise until the assembly screws 
are firmly situated in the narrow end of the 
keyhole slots. Install the third screw and 
tighten all three screws securely. 

2 of 3

1 of 3

Short Light Kit 
Screw

Short Light Kit 
Screw

bag

bag

Fan style may vary.

Note: 

Align the keyhole slots in the lower 
switch housing with the two screws. .

Summary of Contents for Rhinebeck

Page 1: ...Installation Manual 2020 Hunter Fan Co Model 50777 Noble Bronze 50778 Matte Silver Fan weight 2 lbs 16 1 lbs 7 3 kg Rhinebeck PG3858 r020720 ...

Page 2: ... risk of personal injury do not bend the blade brackets when installing the blade brackets balancing the blades or cleaning the fan Do not insert foreign objects in between rotating fan blades Caution c 1 All wiring must be in accordance with national and local electrical codes ANSI NFPA 70 If you are unfamiliar with wiring use a qualified electrician c 2 Use only Hunter replacement parts This equ...

Page 3: ...nstalling the hanger bracket and wiring the fan For installing the canopy Canopy Canopy Screw Ceiling Bracket Wood Screw Wire Nut Washer bag Hunter Pro Tip Find a part that is missing or damaged Don t take it back to the store Let us make it right Visit us at HunterFan com or call us at 1 888 830 1326 Here is what comes in your box bag x6 x18 For installing the blades For installing the light kit ...

Page 4: ...pport Structure Ceiling Outlet Box required Angled Mounting If you have a flat ceiling Hang your fan by a standard downrod Some fans come with a shorter downrod for a Low Profile installation Support Structure Ceiling Outlet Box required Standard Mounting A little more information on Angled Mounting For optimum performance and appearance a longer downrod should be used with your Hunter ceiling fan...

Page 5: ...that came pre assembled in your box Need to install a longer or shorter downrod Check out the guide at the end of this manual 1 STEP Slide the adapter cover onto the downrod until it rests against the hanger ball KEEP 2 STEP Remove the pre installed setscrew so that the downrod can be inserted 3 STEP Pass all wires to one side of horizontal bar in downrod assembly Hand tighten the downrod at least...

Page 6: ...d wires Place the downrod ball into the slot in the ceiling bracket NOTICE To prevent damage to fan ALWAYS lift holding either the fan housing or the downrod Ceiling Bracket Downrod Hanging Fan Wiring Canopy Blades Light Remote Troubleshooting Fan style may vary Note ...

Page 7: ... wires together and slide a wire nut over them Then twist the wire nut clockwise until tight Give it a gentle pull to make sure none of the wires are loose WARNING All wiring must be in accordance with national and local electrical codes ANSI NFPA 70 If you are unfamiliar with wiring or in doubt consult a qualified electrician Connect the white grounded wire from the ceiling to the white wire from...

Page 8: ...ht Remote Troubleshooting NOTICE If screw holes do not align properly then rotate the canopy 180 degrees Hanger ball shape must match canopy opening for correct canopy installation Fan style may vary Note Installing the Blades Align blade with guide line in motor housing Attach each blade to a blade iron using the blade washer found in the hardware bag and the blade assembly screws found in the ha...

Page 9: ... matter which two screw holes you choose Feed the wire plug through the center hole of the upper switch housing then wrap keyhole slots around the screws and twist counterclockwise WARNING FAN FALL HAZARD Make sure all screws are tight to secure the light fixture 2 of 3 Light Kit Screw bag 1 of 3 Light Kit Screw bag Partially install two of the assembly screws found in the bag It does not matter w...

Page 10: ... box and wall switch location before proceeding with installation Turn Power OFF OFF 1 Turning off the power 2 ON ECE 1 2 3 4 SET Battery Door Battery 3 Wiring the Wall Control O N E C E 1 2 3 4 S E T Connect the grounding wire from the wall control to the ground control from the switch box using the provided wire nuts Connect the LIVE IN from the switch box to the VAC from the wall control using ...

Page 11: ...er One Year Limited Warranty Except as otherwise indicated throughout this warranty if any part of your Hunter ceiling fan fails at any time within one year of the date of purchase due to a defect in material or workmanship as determined solely by Hunter Hunter will provide a replacement part free of charge Light Kits Warranty May Vary Light kits are included in the one year limited warranty Howev...

Page 12: ...o remove standard downrod pipe Follow steps 6 10 to reassemble with new downrod 1 2 3 4 5 6 7 8 9 10 WARNING FAN FALL HAZARD To prevent SERIOUS INJURY or DEATH ALWAYS follow the downrod assembly instructions exactly VERIFY the downrod is assembled correctly by firmly pulling on the hanger ball ...

Reviews: