© 2004 Hunter Fan Company
41866-01 02/20/2004
11
11
11
11
11
setting the dip switches
NOTE: You will only have to change the dip switch settings in the
remote if you are using more than one remote controlled fan in the
same area and want to control them separately.
1.
At the circuit breaker or fuse box, turn the power off for the
fan you want to change.
2.
Slide the cover off the back of the remote and remove the bat-
tery. The battery must be removed when changing dip switch
settings. Refer to the in
in
in
in
inssssstttttaaaaallin
llin
llin
llin
lling t
g t
g t
g t
g thhhhhe b
e b
e b
e b
e baaaaatttttttttteeeeerrrrryyyyy section and Fig-
ure 34.
3.
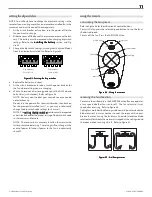
Change the dip switch settings, assuring that they are different
from the previously installed fan. Refer to Figure 35.
FFFFFiiiiigggggur
ur
ur
ur
ure 35 - S
e 35 - S
e 35 - S
e 35 - S
e 35 - Seeeeettttttttttin
in
in
in
ing t
g t
g t
g t
g thhhhhe dip s
e dip s
e dip s
e dip s
e dip sw
w
w
w
wiiiiitttttccccchhhhheeeeesssss
4.
Replace the battery and cover.
5.
At the circuit breaker or fuse box, turn the power back on for
the fan whose settings you are changing.
6.
Within 20 seconds of restoring power, push the Hi, Med, and
Lo buttons (in that order). Refer to Figure 36.
NOTE: You may want to label your controls to assure you do
not mix them up.
Do not turn the power off at the circuit breaker, then back on,
for the previously installed fan(s), as you may inadvertently
change the dip switch code settings for it as well.
NOTE: The ssssseeeeettttttttttin
in
in
in
ing t
g t
g t
g t
g thhhhhe dip s
e dip s
e dip s
e dip s
e dip sw
w
w
w
wiiiiitttttccccchhhhheeeeesssss section must be repeated
as described above for the proper setting of the dip switch code
in the receiver and remote.
NOTE: The receiver has a memory function that retains the
last dip switch code setting. The setting will not change in the
event of power failure or if power to the fan is inadvertently
shut off.
using the remote
controlling the fan speed
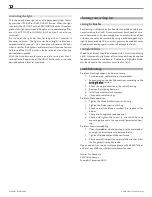
Refer to Figure 36 for identification of control buttons.
To start the fan press the selected speed button to run the fan at
the desired speed.
To turn off the fan. Press the FAN OFF button.
FFFFFiiiiigggggur
ur
ur
ur
ure 36 - Usin
e 36 - Usin
e 36 - Usin
e 36 - Usin
e 36 - Using t
g t
g t
g t
g thhhhhe r
e r
e r
e r
e reeeeem
m
m
m
mooooottttteeeee
reversing the fan direction
To reverse the airflow press the REVERSE button. Reverse operates
at any speed whether fan is on or off. The fan returns to its set
speed after reversing. Refer to Figure 36.
Ceiling fans work best by blowing air downward (counterclockwise
blade rotation) in warm weather to cool the room with a direct
breeze. In winter, having the fan draw air upward (clockwise blade
rotation) will distribute the warmer air trapped at the ceiling around
the room without causing a draft. Refer to Figure 37.
FFFFFiiiiigggggur
ur
ur
ur
ure 37 - A
e 37 - A
e 37 - A
e 37 - A
e 37 - Air f
ir f
ir f
ir f
ir flllllooooow p
w p
w p
w p
w paaaaatttttttttteeeeerrrrrnnnnnsssss
Dip Switches
Set to 01110
Dip Switches
Set to 01001
Up Light
Fan Low
Fan Medium
Fan High
Fan Off
Reverse
1
2
3
0
Down Light

