background image

The Hunter Douglas

®

 Lifetime Guarantee is an expression of our desire to provide a thoroughly satisfying 

experience when selecting, purchasing and living with your window fashion products. If you are not thoroughly 
satisfied, simply contact Hunter Douglas at (888) 501-8364 or visit hunterdouglas.com. In support of this policy  
of consumer satisfaction, we offer our Lifetime Limited Warranty as described below.

NOTE

:


In no event shall Hunter Douglas or its licensed fabricators/distributors be liable or responsible for incidental 

or consequential damages or for any other indirect damage, loss, cost or expense. Some states do not allow the exclusion or 
limitation of incidental or consequential damages, so the above exclusion or limitation may not apply to you. This warranty 
gives you specific legal rights, and you may also have other rights which vary from state to state. 

Different warranty periods and terms apply for commercial products and applications.

Hunter Douglas (or its licensed fabricator/distributor) will repair or replace the 

window fashion product or components found to be defective. 

COVERED

BY


A


LIFETIME


LIMITED


WARRANTY

• 

 Hunter Douglas window fashion products are 
covered for defects in materials, workmanship 
or failure to operate for as long as the original 
retail purchaser owns the product (unless shorter 
periods are provided below).

• 

 All internal mechanisms.

• 

 Components and brackets.

• 

 Fabric delamination.

• 

 Operational cords for a full 7 years from the  
date of purchase.

• 

 Repairs and/or replacements will be made with 
like or similar parts or products.

• 

 Hunter Douglas motorization components are 
covered for 5 years from the date of purchase.

NOT


COVERED

BY


A


LIFETIME


LIMITED


WARRANTY

• 

 Any conditions caused by normal wear and tear.

• 

 Abuse, accidents, misuse or alterations to the 
product.

• 

 Exposure to the elements (sun damage, wind, 
water/moisture) and discoloration or fading  
over time.

• 

 Failure to follow our instructions with respect  
to measurement, proper installation, cleaning  
or maintenance.

• 

 Shipping charges, cost of removal and reinstallation.

TO


OBTAIN


WARRANTY


SERVICE

1.  Contact your original dealer (place of purchase) for warranty assistance.
2.   

Visit hunterdouglas.com for additional warranty information, frequently asked questions and access to service locations.

3.   Contact Hunter Douglas at (888) 501-8364 for technical support, certain parts free of charge, for assistance in obtaining

warranty service or for further explanation of our warranty.

Summary of Contents for 2" Horizontal Aluminum Blinds

Page 1: ...Installation Operation Care 2 Horizontal Aluminum Blinds MagnaView Tilt Feature 5102014000F 4 14...

Page 2: ...10 Complete the Installation 12 Operation Operate the Blind 16 Troubleshooting 17 Care Cleaning Procedures 19 Child Safety Warning 20 Questions Call the Hunter Douglas Customer Information Center at...

Page 3: ...cket Shim 2 or 4 Extension Brackets Optional Valance Splice If Required Hold Down Bracket and Screw Optional Valance Clips Corner Clips for Valance Returns If Required End Bracket Spacer Block Optiona...

Page 4: ...lock Optional End Bracket Spacer Block Optional Hold Down Bracket and Pin Optional Hold Down Bracket and Pin Optional Intermediate Bracket Spacer Block Optional 2 or 4 Extension Brackets Optional Vala...

Page 5: ...teners designed to work with your specific mounting surface s 6 Hex Head Screws Provided Two 11 2 screws are provided per installation bracket Longer 6 Hex Head Screws Not Provided If using spacer blo...

Page 6: ...ation brackets are mounted correctly the rest of the installation process follows easily To prepare for this important first step review the mounting types and basic window terminology illustrated bel...

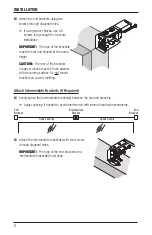
Page 7: ...rew through a top hole as shown below left Inside mount only Mount the end brackets with two screws through diagonal side holes Inside mount or ceiling mount Top mount the end brackets with screws thr...

Page 8: ...nce for valance clips with inside mounts and ceiling mounts Shims are included with your order one for each end bracket and two for each intermediate bracket With each end bracket first fold the shim...

Page 9: ...rnatively measure the width of the headrail and use that width to mark the headrail end points over the window opening Mark 1 4 to the outside of the headrail end marks The outer marks are where the o...

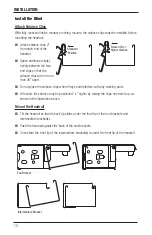
Page 10: ...flush against a flat mounting surface Do not mount brackets on curved molding Attach Intermediate Brackets If Required Evenly space the intermediate bracket s between the two end brackets Adjust spac...

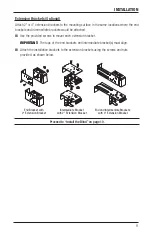
Page 11: ...d screws to mount each extension bracket Important The tops of the end brackets and intermediate bracket s must align Attach the installation brackets to the extension brackets using the screws and nu...

Page 12: ...the valance clips where they could interfere with any working parts If desired the valance may be positioned 1 4 higher by raising the clips one notch up as shown in the illustration above Mount the H...

Page 13: ...s do not have adjustable tabs bend the tabs on the headrail end locks to adjust headrail tightness as shown Close the End Brackets Push the cover down until it snaps over the locking tab on the bottom...

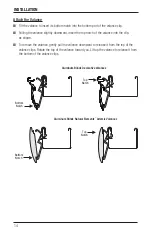
Page 14: ...the plastic sleeve from the top of the wand and insert it over the metal shaft Insert the hook on the wand through the hole in the metal shaft Slide the plastic sleeve down over the hook until firmly...

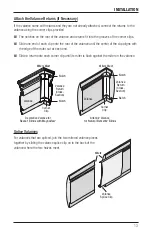
Page 15: ...e edge of the miter cut at each end Slide a return onto each corner clip until its miter is flush against the miter on the valance Splice Valances For valances that are spliced join the two mitered va...

Page 16: ...ll the valance downward to release it from the top of the valance clips Rotate the top of the valance toward you Lift up the valance to release it from the bottom of the valance clips Bottom Notch Top...

Page 17: ...rface to seat it or tap in place with a hammer To mount the hold down brackets first fully lower the blind Align the hold down brackets with the pins in the bottom rail Align the pins with the second...

Page 18: ...wand is required to close the slats tightly Cord tilt The two cords with individual tassels are for tilting the slats Each cord tilts the slats in an alternate direction Raising and Lowering the Blin...

Page 19: ...y the safety cord stop Solution Make sure the slats are in the open position Raise and lower the blind Problem Lift cords are stuck or jammed Solution Check the cords and the movable pin in the cordlo...

Page 20: ...and the blind will not operate as designed If the grommet on the tape string has come out of the slot in the tape roll place the grommet back into the slot If necessary re position the tape string on...

Page 21: ...solution Allow blinds to air dry to preserve the dust repellent properties of the slats For a more thorough cleaning metal bottom rails and slats may be immersed in a bathtub Do not immerse headrails...

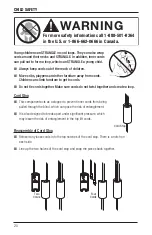
Page 22: ...ther and create a loop Cord Stop This component acts as a stopper to prevent inner cords from being pulled through the blind which can pose the risk of entanglement It is also designed to break apart...

Page 23: ...wo cord cleats 6 to 12 apart at a height where they will be out of the reach of children Take into account that a child may stand on furniture attempting to reach the cords Be sure the cleats are firm...

Page 24: ...WARRANTY Hunter Douglas window fashion products are covered for defects in materials workmanship or failure to operate for as long as the original retail purchaser owns the product unless shorter peri...

Reviews: