OPERATION
12
Operate the Shade
With a straight-pull cordlock, the cord remains vertical. It is not necessary to pull the cord to one
side to lock or release the cordlock. Reach behind the shade to access the cord.
■
To raise the shade: Pull down on the cord until the shade is raised to the desired position.
Then raise the cord slightly to lock it in position.
■
To lower the shade: Pull down on the cord slightly to release the cordlock. Then raise the
cord until the shade is lowered to the desired position. To stop the shade before it is fully
lowered, pull down on the cord slightly to lock the cordlock.
Important:
Do not release the cord while raising and lowering until you lock the
cordlock.
Troubleshooting
Problem
Shade will not fit into the installation brackets.
Solution
Check that all brackets are aligned at the same level and even across the front.
Problem
Shade raises unevenly.
Solution
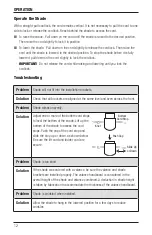
Adjust one or more of the bottom cord stops
to level the bottom of the shade. Lift up the
bottom of the shade to access the cord
stops. Push the cap of the cord stop and
slide the stop up or down, as shown below.
Be sure the lift cord and ladder cord are
secure.
Problem
Shade is too short.
Solution
If the shade was ordered with a valance, be sure the valance and shade
brackets are installed properly. The valance headboard is considered in the
overall height of the shade and valance combined. A deduction in shade height
is taken by fabrication to accommodate the thickness of the valance headboard.
Problem
Shade is wrinkled when installed.
Solution
Allow the shade to hang in the lowered position for a few days to reduce
wrinkles.
Push Cap
Bottom
Cord Stop
Knot
Slide Up
or Down

