INSTALLATION
37
Framed Specialty Shapes Over Standard Shutter
Framed Specialty Shapes Over Standard Shutter
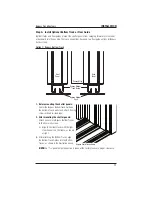
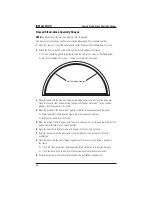
When a specialty shape is over a standard shutter, the bottom of the shape’s frame is attached
to the top of the standard shutter’s frame. The standard shutter is always installed before the
specialty shape.
NOTE:
If a Decorative Sill Cover was ordered, refer to page 39.
1.
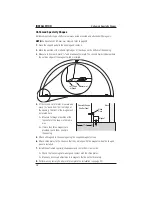
Place the frame in or over the opening.
Align the bottom frame of the shape with
the top frame of the standard shutter.
2.
Set two installation screws through the
bottom frame of the shape into the top
frame of the standard shutter. Do not
overtighten the screws.
3.
Place the shaped panel into the frame
by lining up the hinge barrels and
inserting the hinge pins. Spring-loaded
plungers on the shape snap into
grooves on the frame.
4.
Move the top of the shaped panel’s
frame left or right to create the proper
gaps around the shape.
➤
Mark the top frame location where
the proper gaps are created.
➤
Remove the shaped panel from
the frame.
5.
Move the top of the frame to align it
with the mark, and screw through the
top center to hold the frame in the
correct position.
6.
Place the shaped panel back into the frame and double-check that it fits properly.
7.
Remove the shaped panel from the frame and set all remaining screws; do not overtighten.
8.
Place the shaped panel into the frame. Adjust plunger depth if necessary to provide a good
fit in the
frame.
➤
If fit is too tight, push in on the plunger and rotate clockwise to retract the plunger.
➤
If fit is too loose, push in and rotate the plunger counterclockwise to extend it.
9.
Perform any necessary finish work to complete the installation (see page 42).
Attach Shape Frame

