TROUBLESHOOTING
47
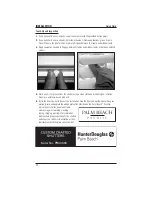
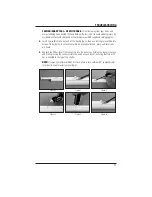
Figure 1
Figure 4
Figure 2
Figure 5
Figure 3
Figure 6
CAUTION: SHARP TOOL – USE WITH CARE.
Orient tool away from your body, and
place stabilizing hand behind the hand holding the tool
(fig.3)
to avoid stabbing injury by
accidental contact with sharp end of tool. Always wear ANSI approved safety goggles.
4.
Insert new cufflink in hole at end of tool handle
(fig.4)
, then use tool to press cufflink into
hole on tilt bar
(fig.5)
. To ensure the cufflink is properly attached, press until two clicks
are heard.
5.
Replace the tilt bar. Insert the connectors into the louvers by holding the louvers in place
and firmly pressing the connector into the notch on each louver, ensuring that top of tilt
bar is oriented to the top of the shutter.
NOTE:
If replacing multiple cufflinks, first use pliers to turn cufflinks 90° (perpendicular
to tilt bar) to enable faster removal
(fig.6)
.


