background image

INSTALLATION

7

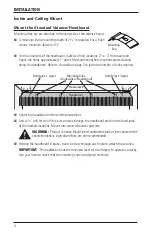
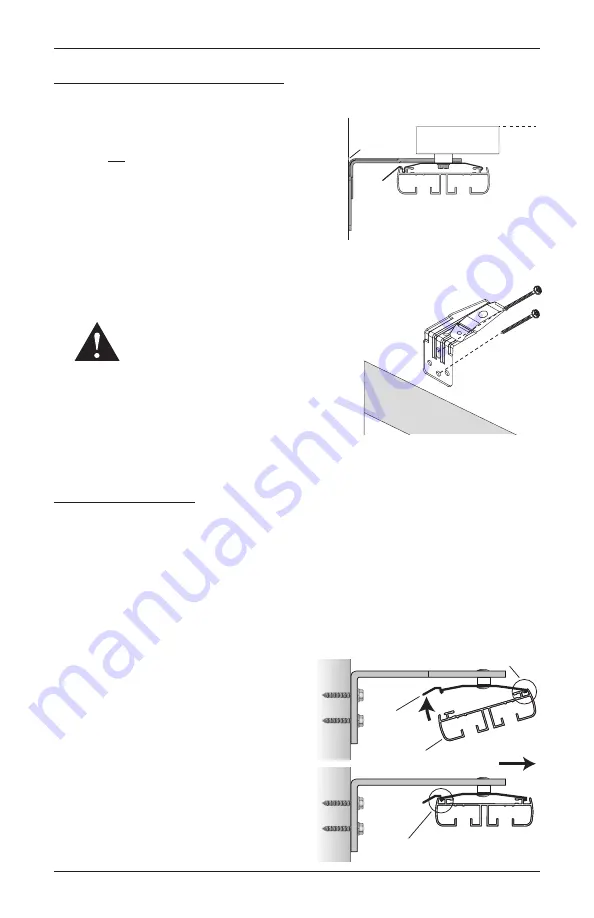
Attach the Installation Brackets


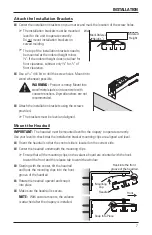
Center the installation brackets on your marks and mark the location of the screw holes.


The installation brackets must be mounted 
level for the unit to operate correctly. 
Do not mount installation brackets on 
curved molding.


The top of the installation brackets need to 
be mounted at the ordered height minus 

7

8

". If the ordered height does not allow for 

floor clearance, subtract only 

3

8

" for 

1

2

" of 

floor clearance.


Use a 

3

32

" drill bit to drill the screw holes. Mount into 

wood whenever possible.


WARNING:  

Product is heavy. Mount into 

wood/metal studs or into concrete with 
concrete anchors. Drywall anchors are not 
recommended.


Attach the installation brackets using the screws 
provided.


The brackets must be level and aligned.

Mount the Headrail

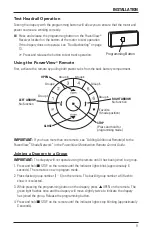
IMPORTANT: 

 The headrail must be mounted level for the drapery to operate correctly. 

Use your level to check that the installation bracket mounting clips are aligned and level.


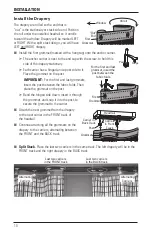
Orient the headrail so that the control side is located on the correct side.


Center the headrail underneath the mounting clips.


Ensure that all the mounting clips on the valance board are oriented with the hook 
toward the front and the release tab toward the window.


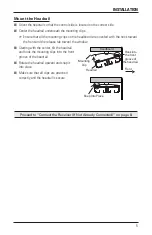
Starting with the center, tilt the headrail 
and hook the mounting clips into the front 
groove of the headrail.


Rotate the headrail upward and snap it 
into place.


Make sure the headrail is secure.

NOTE:

  With outside mounts, the valance 

is attached after the drapery is installed.

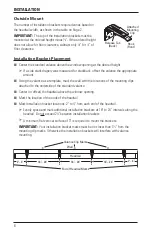
Ordered

Height

Mark Ordered 

Height -

7

8

Wall

Outside Mount

Inside Mount

Headboard

Front

Front

Mounting

Clip

Mounting

Clip

Headrail

Headrail

Hook into

the front

groove of

the headrail.

Hook into the front 

groove of the headrail.

Snap Into Place

Snap Into Place

Summary of Contents for Provenance PowerView Woven Wood Shades

Page 1: ...Provenance Woven Wood Shades Vertical Drapery with PowerView Motorization Installation Operation Care...

Page 2: ...il Operation 9 Using the PowerView Remote 9 Install the Drapery 10 Outside Mounts Install the Valance 11 OPERATION Operate the Drapery 12 Resetting the Drapery If Necessary 13 Troubleshooting 13 CARE...

Page 3: ...STARTED 1 Product View Fabric Valance Valance Return Attached Valance Mounting Clips Outside Mount Installation Brackets Not Shown Split Stack Vertical Drapery Side Stack Vertical Drapery PowerView R...

Page 4: ...operates to your satisfaction Tools Needed Flat blade and Phillips screwdrivers Level laser level is recommended Measuring tape and pencil Power drill 3 32 drill bit and 1 4 hex driver In addition you...

Page 5: ...irst step review the mounting types and basic window terminology illustrated below Refer to the appropriate page below based on your order Inside and Ceiling Mount Page 4 Outside Mount Page 6 Outside...

Page 6: ...ed Center the headboard in the window casement Use a 3 32 drill bit to drill the screw holes through the headboard and into the head jamb at the marked locations Mount into wood whenever possible WARN...

Page 7: ...nt and the release tab toward the window Starting with the center tilt the headrail and hook the mounting clips into the front groove of the headrail Rotate the headrail upward and snap it into place...

Page 8: ...with the locations of the mounting clips attached to the underside of the standard valance Center or offset the headrail above the window opening Mark the location of the ends of the headrail Mark ins...

Page 9: ...Headrail IMPORTANT The headrail must be mounted level for the drapery to operate correctly Use your level to check that the installation bracket mounting clips are aligned and level Orient the headra...

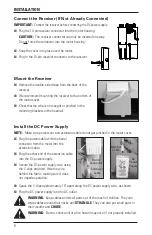
Page 10: ...the DC Power Supply NOTE Make sure power cord and extension cable do not get pinched in the motor cover Plug the power cable with the barrel connector from the motor into the extension cable Plug the...

Page 11: ...e Joining a Drapery to a Group IMPORTANT The drapery will not operate using the remote until it has been joined to a group 1 Press and hold STOP on the remote until the indicator lights blink approxim...

Page 12: ...olds Then place the grommet on the post Bend the hinged side down insert it through the grommet and snap it into the post to secure the grommet to the carrier Attach the next grommet from the drapery...

Page 13: ...alance headboard to hook the mounting clips into the front groove of the headrail Rotate the standard valance down snapping the back of the mounting clip into the back groove of the headrail Attach th...

Page 14: ...favorite position Refer to the PowerView Motorization Remote Control Guide on how to set a favorite position Further Operation and Programming Information PowerView Pebble Remote and or PowerView Sur...

Page 15: ...work assignments This reset does not affect travel limits 1 Press and hold the programming button for 12 seconds The shade will move slightly once after 6 seconds then again after 12 seconds Release t...

Page 16: ...DC Power Supply on page 8 CAUTION Be sure to unplug the DC power supply from the wall outlet before disconnecting the plug at the motor Check that the receiver is securely connected into the motor hou...

Page 17: ...s to release the valance from the headrail Unhook the mounting clip from the front groove in the headrail Repeat for each mounting clip Headrail Removal Firmly support the headrail Push up on the rele...

Page 18: ...o a low pressure Vacuuming Use a low suction hand held vacuum for more thorough dust removal Spot Cleaning Only the following Provenance fabrics can be spot cleaned Prepare a solution of warm water an...

Page 19: ...t different from that to which the receiver is connected Consult the dealer or an experienced radio TV technician for help Any changes or modifications not expressly approved by the party responsible...

Page 20: ...Hunter Douglas window fashion products are covered for defects in materials workmanship or failure to operate for as long as the original retail purchaser owns the product unless shorter periods are...

Reviews: