Hüppe Montage Novetta plus 1
01/99
3
a
Montieren Sie keine be-
schädigte Anlagen!
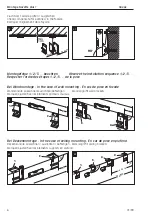
Montageort prüfen
–
Stimmen die Angaben in der
Zeichnung bei objektbezogener
Montage mit den Gegebenheiten
vor Ort überein?
–
Ist der Platzbedarf bauseits einge-
halten worden?
–
Sind die Breiten- /Ausfall- /X-Maße
eingehalten?
☞
Wenn Sie Abweichungen fest-
stellen, halten Sie Rücksprache
mit Ihrem Fachhändler.
Bei Anlagen mit Elektroantrieb:
–
Sind die elektrischen Anschlüsse
vorbereitet?
–
Falls die Anschlußleitungen noch
nicht nach außen geführt sind,
müssen Sie dem Endkunden die
Lage der notwendigen Anschlüsse
zeigen.
a
Lebensgefahr! 230V
Elektroanschlüsse dürfen
nur von ausgebildetem
Fachpersonal gelegt wer-
den!
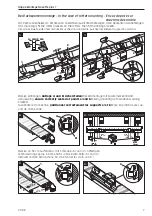
Montageschritte 1-18
befolgen
•
Konsole aufteilen.
•
X-Maße anzeichnen.
•
Konsolen montieren.
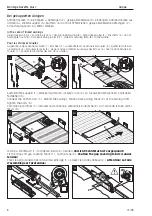
•
Markise einhängen und sichern.
Bei gekuppelter Markise:
•
Zuerst Antriebsmarkise,
dann Markise ohne Antrieb
einhängen und sichern.
•
Dann beide Markisen kuppeln.
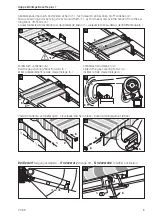
•
Schlitztuch montieren.
Bei Bedarf:
•
Neigungswinkel einstellen.
•
Getriebeabgang einstellen.
•
Elektroantrieb einstellen.
Wenn als Zubehör vorhanden
•
Regenschutzdach montieren.
•
Seitenteil montieren.
•
Funktion prüfen.
Die Montage erfolgt prinzipiell nach
diesen Arbeitsschritten.
Nach örtlichen Gegebenheiten oder
bei objektbezogenen Montagen kann
davon abgewichen werden, wenn
eine andere Abfolge einzelner Ar-
beitsschritte günstiger scheint.
Das Ziel muß immer sein, einen op-
tisch einwandfreien Eindruck zu er-
reichen.
a
Do not assemble damaged
installation.
Check place of installation
–
Do the details in the drawing
match the on-site situation in the
case of an object-specific installa-
tion ?
–
Is the space requirement allowed
for on site?
–
Have the main dimensions been
observed?
☞
If you notice any deviations,
notify distributer immedi-
ately.
For electrically driven installa-
tions:
–
Have the electrical connections
been prepared?
–
If the connecting cables have not
yet been laid to the outside onto
the facade, you must mark the
position of the necessary connec-
tions for the customer.
a
Danger! 230V
Electrical connections may
only be laid by trained,
skilled personnel.
Observe installation sequence
•
Distribute brackets.
•
Mark dimension X.
•
Fit brackets.
•
Hang awning and secure.
On coupled awning:
•
First fit and secure the drive
awning, then the awning without
drive.
•
Then couple the two awnings.
•
Fit gap covering fabric.
If necessary:
•
Adjust tilt angle.
•
Adjust drive eye position.
•
Adjust electric drive.
If fitted as accessories
•
Fit canopy.
•
Fit side fabric.
•
Check function
Installation proceeds in principle ac-
cording to these steps.
Variations are possible according to
local circumstances or if installation
is tailored to a particular object,
where a different sequence may be
advisable. The aim must always be to
create a visually perfect impression.
a
Prière de ne pas poser des
produits endommagés!
Contrôle du lieu de pose
–
Les indications du dessin au niveau du
montage du store coïncident-elles
avec les conditions prévalant sur
place?
–
L’espace nécessaire a-t-il été respecté?
–
Les dimensions des principaux élé-
ments ont-elles été respectées?
☞
Si vous constatez des anoma-
lies, veuillez en informer im-
médiatement votre reven-
deur spécialisé.
Pour les installations avec mo-
teur:
–
Les raccordements électriques ont-ils
été préparés?
–
Si les câbles de raccordement n’ont
pas encore été tirés vers l’extérieur sur
la façade, la position des raccords né-
cessaires doit être communiquée à
l’électricien.
a
Danger de mort! 230 V
Veiller à ce que les raccor-
dements électriques soient
effectués uniquement par
un personnel qualifié!
Respecter l’ordre de pose
•
Placer les éléments porteurs.
•
Marquer les cotes X.
•
Poser les éléments porteurs.
•
Suspendre le store banne et le fixer.
Pour les installations accouplées
•
Suspendre et fixer d’abord le store
banne motorisé, puis le store à
accoupler.
•
Accoupler les store bannes.
•
Poser la toile.
Si nécessaire:
•
Régler l’angle d’inclinaison.
•
Régler la sortie treuil.
•
Régler le moteur électrique.
Si les accessoires suivants sont
disponibles
•
Poser le capot de protection.
•
Poser le pan latéral.
•
Vérifier le fonctionnement.
La pose se fait en principe dans
l’ordre décrit ci-dessus.
On peut cependant y déroger en
fonction des conditions locales ou
pour des adaptations spéciales
quand un odre différent semble être
plus judicieux.
L’objectif doit toujours être la
l’obtention d’un aspect visuel par-
fait.


