background image

EN

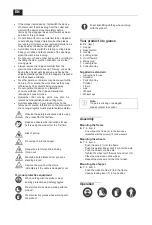
If the chipper is stopped up, first switch the device

off, disconnect the mains plug from the outlet and

wait until the device stops completely before

removing the stoppage. Keep on/off switches clean

and free of foreign bodies.

Do not attempt to remove materials to be chipped or

to hold already chipped material when the blades

are running. Only remove any jammed material to be

chipped when the device is switched off.

Avoid direct contact with the rotating cut-ting blade.

Keep your hands and feet out-side of the openings

when the machine is running.

Do not put your hands, other body parts or clothing in

the filling chamber, ejection channel or near other

moving parts.

Always remove the chipped material from the

ejection zone before it piles up. This way, you avoid

having the chipper get stopped up and having the

chipped material go back into the hopper on rebound

and thus cause accidents.

No other persons or animals may be pre-sent within

an area of 3 m around the work area, as they may

otherwise by hit by objects being slung away.

Do not operate the device on plastered or

concrete surfaces. The chipped material can

rebound and cause injuries.

Remember that moving parts may also be

located behind ventilation and venting slots.

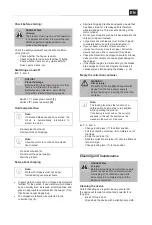
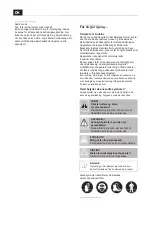
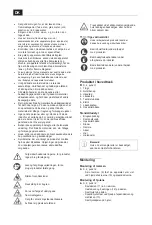
Symbols appearing on your product may not be

removed or covered. Information on the product that

are no longer legible must be replaced immediately.

Observe the safety instructions before using

the product for the first time.
Read and observe the instructions for use
before using the product for the first time.

Risk of slicing.

Do not reach into the hopper.

Danger due to foreign bodies being

thrown out.
Maintain a safe distance from per-sons

standing around.
Remove the plug from the mains

immediately if the cable is damaged or cut.

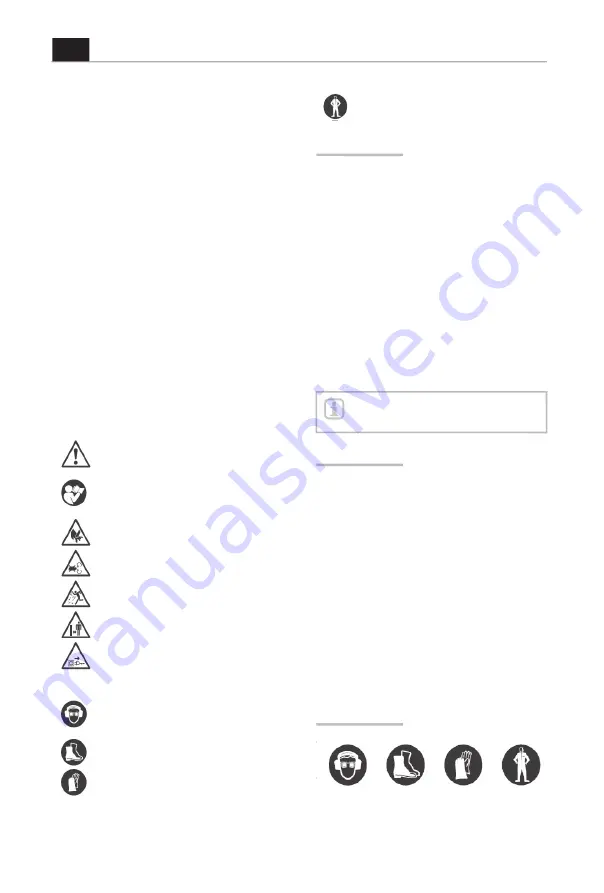
Personal protective equipment

When working with the product, wear

hearing protection and safety goggles.

Wear sturdy shoes when working with the

product.

Wear protective gloves when working with

the product.

Wear tight-fitting clothing when working

with the product.

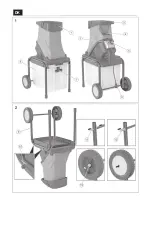
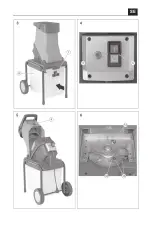
Your product at a glance

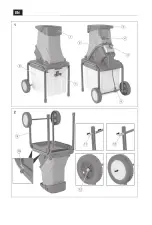
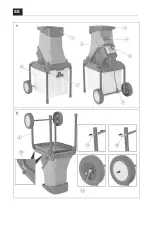
P. 2, item 1

1. Hopper

2. Reset button

3. Handle

4. Locking screw

5. On-Off switch

6. Mains plug

7. Locking lever

8. Collection tray

Supplied as standard

• Instructions for use

• Shredder

• Collection tra

y

• Prodder

• Frame

• Axle

• Wheels

• Wheel ca

ps

Note:

If a part is missing or damaged,

please contact the vendor.

Assembly

Mounting the frame

P. 2, item 2

- Screw down the frame (9) to the device as

illustrated with the screws (10) and washers.

Mounting the wheels

P. 2, item 2

- Push the axle

(11) into the frame.

- Push the washer and socket (12)

onto the axle.

- Push the wheel onto the axle.

- Tighten the wheel with the washer and nut (13).

- Place the wheel cap on the wheel.

- Repeat the procedure for the other wheel.

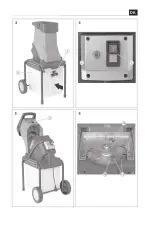
Mounting the chipper

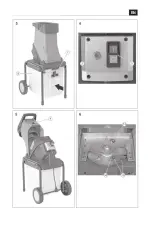
P. 3, item 3

- Push the collection tray (8) into the frame.

- Change locking lever (7) to top position.

Operation

Summary of Contents for 6302588A

Page 1: ...BAHAG NO 6302588A model SHF2500 142XX210MM...

Page 2: ...EN 1 3 1 4 2 5 8 7 6 2 9 11 12 10 13...

Page 3: ...EN 3 4 7 2 5 8 5 6 4 14 16 15...

Page 4: ...odifications to the device or the use of components that are not tested and approved by the manufacturer may result in unforeseen damage Any use that deviates from its intended use and is not included...

Page 5: ...not by the cable Do not bend crush pull or drive over the power cable protect from sharp edges oil and heat Do not lift the device using the cable or use the cable for purposes other than intended Ch...

Page 6: ...uct that are no longer legible must be replaced immediately Observe the safety instructions before using the product for the first time Read and observe the instructions for use before using the produ...

Page 7: ...revents blocking of the motor cylinder Do not put soft waste such as kitchen waste into the chipper compost it instead Large branches with leaves must first be chipped completely before any other mate...

Page 8: ...stop functioning safely You thus endanger yourself and your environment Often only small faults cause a malfunction You can usually easily remedy such faults yourself Please consult the following tabl...

Page 9: ...ot necessarily represent safe workplace values Although there is a correlation between emission and immission levels this cannot be used to infer whether additional safety measures are necessary or no...

Page 10: ...BRUGERMANUAL...

Page 11: ...DK 1 3 1 4 2 5 8 7 6 2 9 11 12 10 13...

Page 12: ...DK 3 4 7 2 5 8 5 6 4 14 16 15...

Page 13: ...rug eller modifikationer af apparatet eller brug af komponenter der ikke er afpr vet og godkendt af producenten kan resultere i uforudset beskadigelse Enhver brug der afviger fra den tilsigtede anvend...

Page 14: ...ner f r apparatet tilsluttes V rkt jet m kun bruges i overensstemmelse med de specificerede begr nsninger for sp nding og effekt se typeskiltet Ber r aldrig str mstikket med v de h nder Afbryd altid l...

Page 15: ...o for at de rammes af l se genstande der bliver slynget ud Betjen ikke apparatet p belagte eller betonerede underlag Det findelte materiale kan sl tilbage og for rsage personskade Husk at der ogs kan...

Page 16: ...gisk g dning til haven Tilf r materiale der nedbrydes p naturlig vis herunder f eks blade sm grene og gr s i passende m ngder i tragten 1 s den ikke blokeres Det findelte materiale kan opsamles i opsa...

Page 17: ...unbrakon glen Vend eller udskift klingen 16 Monter i den modsatte r kkef lge Bem rk Klingerne kan ogs sk rpes Dette skal imidlertid udf res af en specialist da begge klinger skal v re lige tunge for a...

Page 18: ...Bortskaffelse af emballagen Emballagen best r af pap og m rkede kunststoffer som kan genanvendes S rg for at disse materialer genanvendes Tekniske data SHF2500 Nominel sp nding 230 240 V 50 Hz Nominel...

Page 19: ...BRUKSANVISNING...

Page 20: ...1 3 1 4 2 5 8 7 6 2 9 11 12 10 13 SE...

Page 21: ...4 7 2 5 8 5 6 4 14 16 15 SE...

Page 22: ...eringar av enheten eller anv ndning av komponenter som inte r testade och godk nda av tillverkaren kan medf ra of rutsedda skador All anv ndning som avviker fr n den avsedda anv ndningen och som inte...

Page 23: ...sladden eller anv nd sladden f r andra ndam l n det avsedda Kontrollera stickkontakten och sladden f re varje anv ndning Dra omedelbart ur stickkontakten om n tsladden r skadad Anv nd aldrig enheten...

Page 24: ...f rsta g ngen L s och f lj bruksanvisningen innan du anv nder enheten f r f rsta g ngen Sk rrisk Stick inte ned n gonting i inmataren Fara fr n fr mmande f rem l som kastas ut H ll ett s kerhetsavst n...

Page 25: ...g rdsavfall som har legat n gra dagar och som r vissnat och fuktigt Det f rhindrar att motorcylindern blockeras L gg inte i mjukt material som k ksavfall i flistuggen utan kompostera det ist llet Stor...

Page 26: ...ls kning och felavhj lpande N r n gonting inte fungerar FARA Risk f r personskada Reparationer som utf rs p felaktigt s tt kan medf ra att enheten inte l ngre r s ker Du uts tter b de dig sj lv och di...

Page 27: ...A K 2 55 dB A Ledningsimpedans Zmax 0 351 Vikt 13 8 kg De angivna v rdena r emissionsv rden och representerar inte n dv ndigtvis s kra arbetsplatsv rden ven om det finns en korrelation mellan emissio...

Page 28: ......
Reviews: