background image

6

Assembly 

WARNING: 

To reduce the risk of fire or explosion, do not operate this vacuum in areas with flammable gases, vapors or explosive 

dust in the air. Flammable gases or vapors include but are not limited to: lighter fluid, solvent-type cleaners, oil-based paints, gasoline, 

alcohol or aerosol sprays. Explosive dusts include but are not limited to: coal, magnesium, aluminum, and grain or gun powder. Do not

vacuum explosive dust, flammable or combustible liquids or hot ashes. Do not use this vacuum as a sprayer for any flammable or 

combustible liquid. To reduce the risk of health hazards from vapors or dusts, do not vacuum toxic materials. 

WARNING: 

The operation of any utility vacuum can result in foreign objects being blown into the eyes, which can result in severe eye 

damage. Always wear safety eyewear complying with ANSI Z87.1 (or in Canada, CSA Z94.3) before starting operation.

CAUTION: 

                     To reduce risk of hearing damage, wear ear protectors when using the vacuum for extended hours or when using it in a
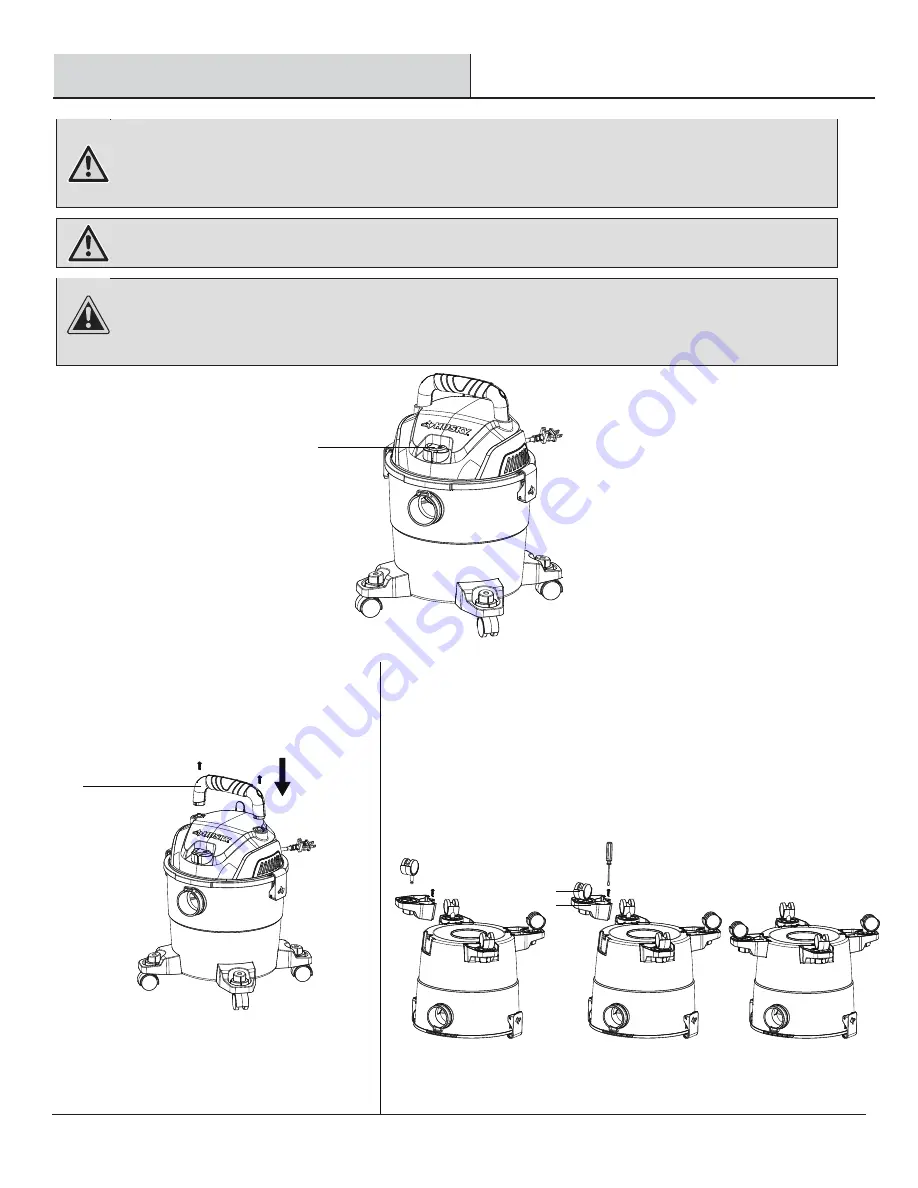
noisy area. This 15.1 Liter / 4 Gal wet/dry vacuum is not fully assembled at the factory and need install casters and handle following 
below steps when you remove it from the carton. The unit is featured with vacuuming and blowing function. fully assembled, plug the 
power cord into the wall receptacle, turn the unit “ON” by pushing theswitch from position “O” to position “I” as shown in Figure A. 
The “O” is the “OFF” position and the “I” is the “ON” position.

Insert the casters (I) into the bottom of the caster base as shown 
in Figure B.

Install Four Accessory holders(H) into the dust tank grooves
Insert provided screws

Strong pressure is required. Listen for the click to ensure they are 
locked in place.

Figure B

INSTALLING CASTERS

Figure A

O = OFF

I = ON

A


INSTALLING HANDLE

Place handle (A) in recess
Insert provided screws

H

I

Summary of Contents for 8200445

Page 1: ...cts designed to enhance your home Visit us online to see our full line of products available for your home improvement needs Thank you for choosing Husky USE AND CARE GUIDE 4 GALLON PORTABLE POLY WET DRY VACUUM Questions problems missing parts Before returning to the store call Husky Customer Service 8 a m 7 p m EST Monday Friday 9 a m 6 p m EST Saturday 1 888 HD HUSKY HUSKYTOOLS COM ...

Page 2: ...t use to pick up flammable or combustible liquids such as gasoline or use in areas where they may be present 16 Do not use your cleaner as a sprayer of flammable liquids such as oil based paint lacquers etc 17 Do not vacuum toxic carcinogenic combustible or other hazardous materials such as asbestos arsenic barium beryllium lead pesticides or other health endangering materials 18 Do not pick up so...

Page 3: ...ulated Wet Dry Vacuum must be identical to the parts they replace Your double insulated Wet Dry Vacuum is marked with the words DOUBLE INSULATED and the symbol square within a square may also be marked on the appliance To reduce the risk of injury from electrical shock 1 This appliance has a polarized plug one blade is wider than the other This plug will fit in a polarized outlet only one way If t...

Page 4: ... D Vacuum port inlet 1 k n a t t s u D E 1 t r o p g n i w o l B F 1 k o o h d r o c r e w o P G 4 r e d l o h y r o s s e c c A H 4 r e t s a C I 1 e s o H J 1 Floor nozzle K 3 d n a w n o i s n e t x E L M 1 1 r e t l i f m a o F N J K L M N Cartridge filter replace with multi fit cartridge filter B D E A C F G H I ...

Page 5: ...ew Driver HARDWARE INCLUDED NOTE Hardware not shown to actual size Part Description Quantity AA Screw ST 3 9X16F 4 Pre Assembly AA M O C S L O O T Y K S U H 5 S U H D H 8 8 8 1 t c a t n o c e s a e l P KY for further assistance ...

Page 6: ...plying with ANSI Z87 1 or in Canada CSA Z94 3 before starting operation CAUTION To reduce risk of hearing damage wear ear protectors when using the vacuum for extended hours or when using it in a noisy area This 15 1 Liter 4 Gal wet dry vacuum is not fully assembled at the factory and need install casters and handle following below steps when you remove it from the carton The unit is featured with...

Page 7: ...fore using for dry pick up Remove the cartridge filter M and replace it with the foam filter N when you do wet pick ups This wet dry vacuum is equipped with a float mechanism which will rise automatically to cut off the airflow when the liquid in the tank reaches a predetermined level When this happens turn off the vacuum unplug the power cord and empty the dust tank You will know that the float h...

Page 8: ...lter with holes or tears in it Even a small hole can cause dust to come out of your vacuum Replace it immediately NOTE Before installing the filter on the vacuum clean the area of the lid so that the clamp ring will seal the bag against the lid and stop small particles from bypassing the filter bag If the filter is clean and not damaged replace it on the filter cage If it cannot be reused place a ...

Page 9: ...eshooting checks Minor problems often can be fixed without calling customer service Problem Possible Cause Corrective Action The vacuum does not run No electricity Make sure electrical outlet has voltage a qualified electrician may need to be contacted There is a loss of suction during wet pick up The tank is full The hose is clogged The filter is clogged Drain and clean the tank Remove the hose a...

Page 10: ...1 1 Power Cord 1 1 2 Latch 2 1 1 Dust Tank 3 1 1 14 4 Accessory holder 4 Caster Vacuum Port Inlet Handle HKY04001 HKY04002 HKY04003 HKY04004 HKY04005 HKY04006 HKY04007 HKY04008 HKY04009 HKY04010 HKY04011 HKY04012 HKY04013 HKY04014 ON OFF Switch Top Cover lid Motor Noise Reducing Sponge Part No ...

Page 11: ...tions problems missing parts Before returning to the store call Husky Customer Service 8 a m 7 p m EST Monday Friday 9 a m 6 p m EST Saturday 1 888 43 HUSKY HUSKYTOOLS COM Retain this manual for future use ...

Reviews: