background image

 17 HUSKYTOOLS.com


  Please contact 1-888-43-HUSKY for further assistance.

Operation (continued)

Draining the tank

WARNING:

 Risk of unsafe operation. Air tanks contain 

high pressure air. Keep face and other body parts away 
from outlet of drain. Use eye protection [ANSI Z87.1 (CAN/
CSA Z94.3)] when draining, as debris can be kicked up 
into face.

WARNING:

 Risk from noise. Use ear protection (ANSI 

S12.6 (S3.19), as air flow noise is loud when draining.

WARNING:

 Risk of bursting. Water will condense in the 

air tank. If not drained, water will corrode and weaken the 
air tank causing a risk of air tank rupture.

NOTE:

 All compressed air systems generate condensate 

that accumulates in any drain point (e.g., tanks, filter, 
after-coolers, dryers). This condensate contains lubricating 
oil and/or substances which may be regulated and must 
be disposed of in accordance with local, state, and federal 
laws and regulations.

NOTE:

 If drain valve is plugged, release all air pressure. 

The valve can then be removed, cleaned, then reinstalled.

NOTE:

 Risk of property damage. Drained water from the 

air tank may contain oil and rust which can cause stains.


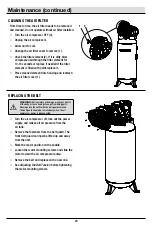
Set the  AUTO ( I ) / OFF ( O ) switch (1) to the OFF 
( O ) position.


Slowly bleed the air from the compressor 
tank by pulling the safety valve to allow the 
pressure to escape from the tank until the 
pressure is approximately 20 psi.


Drain the water from the tank by opening the 
drain valve (2) on the bottom of the tank.


After the water has been drained, close the 
drain valve (2). The air compressor can now 
be stored. 

1

2

Summary of Contents for 911-625

Page 1: ...ur home Visit us online to see our full line of products available for your home improvement needs Thank you for choosing Husky USE AND CARE GUIDE 60 GALLON STATIONARY AIR COMPRESSOR Questions problem...

Page 2: ...le liquids gases or dust Power tools create sparks which may ignite the dust or fumes Keep bystanders children and visitors away while operating tools Distractions can cause you to lose control WARNIN...

Page 3: ...LEAD May be harmful if eaten or chewed May generate dust containing lead Wash hands after use Keep out of reach of children WARNING This product can expose you to chemicals including lead which is kno...

Page 4: ...er direct a jet of compressed air toward people or animals Protect your lungs Wear a face or dust mask if the operation is dusty Do not use this air compressor to spray chemicals Your lungs can be dam...

Page 5: ...ower rating A line intended only for lights cannot properly carry a power tool motor Wire that is heavy enough for a short distance will be too light for a greater distance A line that can support one...

Page 6: ...does not apply to any damage to the manufacturer s product that is the result of improper maintenance or to any manufacturer s product that has been altered or modified The warranty does not extend to...

Page 7: ...240V 60 Hz Single phase AC only 15 Amps Minimum branch circuit requirement 20 A Fuse type Time delay Net weight Approximate 200 lbs DUTY CYCLE This air compressor pump is capable of running continuou...

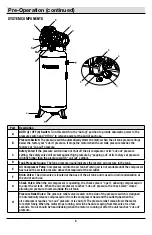
Page 8: ...compressor has raised the air tank pressure above that required at the air outlet F Drain Valve The drain valve is located at the base of the air tank and is used to drain condensation at the end of e...

Page 9: ...s The pump oil sight glass is a visual identifier for oil level in the crankcase O Motor The motor is the drive component powered by electricity to rotate the pump by a belt pulley system P Air Outlet...

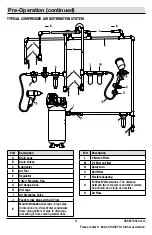
Page 10: ...vibration A separate regulator is recommended to control the air pressure Air pressure from the tank is usually too high for individual air driven tools Do not install the lubricators between the tan...

Page 11: ...s H Dirt Legs I Air Discharge Valve J Feeder Lines Slope with Air Flow K Main Distribution Air Lines Slope pipe in direction of air flow Water condensate flows along bottom of pipe to drain legs preve...

Page 12: ...nailer Impact wrench Heavy duty 1 2 in and 3 4 in impact wrench Air ratchet Recommended Tool Use Tool Cutting Drilling Surface Prep Painting HVLP Painting Grease Gun Air hammer Cut off tool Drill Impa...

Page 13: ...wiring Make sure the wires are secure at all terminals and connections Make sure all contacts move freely and are not obstructed Open the drain valve 2 fully to permit air to escape and prevent air p...

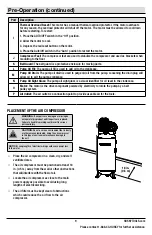
Page 14: ...ce Make sure the concrete is in good condition with no cracks or damage Mark the surface of the concrete using the holes in the legs of the compressor as a template Drill holes in the concrete for the...

Page 15: ...nd accessories may require filtered air Read the in struc tions for the air tools and accessories NOTE A regulator MUST be installed when using accessories rated at less than 150 psi The hose or acces...

Page 16: ...he ring Air stops escaping at about 20 psi If air continues to escape after releasing the safety valve ring discontinue use and seek service before using the air compressor again 1 2 4 Running the air...

Page 17: ...lates in any drain point e g tanks filter after coolers dryers This condensate contains lubricating oil and or substances which may be regulated and must be disposed of in accordance with local state...

Page 18: ...Use of any other parts may create a hazard or cause product damage WARNING Always release all pressure disconnect from power supply and allow unit to cool to the touch before cleaning or making repair...

Page 19: ...e oil fill plug 1 and slowly add the oil until it reaches the middle of the sight glass NOTE Use 30W compressor oil or a heavy duty SAE 30W non detergent SF grade or better oil Do not use multi weight...

Page 20: ...ver 1 REPLACING THE BELT WARNING Serious injury or damage may occur if parts of the body or loose items get caught in moving parts Never operate the outfit with the belt guard removed The belt guard s...

Page 21: ...n the following page Slide the motor into the original position and line the motor up with the mark made earlier on the saddle Tighten the two outside motor mounting screws enough to hold the motor in...

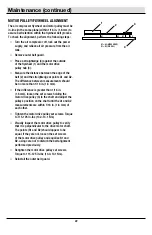
Page 22: ...1 16 in 1 6 mm If the difference is greater than 1 16 in 1 6 mm loosen the set screws holding the motor drive pulley 3 to the shaft and adjust the pulley s position on the shaft until the A1 and A2 m...

Page 23: ...air line fittings and connections piping to look for any leaks Pull ring on safety valve allowing air to bleed from the tank until tank pressure is approximately 20 PSI Release safety valve ring Drain...

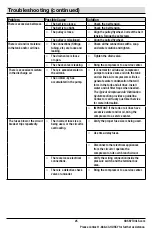
Page 24: ...run at all There is low voltage from the power source Check the voltage with a voltmeter There are loose electrical connections Verify the wiring connections inside the pressure switch and the termin...

Page 25: ...mps to release some oil into the tank and air lines Air compressors will also generate water condensation that will form in the tank and air lines Install water and oil filter traps when needed The Ty...

Page 26: ...problems missing parts Before returning to the store call Husky Customer Service 8 a m 6 p m EST Monday Friday 1 888 43 HUSKY HUSKYTOOLS COM Retain this manual for future use Document Number E111362 0...

Page 27: ...a ver nuestra l nea completa de productos disponibles para las necesidades de mejora de su hogar Gracias por elegir Husky GU A DE USO Y CUIDADO COMPRESOR DE AIRE ESTACIONARIO DE 60 GALONES 227 12 L Pr...

Page 28: ...de l quidos gases o polvos inflamables Las herramientas el ctricas generan chispas las cuales pueden incendiar los polvos o vapores Mantenga a las personas que est n presentes los ni os y los visitant...

Page 29: ...e come o se mastica Puede generar polvo que contenga plomo L vese las manos despu s de usarla Mant ngalo fuera del alcance de los ni os ADVERTENCIA Este producto puede exponerle a los productos qu mic...

Page 30: ...onecta a un circuito protegido por fusibles utilice fusibles de acci n retardada con este producto Aseg rese de que la manguera est libre de obstrucciones o enredos Las mangueras enredadas u obstruida...

Page 31: ...n cable que sea lo suficientemente pesado para una distancia corta ser demasiado ligero para una distancia mayor Es posible que una l nea que pueda mantener el consumo de una herramienta el ctrica no...

Page 32: ...de un mantenimiento inapropiado o a cualquier producto del fabricante que haya sido alterado o modificado La garant a no se extiende a las reparaciones hechas necesarias por el desgaste normal o por...

Page 33: ...Entrada 240 Vca 60 Hz 15 A fase nica Requisito m nimo del circuito derivado 20 A Tipo de fusible De acci n retardada Peso neto Aproximado 91 kg 200 lb CICLO DE SERVICIO Esta bomba de compresor de aire...

Page 34: ...que el ajuste de desconexi n del interruptor de presi n D Man metro del tanque El man metro del tanque indica la presi n del aire de reserva en el tanque E Bomba del compresor de aire Comprime el aire...

Page 35: ...arrancarlo 1 Mueve el interruptor Auto Off apagado a la posici n Off apagado 2 Deja que el motor se enfr e 3 Oprime el bot n rojo de reiniciar del motor 4 Mueve el interruptor Auto Off apagado a la po...

Page 36: ...e entorno puede causar da os a la unidad AVISO Los tramos largos de cable el ctrico podr an causar p rdida de la potencia suministrada al motor Coloque el compresor en un rea limpia seca y bien ventil...

Page 37: ...nda un regulador independiente para controlar la presi n de aire Generalmente la presi n de aire procedente del tanque es demasiado alta para las herramientas individuales accionadas por aire No insta...

Page 38: ...ujo de aire Pieza Descripci n K L neas de distribuci n de aire principales Incline la tuber a en el sentido del flujo de aire El condensado de agua fluye a lo largo de la parte inferior de la tuber a...

Page 39: ...ado Llave de impacto Llave de impacto de servicio pesado de 1 2 pulgada 1 27 cm y 3 4 pulgada 1 9 cm Carraca neum tica Uso de herramientas recomendado Herramienta Corte taladrado Preparaci n de superf...

Page 40: ...libremente y no est n obstruidos Abra completamente la v lvula de drenaje 2 para permitir que el aire escape e impedir la acumulaci n de presi n de aire en el tanque de aire durante el per odo de ase...

Page 41: ...una superficie nivelada y s lida Aseg rese de que el concreto est en buenas condiciones sin grietas ni da os Marque la superficie del concreto utilizando los orificios de las patas del compresor como...

Page 42: ...nal m xima PRECAUCI N Riesgo de funcionamiento inseguro El aire comprimido procedente de la unidad puede contener condensaci n de agua y niebla de aceite No roc e aire sin filtrar a un objeto que podr...

Page 43: ...aire y haga que sea revisado por un t cnico de servicio capacitado NOTA Cuando utilice el regulador y otros accesorios consulte las instrucciones del fabricante Enchufe el cable de alimentaci n en un...

Page 44: ...ula de seguridad haya sido reemplazada La utilizaci n del compresor de aire en esta situaci n podr a causar lesiones corporales graves Ajusta el interruptor Auto Off apagado 1 en On y espera a que el...

Page 45: ...ADVERTENCIA Es posible que su herramienta requiera m s consumo de aire del que este compresor es capaz de suministrar Consulte el manual de la herramienta para evitar da os a la misma o correr el rie...

Page 46: ...ier punto de drenaje por ej tanques filtro posenfriadores y secadores Esta condensaci n contiene aceite y o sustancias lubricantes que pueden estar regulados y se deben eliminar de acuerdo con las ley...

Page 47: ...lice nicamente piezas de repuesto Husky id nticas El uso de cualquier otra pieza puede crear un peligro o causar da os al producto ADVERTENCIA Deje escapar siempre toda la presi n desconecte el compre...

Page 48: ...edio de la mirilla NOTA Utilice aceite para compresores 30W o un aceite no detergente SAE 30W de servicio pesado de grado SF o mejor No utilice aceites automotrices multipeso ya que reducir n la vida...

Page 49: ...raves o da os si partes del cuerpo o art culos sueltos quedan atrapados en las piezas m viles No utilice nunca la unidad si se ha retirado el protector de la correa El protector de la correa s lo se d...

Page 50: ...entre la polea y el volante cuando se aplique un peso de diez libras 4 5 kg en el punto intermedio Cuando se logre la tensi n apropiada de la correa apriete los cuatro tornillos de montaje del motor A...

Page 51: ...ferencia es mayor de 1 16 de pulgada 1 6 mm afloje el tornillos de ajuste que sujeta la polea de accionamiento del motor 3 al eje y ajuste la posici n de la polea en el eje hasta que las mediciones A1...

Page 52: ...una aver a prematura o un rendimiento inadecuado Enciende el compresor de aire y deje que se incremente la presi n del tanque El motor se detendr una vez alcanzado el valor de pre si n de corte apague...

Page 53: ...Verifique el cableado NOTA Los tramos largos de cable el ctrico podr an causar p rdida de la potencia suministrada al motor El interruptor de presi n est en mal estado Reemplace el interruptor de pres...

Page 54: ...a tensi n de la correa Hay un desgaste excesivo de la correa La correa est demasiado floja Compruebe la tensi n de la correa La correa est demasiado apretada Compruebe la tensi n de la correa La polea...

Page 55: ...acte o llame a Servicio al Cliente de Husky para obtener m s informaci n El aceite que escapa se ha acumulado en la bomba IMPORTANTE Si el tanque o las l neas de aire tiene exceso de agua y o aceite l...

Page 56: ...Antes de devolver la unidad a la tienda llame a Servicio al Cliente de Husky de 8 a m a 6 p m Hora del Este EST de lunes a viernes 1 888 43 HUSKY HUSKYTOOLS COM Retenga este manual para uso futuro N m...

Reviews: