


RECORDATORIO: ¡Guarde su prueba de compra con fecha para fines de la garantía!
Adjúntela a este manual o archívela en lugar seguro.
8
Pistola
Pulverizadora
Multiuso
Descripción
Las pistolas pulverizadoras multiuso
están concebidas para pulverizar todo
tipo de pinturas y materiales. Son
ideales para uso doméstico, en fincas o
para uso comercial.
• Viene de fábrica para usarla con el
sistema a presión sin purgador, se
puede usar con sifón, sin purgador o
con cualquier combinación de estos
métodos.
• Le permite usar tapas de aire de
mezcla interna o externa.
• Tiene una perilla de control de
fluído.
• Le permite pintar con patrones
verticales u horizontales.
• Puede usarse con un tanque de
pintura.
Especificaciones
Sistema de
alimentación . . . . . . . .A presión/sifón
Mezcla de material . .Interno/Externo
Tipo de
purgador . . . .Purgador/Sin Purgador
Diám. Interno de la
boquilla de fluído . . . .0,051” (1,3mm)
Presión máx.
suministro de aire . . . . . . . . . .3,45 bar
Consumo de aire . . . .0,06 (promedio)
m3/min a 2,76 bar . . . .0,10 (continuo)
Diámetro del
patrón . . . . . . . . . .16,51 cm a 3,45 bar
a 20,32 cm de la pieza de trabajo
Entrada de
aire . . . . . . . . . .6,4 mm (1/4”) NPS (M)
Entrada de
fluído . . . . . . . .9,5 mm (3/8”) NPS (M)
Material de la
boquilla . .Acero galvanizado con zinc
Material de la
aguja . . . . . . . . . . . . .Acero inoxidable
Medidas de
Seguridad
Este manual contiene información que
es muy importante que sepa y
comprenda. Esta información se la
suministramos como medida de
SEGURIDAD y para EVITAR PROBLEMAS
CON EL EQUIPO. Debe reconocer los
siguientes símbolos.
Ésto le
indica
que hay una situación inmediata que LE
OCASIONARIA la muerte o heridas de
gravedad.
Ésto le
indica
que hay una situación que PODRIA
ocasionarle la muerte o heridas de
gravedad.
Ésto le
indica
que hay una situación que PODRIA
ocasionarle heridas no muy graves.
Ésto le
indica
una información importante, que de no
seguirla, le podría ocasionar daños al
equipo.
Desempaque
Al desempacar este producto, revíselo
con cuidado para cerciorarse de que
esté en perfecto estado. Igualmente,
cerciórese de apretar todos los pernos,
tuercas y conexiones, antes de usarlo.
No debe
utilizar la
unidad si se ha dañado durante el
envío, manejo o uso. Los daños podrían
ocasionar una explosión y ocasionarle
heridas o daños a su propiedad.
!
ADVERTENCIA
AVISO
!
PRECAUCION
!
ADVERTENCIA
!
PELIGRO
IN283801AV 3/03
Terminología de las
Pistola Pulverizadoras
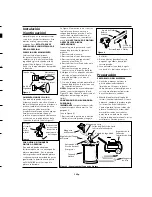
SISTEMA DE ALIMENTACION
– Es el
método usado para suministrarle a la
pistola la pintura que se va a rociar.
SISTEMA A PRESION
– Es un método
por el cual se le aplica presión al envase
o tanque de pintura para suministrarle
pintura a la pistola. Este método puede
utilizar tapas de aire de mezcla interna
o externa. Este método generalmente
se usa para rociar pinturas espesas o
para pintar superficies grandes.
SISTEMA DE SIFON
– En este método
se utiliza la presión atmosférica para
crear un vacío parcial para suministrarle
la pintura a la pistola. Con este método
sólo se pueden utilizar tapas de aire de
mezcla externa. El sistema de sifón se
usa para rociar pinturas que no sean
muy espesas.
SISTEMA DE GRAVEDAD
– Este
método es similar al de sifón. Sin
embargo, el envase está invertido para
crear una presión positiva del fluído en
la boquilla.
MEZCLA
– Es la mezcla de pintura y
aire para rociar.
MEZCLA INTERNA
– Es el proceso de
mezclar la pintura con aire dentro de la
tapa de aire, antes de rociarla. Este
método es mejor para pinturas espesas,
pinturas que tardan en secarse, y sólo
se puede usar con el sistema a presión.
Nunca use el método de mezcla interna
cuando vaya a rociar pinturas que se
secan rápidamente. De hacerlo, la
pintura se secará dentro de la tapa y la
atascará.
MEZCLA EXTERNA
– Es el proceso de
mezclar la pintura con aire fuera de la
tapa de aire. Este método se debe usar
17 Sp
Multi-Purpose Spray Gun
Limited Warranty - Husky Spray Gun by Campbell Hausfeld
1.
DURATION: From the date of purchase by the original purchaser as follows: Standard Duty Products - One Year, Serious
Duty Products - Two Years, Extreme Duty Products - Three Years.
2.
WHO GIVES THIS WARRANTY (WARRANTOR): Campbell Hausfeld / Scott Fetzer Company, 100 Production Drive,
Harrison, Ohio, 45030, Telephone: (800) 543-6400
3. WHO RECEIVES THIS WARRANTY (PURCHASER): The original purchaser (other than for purposes of resale) of the
Campbell Hausfeld product.
4. WHAT PRODUCTS ARE COVERED BY THIS WARRANTY: Any Campbell Hausfeld nailer, stapler, air tool, spray gun,
inflator or air accessory supplied or manufactured by Warrantor.
5. WHAT IS COVERED UNDER THIS WARRANTY: Substantial defects in material and workmanship which occur within the
duration of the warranty period.
6. WHAT IS NOT COVERED UNDER THIS WARRANTY:
A.
Implied warranties, including those of merchantability and FITNESS FOR A PARTICULAR PURPOSE ARE LIMITED
FROM THE DATE OF ORIGINAL PURCHASE AS STATED IN THE DURATION. If this product is used for commercial,
industrial or rental purposes, the warranty will apply for ninety (90) days from the date of purchase. Some States
do not allow limitation on how long an implied warranty lasts, so the above limitations may not apply to you.
B.
ANY INCIDENTAL, INDIRECT, OR CONSEQUENTIAL LOSS, DAMAGE, OR EXPENSE THAT MAY RESULT FROM ANY
DEFECT, FAILURE, OR MALFUNCTION OF THE CAMPBELL HAUSFELD PRODUCT. Some States do not allow the
exclusion or limitation of incidental or consequential damages, so the above limitation or exclusion may not apply
to you.
C.
Any failure that results from an accident, purchaser’s abuse, neglect or failure to operate products in accordance
with instructions provided in the owner’s manual(s) supplied with product. Accident, purchaser's abuse, neglect or
failure to operate products in accordance with instructions shall also include the removal or alteration of any safety
devices. If such safety devices are removed or altered, this warranty is void.
D.
Normal adjustments which are explained in the owner’s manual(s) provided with the product.
E.
Items or service that are normally required to maintain the product, i.e. o-rings, springs, bumpers, debris shields,
driver blades, fuses, batteries, gaskets, packings or seals, fluid nozzles, needles, sandblast nozzles, lubricants,
material hoses, filter elements, motor vanes, abrasives, blades, cut-off wheels, chisels, chisel retainers, cutters,
collets, chucks, rivet jaws, screw driver bits, sanding pads, back-up pads, impact mechanism, or any other
expendable part not specifically listed. These items will only be covered for ninety (90) days from date of original
purchase. Underlined items are warranted for defects in material and workmanship only.
7.
RESPONSIBILITIES OF WARRANTOR UNDER THIS WARRANTY: Repair or replace, at Warrantor’s option, products or
components which are defective, have malfunctioned and/or failed to conform within duration of the warranty period.
8.
RESPONSIBILITIES OF PURCHASER UNDER THIS WARRANTY:
A.
Provide dated proof of purchase and maintenance records.
B.
Deliver or ship the Campbell Hausfeld product or component to the nearest Campbell Hausfeld Authorized Service
Center. Freight costs, if any, must be borne by the purchaser.
C.
Use reasonable care in the operation and maintenance of the products as described in the owner’s manual(s).
9.
WHEN WARRANTOR WILL PERFORM REPAIR OR REPLACEMENT UNDER THIS WARRANTY: Repair or replacement will be
scheduled and serviced according to the normal work flow at the servicing location, and depending on the availability
of replacement parts.
This Limited Warranty applies in the United States, Canada and Mexico only and gives you specific legal rights. You may also
have other rights which vary from state to state or country to country.
Ver la Garantía en página 24 para información importante sobre el uso comercial de este producto.
Sírvase leer y guardar estas instrucciones.Lea con cuidado antes de tratar de armar, instalar, manejar o darle servicio al producto descrito en
este manual. Protéjase Ud. y a los demás observando todas las reglas de seguridad. El no seguir las instrucciones podría resultar en heridas y/o
daños a su propiedad. Guarde este manual como referencia.
Manual de Instrucciones
HDS420
© 2003


