background image

17

MAINTENANCE

NOTE: 

Some commercial air line drying liquids are harmful 

to “O” rings and seals. Do not use these low temperature 
air dryers without checking compatibility.

AIR SUPPLy PRESSURE AND VOLUME

Air volume is as important as air pressure. The air volume 
supplied to the tool may be inadequate because of undersize 
fittings and hoses, or from the effects of dirt and water in the 
system. Restricted air flow will prevent the tool from receiving 
an adequate volume of air, even though the pressure reading 
is  high.  The  results  will  be  a  slow  operation  or  reduced 
driving  power.  Before  evaluating  tool  problems  for  these 
symptoms, trace the air supply from the tool to the supply 
source  for  restrictive  connectors,  low  points  containing 
water and anything else that would prevent full volume flow 
of air to the tool.

REQUIRED DAILy CHECKLIST

 

Disconnect the air supply from the tool and remove all 
fasteners.

 

Check  all  screws,  nuts,  bolts,  and  pins  on  the  tool.  If 
any of these are loose, they must be tightened with the 
appropriate size wrench. 

 

Press  the  workpiece  contact  against  a  workpiece  to 
ensure that it moves smoothly. 

 

With the workpiece contact depressed, pull the trigger. 
The trigger should move smoothly, without binding.

 

While the tool is not loaded, connect the appropriate air 
supply (at 70 psi) to the tool.

 

 Without pulling the trigger, press the workpiece contact 
against  a  workpiece  several  times.  The  tool  must  not 
operate. No air should leak from the tool.

 

With  the  workpiece  contact  not  engaged  on  the 
workpiece, point the tool down and away and pull the 
trigger several times. Hold the trigger in this position for 
a minimum of 5 seconds. The tool must not operate.

 

Press  the  workpiece  contact  firmly  against  the 
workpiece. Pull the trigger. The tool must operate. 

 

With the workpiece contact still depressed, release the 
trigger. The driver must return to its up position.

 

If the tool successfully meets all the requirements in this 
checklist, it is ready for use. Load the proper fasteners 
for the desired application. 

 

Set  the  depth  of  drive  according  to  the 

Drive  Depth 

Adjustment

 section in this manual. Repeat this checklist 

before using the tool each day, or if the tool is dropped 
or damaged in any way.

WARNING: 


When  servicing  use  only  identical  replacement  parts. 
Use  of  any  other  parts  may  create  a  hazard  or  cause 
product damage.

WARNING:

Always wear safety goggles or safety glasses with side 
shields  during  power  tool  operation  or  when  blowing 
dust. If operation is dusty, also wear a dust mask.

WARNING:

Disconnect the tool from the air supply before performing 
maintenance.  Failure  to  do  so  could  result  in  serious 
personal injury.

GENERAL MAINTENANCE

Avoid  using  solvents  when  cleaning  plastic  parts.  Most 
plastics are susceptible to damage from various types of 
commercial solvents and may be damaged by their use. Use 
clean cloths to remove dirt, dust, oil, grease, etc.

WARNING: 

Do not at any time let brake fluids, gasoline, petroleum-
based products, penetrating oils, etc., come in contact 
with  plastic  parts.  Chemicals  can  damage,  weaken  or 
destroy  plastic  which  may  result  in  serious  personal 
injury.

LUBRICATION

Frequent, but not excessive, lubrication is required for best 

performance. Oil for pneumatic fastening tools added through 

the air line connection will lubricate the internal parts. Do 

not  use  detergent  oil  or  additives  as  these  lubricants  will 

cause  accelerated  wear  to  the  seals  and  bumpers  in  the 

tool, resulting in poor tool performance and frequent tool 
maintenance.

COLD WEATHER OPERATION

For cold weather operation, near and below freezing, the 
moisture in the air line may freeze and prevent tool operation. 
We recommend the use of air tool lubricant or permanent 
antifreeze (ethylene glycol) as a cold weather lubricant.

CAUTION: 

Do  not  store  tools  in  a  cold  weather  environment  to 
prevent  frost  or  ice  formation  on  the  tools’  operating 
valves and mechanisms that could cause tool failure.

Summary of Contents for H125BN

Page 1: ...nufactured to Husky s high standard for dependability ease of operation and operator safety When properly cared for it will give you years of rugged trouble free performance WARNING To reduce the risk of injury the user must read and understand the operator s manual before using this product Thank you for buying a Husky product ...

Page 2: ...ntenance 17 Accessories 18 Troubleshooting 18 Warranty 19 Customer Service Information Back Page TABLE OF CONTENTS INTRODUCTION This product has many features for making its use more pleasant and enjoyable Safety performance and dependability have been given top priority in the design of this product making it easy to maintain and operate ...

Page 3: ...arts Keep fingers away from trigger when not driving fasteners to avoid accidental firing Do not overreach Keep proper footing and balance at all times Proper footing and balance enables better control of the tool in unexpected situations Use safety equipment Always wear eye protection Dust mask nonskid safety shoes hard hat or hearing protection must be used for appropriate conditions Do not use ...

Page 4: ... that the tool contains fasteners Do not carry the tool from place to place holding the trigger Accidental discharge could result Always handle the tool with care Respect the tool as a working implement Never engage in horseplay Never pull the trigger unless nose is directed toward the work Keep others a safe distance from the tool while tool is in operation as accidental actuation may occur possi...

Page 5: ... top of other fasteners or with the tool at an overly steep angle as this may cause deflection of fasteners which could cause injury Do not drive fasteners close to the edge of the workpiece as the wood may split allowing the fastener to be deflected possibly causing injury AIR SUPPLY AND CONNECTIONS Do not use oxygen combustible gases or bottled gases as a power source for this tool as tool will ...

Page 6: ...Hands Away Keep hands and body away from the discharge area of the tool The following signal words and meanings are intended to explain the levels of risk associated with this product Indicates an imminently hazardous situation which if not avoided will result in death or serious injury Indicates a potentially hazardous situation which if not avoided could result in death or serious injury Indicat...

Page 7: ...imum air pressure The maximum allowable pressure of the compressed air as specified by the manufacturer for operating a tool Operating control A control that separately or as part of an actuation system can cause the actuation of a tool Single sequential actuation Anactuationsysteminwhichthereismorethanoneoperating control and the operating controls must be activated in a specific sequence to actu...

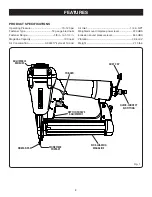
Page 8: ...ne Capacity 100 nails Air Consumption 0 0332 ft3 cycle at 100 psi SIDE loading magazine QUICK CONNECT AIR FITTING DEPTH OF DRIVE ADJUSTMENT ADJUSTABLE EXHAUST trigger workpiece contact Air Inlet 1 4 in NPT Weighted sound impulse power level 97 3 dBA Emission sound pressure level 84 3 dBA Vibration 3 08 m s2 Weight 2 15 lbs NO MAR pad DUST CAP ...

Page 9: ...RIGGER Your brad nailer has a single sequential trigger for precise fastener placement ASSEMBLY UNPACKING This product has been shipped completely assembled n Carefully remove the product and any accessories from the box Make sure that all items listed in the packing list are included n Inspect the product carefully to make sure no breakage or damage occurred during shipping n Do not discard the p...

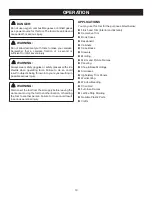
Page 10: ...own into your eyes resulting in possible serious injury WARNING Disconnect the tool from the air supply before leaving the work area moving the tool to another location or handing the tool to another person Failure to do so could result in serious personal injury APPLICATIONS You may use this tool for the purposes listed below Finish and Trim Interior and Exterior Decorative Trim Book Cases Basebo...

Page 11: ...unctioning within the proper range of 70 120 psi dUST CAP See Figure 2 The dust cap helps prevent dust and debris from entering the air fitting Cover the air fitting with the dust cap when storing the tool no MAR pad See Figure 3 4 Theno marpadattachedtothenoseofthetoolhelpsprevent marring and denting when working with softer woods On board storage for the no mar pad is located on the magazine of ...

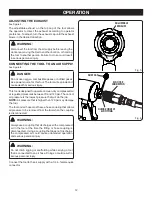
Page 12: ...ressed air at regulated pressures between 70 and 120 psi The correct air pressure is the lowest pressure that will do the job NOTE Air pressure that is higher than 120 psi may damage the tool The tool and air hose must have a hose coupling that allows all pressure to be removed from the tool when the coupling is disconnected WARNING Always use a coupling that discharges all the compressed air in t...

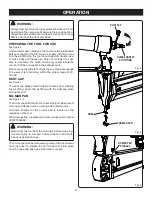
Page 13: ... the tool pointed away from you insert a strip of nails into the magazine Be sure the nails are pointed downward as shown CORRECT NAIL POSITION Nails should always be inserted with the points downward fitting into the nail track or as close as possible to the nail track Nail heads must sit either on the top edge of a rib or inside a track between two ribs Nails heads should never lie on top of a r...

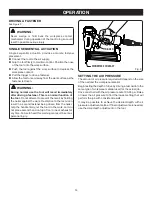
Page 14: ... the recoil by holding the nailer against the work Restriction to the recoil can result in a second fastener being driven from the nailer Grip the handle firmly let the tool do the work and do not place second hand on top of tool or near exhaust at any time Failure to heed this warning can result in serious personal injury OPERATION Fig 9 TRIGGER WORKPIECE CONTACT setting the AIR pressure The amou...

Page 15: ...t the tool to the air supply Drive a test nail after each adjustment until the desired depth is set WARNING Disconnect the tool from the air supply before removing nails Failure to do so could result in serious personal injury removing nails from the tool See Figure 11 Disconnect the tool from the air supply To remove a strip of nails from the tool depress the latch located at the rear of the maga...

Page 16: ...n the tool disconnect the air hose and keep the tool pointed away from you while clearing the jam Disconnect the tool from the air supply Insert a flat blade screwdriver under jammed nail Pry out nail use pliers if necessary Remove the bent fastener Use the flat blade screwdriver to push the driver blade to its top position Reconnect the tool to the air supply Reinstall fasteners and close the mag...

Page 17: ...o its up position If the tool successfully meets all the requirements in this checklist it is ready for use Load the proper fasteners for the desired application Set the depth of drive according to the Drive Depth Adjustment section in this manual Repeat this checklist before using the tool each day or if the tool is dropped or damaged in any way WARNING When servicing use only identical replaceme...

Page 18: ... POSSIBLE CAUSE SOLUTION Air leak near the top of the tool or in the trigger area Loose screws Worn or damaged O rings or seals Tighten screws Install Overhaul Kit Air leak near the bottom of the tool Loose screws Worn or damaged O rings or bumper Tighten screws Install Overhaul Kit Tool does nothing or operates sluggishly Inadequate air supply Inadequate lubrication Worn or damaged O rings or bum...

Page 19: ...in this operator s manual This warranty does not apply to any damage to the One World Technologies Inc product that is the result of improper maintenance or to any One World Technologies Inc product that has been altered or modified The warranty does not extend to repairs made necessary by normal wear or by the use of parts or accessories which are either incompatible with the OneWorldTechnologies...

Page 20: ...rized Service Center MODEL NO AND SERIAL NO The model number of this tool will be found on a plate attached to the air tank Please record the model number and serial number in the space provided below HOW TO ORDER REPAIR PARTS When ordering repair parts always give the following information MODEL NUMBER SERIAL NUMBER H125BN 987000 156 5 24 07 REV 00 OPERATOR S MANUAL 18 GAUGE BRAD NAILER H125BN ON...

Reviews: