
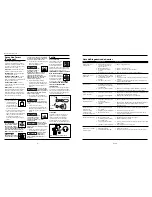
limpiarla con thinner o solvente
adecuados para el material que va a
rociar, para eliminar cualquier tipo
de contaminantes o residuos.
2. Mezcle bien el material según las
instrucciones del fabricante. Si fuera
necesario, adelgace la pintura según
las instrucciones del fabricante.
Cuele el material por un colador de
pintura. Pruebe la consistencia del
material haciendo unos cuantos
pases sobre un pedazo de cartón.
Cerciórese de que el material a rociar
esté limpio y libre de grumos.
3. Llene el envase hasta 3/4 de su
capacidad y encienda el compresor de
aire. Cerciórese de que las mangueras
sean lo suficientemente largas para
permitir el desplazamiento total de la
pistola a lo largo de la superficie que
va a pintar.
4. Cerciórese de que el regulador de la
presión de aire esté fijado al nivel
indicado para el funcionamiento
adecuado de la pistola. Vea las
indicaciones al respecto en la sección
de especificaciones. Oprima el gatillo
y verifique la presión de aire en la
entrada de la pistola.
5. Utilice un pedazo de cartón u otro
material desechable para practicar y
hacer los ajustes necesarios antes de
comenzar a pintar.
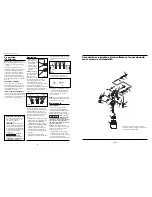
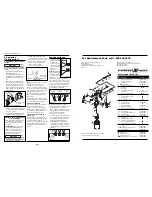
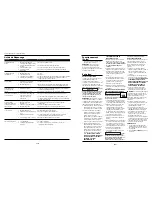
La Figura 3 le muestra cómo conectar
la pistola cuando vaya a usar un
tanque de pintura a presión. Vea las
instrucciones suministradas con el
tanque acerca de cómo conectarlo y
usarlo.
NO USE UN TANQUE DE
PINTURA ANTES DE LEER LAS
INSTRUCCIONES
.
Prepare la pistola para usarla con el
tanque de pintura de la siguiente
manera:
1. Desconéctele el envase.
2. Desconéctele el tubo de material.
3. Después de desconectar el tubo,
busque la tuerca de bronce y sáquela
con un dado hex de 14 mm.
4. Desconecte la parte superior del
envase y el empaque.
5. Conecte la manguera de material del
tanque de pintura a la pistola
pulverizadora.
6. La perilla de la válvula de
presión/sifón se debe apretar en el
mismo sentido de las agujas del reloj
(dirección S) cuando haga las
conexiones mostradas en la Figura 3
para usar un tanque de pintura a
presión. Ésto evitará la fuga de aire a
través del orificio de la válvula del
envase cuando no lo esté usando.
Preparacion
PREPARACION DEL MATERIAL
1. Antes de comenzar a utilizar la
pistola pulverizadora deberá
21 Sp
Instalación
(Continuación)
materiales que no sean espesos tales
como lacas y esmaltes sintéticos. Este
método es mejor para trabajos de
acabado finos.
ESTAS BOQUILLAS SE
PUEDEN USAR CON SISTEMAS DE
SIFON O PRESION.
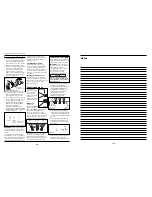
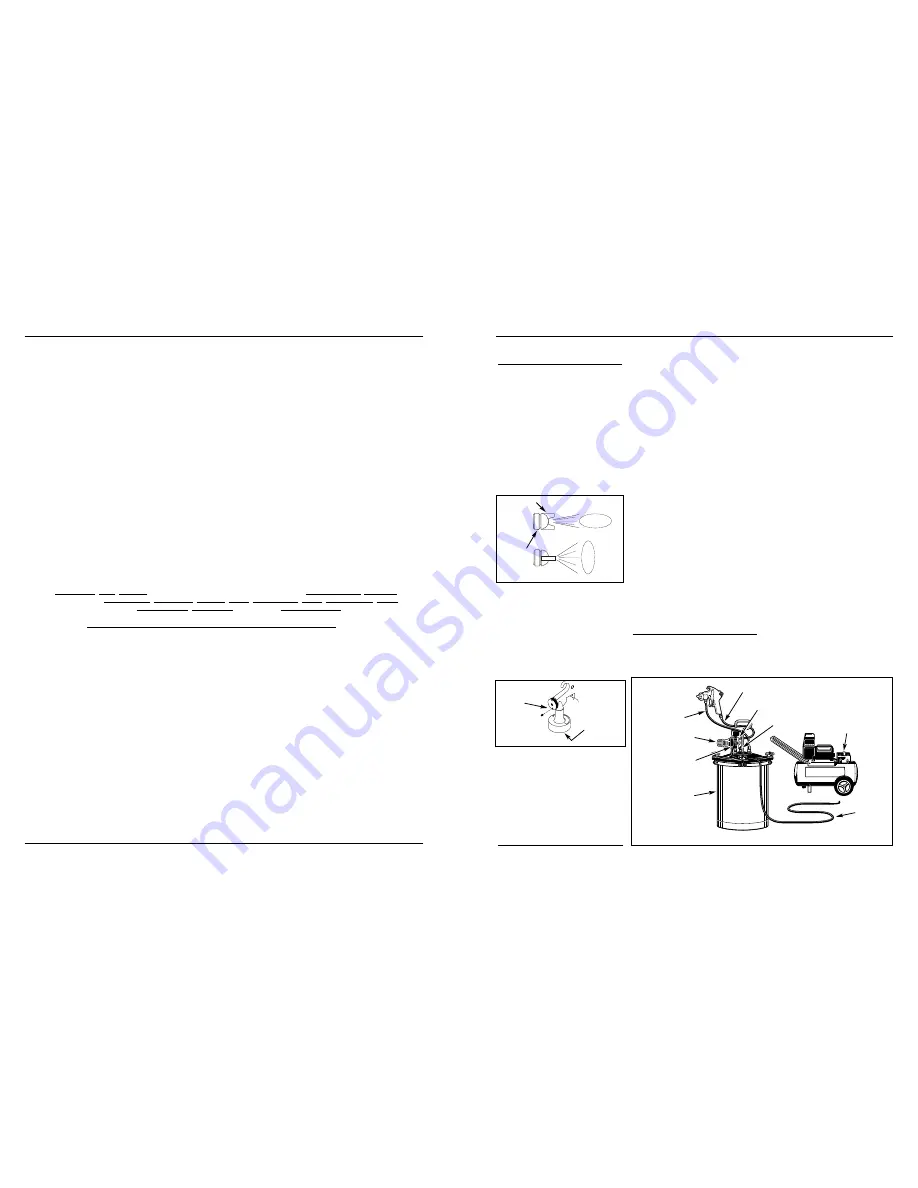
DIRECCION DEL MOVIMIENTO
La dirección del movimiento
(horizontal o vertical) se puede
cambiar con sólo aflojar el anillo de
seguridad y girar la boquilla de aire 90
grados (Vea la Figura 1). Apriete el
anillo con la mano después de cambiar
la dirección.
ALIMENTACION DEL FLUIDO
Este modelo se puede usar con los
sistemas a presión o de sifón. Viene de
fábrica lista para usarse con el sistema
de sifón, pero debe revisarla antes de
usarla para cerciorarse de que esté lista
para funcionar con el método deseado.
Para hacer el cambio de un método a
otro sólo debe girar completamente la
perilla lateral (Vea la Figura 2).
PARA USAR UN TANQUE DE
PINTURA A PRESION
Este modelo puede adaptarse
fácilmente para uso con un tanque de
pintura presurizado. Ésto le permite
aplicar grandes cantidades de pintura
continuamente sin necesidad de parar.
Igualmente, le permite usar la pistola
en CUALQUIER posición sin que la
pintura se derrame.
Figura 1
Movimiento
Horizontal
Movimiento Vertical
Boquilla de
Aire
Anillo de
Seguridad
Figura 3 - Conexiones del Tanque de Pintura
Regulador del Tanque
de Pintura
Válvula de Seguridad
Manguera de Aire
Tanque de
Pintura
Manguera
de Material
Manguera
de Aire
Salida de Alta Presión Hacia
la Pistola Pulverizadora
Entrada de Alta
Presión Desde el
Compresor
Regulador de la
Fuente de
Suministro de Aire
Coloque
el tornillo
en el
orificio
inferior
Desconéctelo
del extremo
inferior de la
parte superior
del tanque
Figura 2
8
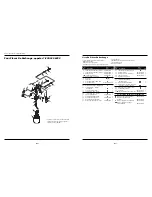
Multi-Purpose Spray Gun
Limited Warranty - Husky Spray Gun by Campbell Hausfeld
1.
DURATION: From the date of purchase by the original purchaser as follows: Standard Duty Products - One Year.
2.
WHO GIVES THIS WARRANTY (WARRANTOR): Campbell Hausfeld / Scott Fetzer Company, 100 Production Drive,
Harrison, Ohio, 45030, Telephone: (800) 543-6400
3. WHO RECEIVES THIS WARRANTY (PURCHASER): The original purchaser (other than for purposes of resale) of the
Campbell Hausfeld product.
4. WHAT PRODUCTS ARE COVERED BY THIS WARRANTY: Any Campbell Hausfeld nailer, stapler, air tool, spray gun,
inflator or air accessory supplied or manufactured by Warrantor.
5. WHAT IS COVERED UNDER THIS WARRANTY: Substantial defects in material and workmanship which occur within the
duration of the warranty period.
6. WHAT IS NOT COVERED UNDER THIS WARRANTY:
A.
Implied warranties, including those of merchantability and FITNESS FOR A PARTICULAR PURPOSE ARE LIMITED
FROM THE DATE OF ORIGINAL PURCHASE AS STATED IN THE DURATION. If this product is used for commercial,
industrial or rental purposes, the warranty will apply for ninety (90) days from the date of purchase. Some States
do not allow limitation on how long an implied warranty lasts, so the above limitations may not apply to you.
B.
ANY INCIDENTAL, INDIRECT, OR CONSEQUENTIAL LOSS, DAMAGE, OR EXPENSE THAT MAY RESULT FROM ANY
DEFECT, FAILURE, OR MALFUNCTION OF THE CAMPBELL HAUSFELD PRODUCT. Some States do not allow the
exclusion or limitation of incidental or consequential damages, so the above limitation or exclusion may not apply
to you.
C.
Any failure that results from an accident, purchaser’s abuse, neglect or failure to operate products in accordance
with instructions provided in the owner’s manual(s) supplied with product. Accident, purchaser's abuse, neglect or
failure to operate products in accordance with instructions shall also include the removal or alteration of any safety
devices. If such safety devices are removed or altered, this warranty is void.
D.
Normal adjustments which are explained in the owner’s manual(s) provided with the product.
E.
Items or service that are normally required to maintain the product, i.e. o-rings, springs, bumpers, debris shields,
driver blades, fuses, batteries, gaskets, packings or seals, fluid nozzles, needles, sandblast nozzles, lubricants,
material hoses, filter elements, motor vanes, abrasives, blades, cut-off wheels, chisels, chisel retainers, cutters,
collets, chucks, rivet jaws, screw driver bits, sanding pads, back-up pads, impact mechanism, or any other
expendable part not specifically listed. These items will only be covered for ninety (90) days from date of original
purchase. Underlined items are warranted for defects in material and workmanship only.
7.
RESPONSIBILITIES OF WARRANTOR UNDER THIS WARRANTY: Repair or replace, at Warrantor’s option, products or
components which are defective, have malfunctioned and/or failed to conform within duration of the warranty period.
8.
RESPONSIBILITIES OF PURCHASER UNDER THIS WARRANTY:
A.
Provide dated proof of purchase and maintenance records.
B.
Deliver or ship the Campbell Hausfeld product or component to the nearest Campbell Hausfeld Authorized Service
Center. Freight costs, if any, must be borne by the purchaser.
C.
Use reasonable care in the operation and maintenance of the products as described in the owner’s manual(s).
9.
WHEN WARRANTOR WILL PERFORM REPAIR OR REPLACEMENT UNDER THIS WARRANTY: Repair or replacement will be
scheduled and serviced according to the normal work flow at the servicing location, and depending on the availability
of replacement parts.
This Limited Warranty applies in the United States, Canada and Mexico only and gives you specific legal rights. You may
also have other rights which vary from state to state or country to country.


