


Operating Instructions
Instructions d’Utilisation
Manual de Instrucciones
19
Notes
Notas
2
Operating Instructions
General Safety
Information
(Continued)
2. Follow all local electrical and safety
codes as well as in the United States,
the National Electrical Codes (NEC)
and Occupational Safety and Health
Act (OSHA).
Use a face mask/respira-
tor and protective
clothing when spraying.
Always spray in a well
ventilated area to pre-
vent health and fire hazards. Refer to
Material Safety Data Sheets (MSDS) of
spray material for details.
Never spray closer than
25 feet to the compres-
sor! If possible, locate
compressor in separate
room. Never spray into the compressor,
compressor controls or the motor.
3. Do not smoke or eat when spraying
paint, insecticides, or other flamma-
ble substances.
Do not spray flammable
materials in vicinity of
open flame or near igni-
tion sources. Motors, electrical equip-
ment and controls can cause electrical
arcs that will ignite a flammable gas or
vapor. Never store flammable liquids
or gases in the vicinity of the compres-
sor.
4. When spraying and cleaning, always
follow the instructions and safety
precautions provided by the material
manufacturer (Refer to MSDS).
Do not spray acids,
corrosive materials,
toxic chemicals, fertilizers or pesticides.
Using these materials could result in
death or serious injury.
5. Keep visitors away and NEVER allow
children or pets in the work area.
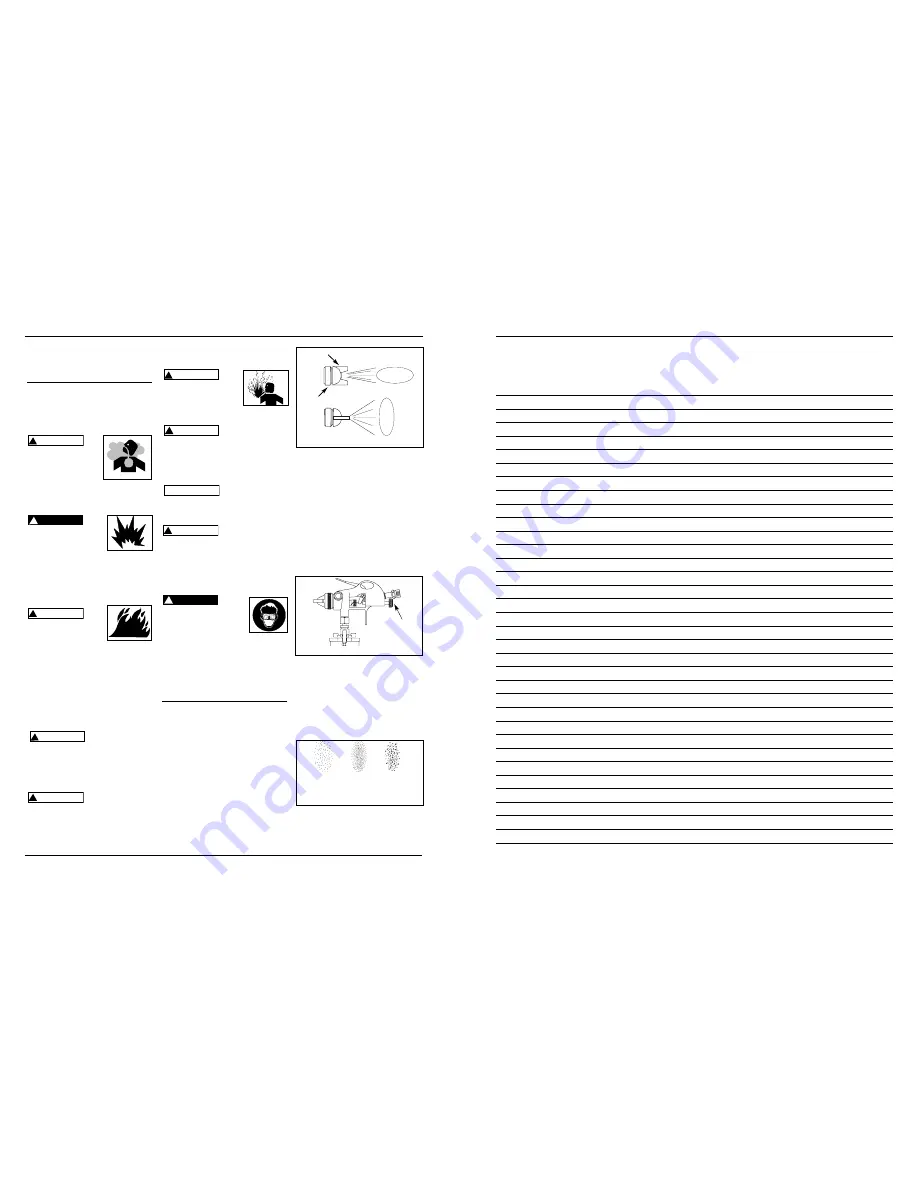
Never aim or
spray at yourself or
anyone else or serious injury could
occur.
6. Always work in a clean environment.
To avoid injury and damage to the
!
WARNING
!
WARNING
!
WARNING
!
DANGER
!
WARNING
workpiece, do not aim the spray gun
at any dust or debris.
Do not use pressure that
exceeds the operating
pressure of any of the
parts (hoses, fittings,
etc.) in the painting system.
Keep hose away
from sharp objects.
Bursting air hoses may cause injury.
Examine air hoses regularly and replace
if damaged.
7. Always use a pressure regulator on
the air supply to the spray gun.
Failure to install
appropriate
water/oil removal equipment may
result in damage to machinery or work-
piece.
Do not misuse this
product. Excessive
exposure to vibration, work in awk-
ward positions, and repetitive work
motions can cause injury to hands and
arms. Stop using any tool if discomfort,
numbness, tingling, or pain occur, and
consult a physician.
CALIFORNIA PROPOSITION 65
You can create dust when
you cut, sand, drill or grind
materials such as wood,
paint, metal, concrete,
cement, or other masonry. This dust
often contains chemicals known to
cause cancer, birth defects, or other
reproductive harm. Wear protective
gear.
Preparation
1. Thoroughly mix the paint in accor-
dance with the manufacturer’s
instructions, adding thinner where
necessary. Most materials will spray
readily if thinned properly. Strain
material through cheese cloth or a
paint strainer. Test the consistency of
the material by making a few strokes
on a cardboard target. If material still
appears too thick, add a small amount
of thinner. THIN WITH CARE!!
2. Fill the canister about 3/4 full and
start the air compressor.
3. Set up a piece of cardboard or other
scrap material to use as a target and
adjust for best spray pattern.
!
DANGER
!
WARNING
!
NOTICE
!
CAUTION
!
WARNING
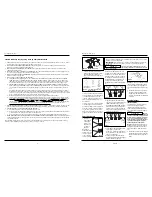
FAN DIRECTION
The direction of the fan (horizontal or
vertical) can be changed by loosening
the lock ring and turning the air cap 90
degrees (See Figure 1). Hand tighten
lock ring after adjustment.
PATTERN ADJUSTMENT
1. Adjust air pressure to the spray gun
according to the recommendations
supplied with the spray material. This
air pressure usually falls between 40 -
60 PSI. Adjust air pressure with the
trigger pulled.
2. Turn fluid control knob fully clock-
wise until closed.
3. Trigger a short burst while turning
fluid control knob counterclockwise.
Observe the spray pattern on the tar-
get and adjust the fluid control knob
until the desired pattern (atomiza-
tion) is obtained.
If the spray is too fine (excessive over-
spray), caused by too much air for the
amount of paint being sprayed, reduce
Figure 1
Horizontal Fan
Vertical Fan
Air Cap
Lock Ring
Figure 2 - Adjustment on Spray Gun
Fluid Control
Knob
Correct
Paint too
coarse
Paint too
fine
Figure 3 - Pattern Consistency
(Atomization)
;;;;;;
;;;;;;
;;;;;;
;;;;;;
;;;;;;


