


Manual de Instrucciones
17 Sp
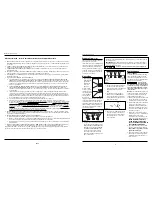
Acumulación de
pintura a la
derecha o izquier-
da
Acumulación de
pintura en la parte
superior o inferior
Acabado
disparejo
Acumulación de
pintura en el cen-
tro
Rocío salpicado
Fuga de fluído a través de
la tuerca de empaque de la
aguja
El aire se fuga a través de la
boquilla de aire aún sin
apretar el gatillo
El fluído se fuga a través de
la boquilla de la pistola pul-
verizadora a presión
Rocío excesivo
No puede rociar
Guía de Diagnóstico de Averías
Problema
Posible(s) Causa(s)
Acción a Tomar
1. Los orificios a los lados de la boquilla
de aire están tapados
2. Acumulación de impurezas a los lados
de la boquilla
1. Acumulación de material reseco en la
parte superior o inferior de la boquilla
2. La boquilla de aire está floja o el asien-
to está sucio
3. La boquilla de aire está obstruída
1. El control de fluído está muy bajo
2. Está atomizando demasiado aire
1. El material está muy espeso
2. La presión de atomización es muy baja
1. El nivel de material es muy bajo
2. El envase está muy inclinado
3. La conexión del suministro de fluído
está floja
4. La boquilla o el asiento están flojos o
dañados
5. La tuerca que sostiene el empaque de
la aguja está floja o dañada
6. El orificio de ventilación está obstruído
1. La tuerca que sostiene el empaque está
floja
2. El empaque está desgastado o seco
1. El vástago de la válvula se atasca
2. La válvula de aire o el asiento están conta-
minados
3. La válvula de aire o el asiento están des-
gastados o dañados
4. El resorte de la válvula de aire está roto
5. El vástago de la válvula está torcido
1. La tuerca que sostiene el empaque está
muy apretada
2. La boquilla está desgastada o dañada
3. La boquilla está sucia
4. El resorte de la aguja está roto
1. La presión de atomización es muy alta
2. La pistola está muy lejos de la superfi-
cie
3. Está pintando incorrectamente (está
moviendo la pistola muy rápido)
1. La pistola no tiene presión
2. El control de fluído está muy cerrado
3. El fluído está muy espeso
1. Límpielos. Use sólo pintura no metálica
2. Límpiela
1. Límpiela
2. Límpiela y apriétela
3. Límpiela. Use sólo pintura no metálica
1. Aumente el nivel de fluído
2. Reduzca la presión de atomización
1. Diluya el material hasta alcanzar la viscosidad adecuada
2. Aumente la presión de atomización
1. Añádale más material
2. Colóquelo más derecho
3. Apriétela
4. Ajústela o reemplácela
5. Lubríquela o apriétela
6. Destápelo
1. Apriétela, pero sin restringir la aguja
2. Reemplácela o lubríquela (con aceite sin silicón)
1. Lubríquelo
2. Límpielos
3. Reemplácela
4. Reemplácela
5. Reemplácela
1. Ajústela
2. Reemplace la boquilla y aguja con un juego de boquilla/aguja
ondeados
3. Límpiela
4. Reemplácela
1. Reduzca la presión
2. Acérquela a la superficie
3. El movimiento debe ser moderado y paralelo a la superficie
1. Revise las líneas de aire
2. Abra el control de fluído
3. Diluya el fluído o use el sistema a presión
4
Operating Instructions
Maintenance
(Cont.)
6. Use a non-silicone oil on all moving
parts when reassembling. Use
Vaseline
®
or light grease on all thread-
ed connections prior to storage.
7. Clean and flush gun thoroughly to
neutralize any contaminants corro-
sive to the spray gun.
PERIODIC CLEAN-UP
Due to improper cleaning and paint it
may be necessary to inspect and clean
the internal parts and the gun body.
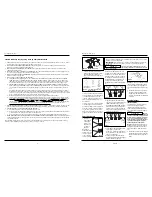
1. Examine openings in air cap and
fluid tip. If clogged, remove any o-
rings and soak the air cap or fluid tip
in solvent.
2. A brush or toothpick or something
similar may be used to dislodge the
dried paint from holes and passages.
NEVER USE METAL OBJECTS TO
CLEAN PRECISELY DRILLED PAS-
SAGES. DAMAGED PASSAGES
WILL CAUSE IMPROPER SPRAYING.
3. Remove and check the adjusting nee-
dle for excessive wear at the tip and
straightness.
IMPORTANT:
If the needle tip is worn
more on one side than the other,
either the needle is bent or the gun
body has been dropped or knocked
out-of-line. There are no adjustments
that can be made to a bent gun body.
Test the needle by rolling on a flat sur-
face. Replace if necessary.
4. Check and replace any damaged o-
rings and seals. O-rings and seals can be
wiped clean but not soaked in solvent.
5. Unscrew packing nuts and replace
the packing ONLY if a leak will not
stop when the nut is tightened. Do
not over-tighten a packing nut
because this will restrict movement
of the needle.
6. Re-assemble in reverse order of
above and use a non-silicone oil on
moving parts. Apply Vaseline
®
or
light grease on threaded joints and
hose connections.
STORING
1. When not using spray gun, turn the
fluid adjustment knob counterclock-
wise to open which will reduce
spring tension on needle fluid tip.
2. Spray gun
MUST BE
well cleaned
and lightly lubricated.
Notes


