6
Operating Instructions
MOISTURe In COMpReSSeD AIR
Moisture in compressed air will form
into droplets as it comes from an air
compressor pump . When humidity is high
or when a compressor is in continuous
use for an extended period of time, this
moisture will collect in the tank . When
using a paint spray or sandblast gun,
this water will be carried from the tank
through the hose, and out of the gun as
droplets mixed with the spray material .
IMpORTAnT:
This condensation will cause
water spots in a paint job, especially when
spraying other than water based paints . If
sandblasting, it will cause the sand to cake
and clog the gun, rendering it ineffective .
A filter in the air line, located as near to
the gun as possible, will help eliminate
this moisture .
Operation
START-Up / BReAk-In pROCeDURe
Do not attach air
tools to open end of
the hose until start-up is completed and
the unit checks Ok.
Never disconnect
threaded joints with
pressure in tank!
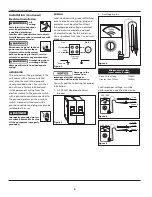
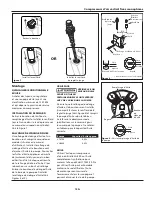
1 . Remove cap from oil fill opening .
Fill pump to the proper oil level (see
Figure 10) . Install breather (found
in parts bag with this manual or
hanging from cylinder) .
2 . Open the tank drain valve . Turn
outlet valve to open air flow .
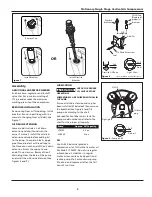
3 . Move pressure switch lever or knob
to the OFF position and plug in
power cord . Move pressure switch
to the AUTO position to run the unit
(see Figure 11) .
4 . Run the unit for 30 minutes at zero
(0) psi (under no load) to break in
pump parts .
5 . Move the pressure switch lever or
knob to OFF and turn tank drain
valve to shut off air flow . The
compressor is now ready for use .
Maintenance
Disconnect, tag and lock out
power source, then release
all pressure from the system
before attempting to install, service,
relocate or perform any maintenance.
All repairs should be performed by an
authorized service representative .
FOR eFFICIenT OpeRATIOn:
Perform the following maintenance
schedule .
1 . Maintain proper oil level . Refer to
Lubrication section for details .
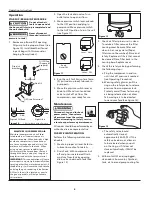
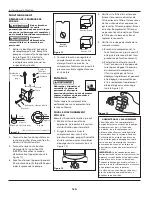
2 . Drain Tank . With compressor shut
off and pressure released: Drain
moisture from tank by opening
drain valve underneath tank (See
Figure 12) .
3 . Check air filter to be sure it is clean .
To service a filter, remove the filter
housing cover . Remove filter and
clean in hot, soapy water (Paper
filters cannot be washed) . Rinse and
let dry . Replace air filters that cannot
be cleaned . Place filter back in the
housing base . Replace cover .
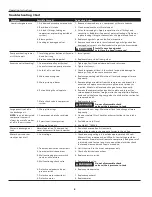
4 . Check the safety valve by performing
the following steps:
a . Plug the compressor in and run
until shut off pressure is reached
(see Operating Procedure) .
b . Wearing safety glasses, pull the
ring on the safety valve to release
pressure from compressor tank .
Protect yourself from fast-moving
air being released; do not allow
fast-moving air to be directed
toward your face (See Figure 13) .
c . The safety valve should
automatically close at
approximately 40-50 PSI . If the
safety valve does not allow air
to be released when you pull
on the ring, or if it does not
close automatically, it MUST be
replaced .
5 . With motor OFF and unplugged,
clean debris from motor, flywheel,
tank, air lines and pump cooling fins .
AU
TO / OFF
Figure 11
Knob
Auto/Off
Lever - Auto
Lever - Off
Figure 13
Dipstick
Breather
Add Oil
Oil Drain Extension*
Cap*
Full
Add
Low
Max
Dipstick Oil Read
Full
Add
Sight Glass
* Not included with all models.
Oil Fill Cap
(Dispose of
properly)
Breather
OR
Figure 10
Figure 12
Summary of Contents for VT631402
Page 31: ...31 Notes Notas...


