3 Sewing Mode
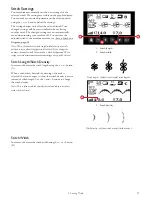
Sewing mode is the first view on the display after you turn on
the machine without the embroidery unit connected. Here
you will find the basic information you need to start sewing.
This is also where you adjust the settings of your stitch.
Straight stitch is selected by default.
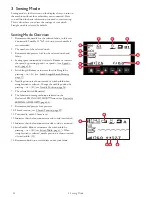
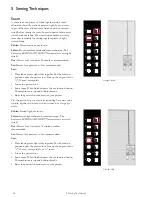
Sewing Mode Overview
1. Recommended needle for the selected fabric, in this case
a universal 80 needle. If "Str" is shown, stretch needle is
recommended.
2. The number of the selected stitch.
3. Recommended presser foot for the selected stitch and
fabric.
4. Sewing speed indicated by five levels. Reduce or increase
the speed by pressing speed + or speed – (see Speed +
and –, page 26).
5. Stitch length. Reduce or increase the stitch length by
pressing – or +(A) (see Stitch Length/Stitch Density,
page 37).
6. Needle position is shown instead of stitch width when
straight stitch is selected. Change the needle position by
pressing – or + (B) (see Needle Position, page 38)
7. The selected stitch illustrated.
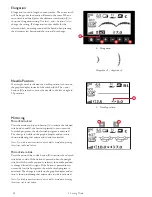
8. The fabric and sewing technique selected on the
Exclusive SEWING ADVISOR™ feature (see Exclusive
SEWING ADVISOR™, page 35).
9. Recommended presser foot pressure.
10. Thread tension (see Thread Tension, page 29)
11. Twin needle, width 2.0mm is set.
12. Indicates that the function mirror end to end is activated.
13. Indicates that the function mirror side to side is activated.
14. Stitch width. Reduce or increase the stitch width by
pressing – or + (B) (see Stitch Width, page 37). When
straight stitch is selected, needle position is shown instead
of stitch width. (23)
15. Recommendation to use stabilizer under your fabric.
32
3 Sewing Mode
Summary of Contents for Designer Jade 35
Page 1: ...User s Guide KEEPING THE WORLD SEWING ...
Page 82: ......


