background image

9:2

available MeMory

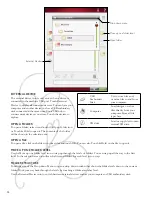
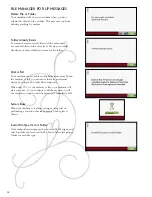
The built-in memory can store designs, fonts, stitches and other files. To check how much memory is still available in the 

built-in memory, go into File Manager, touch Quick Help and then touch either My Designs, My Fonts or My Files. A pop-

up message shows how much memory is available.

file Manager

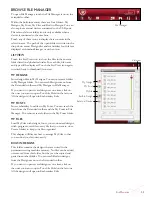
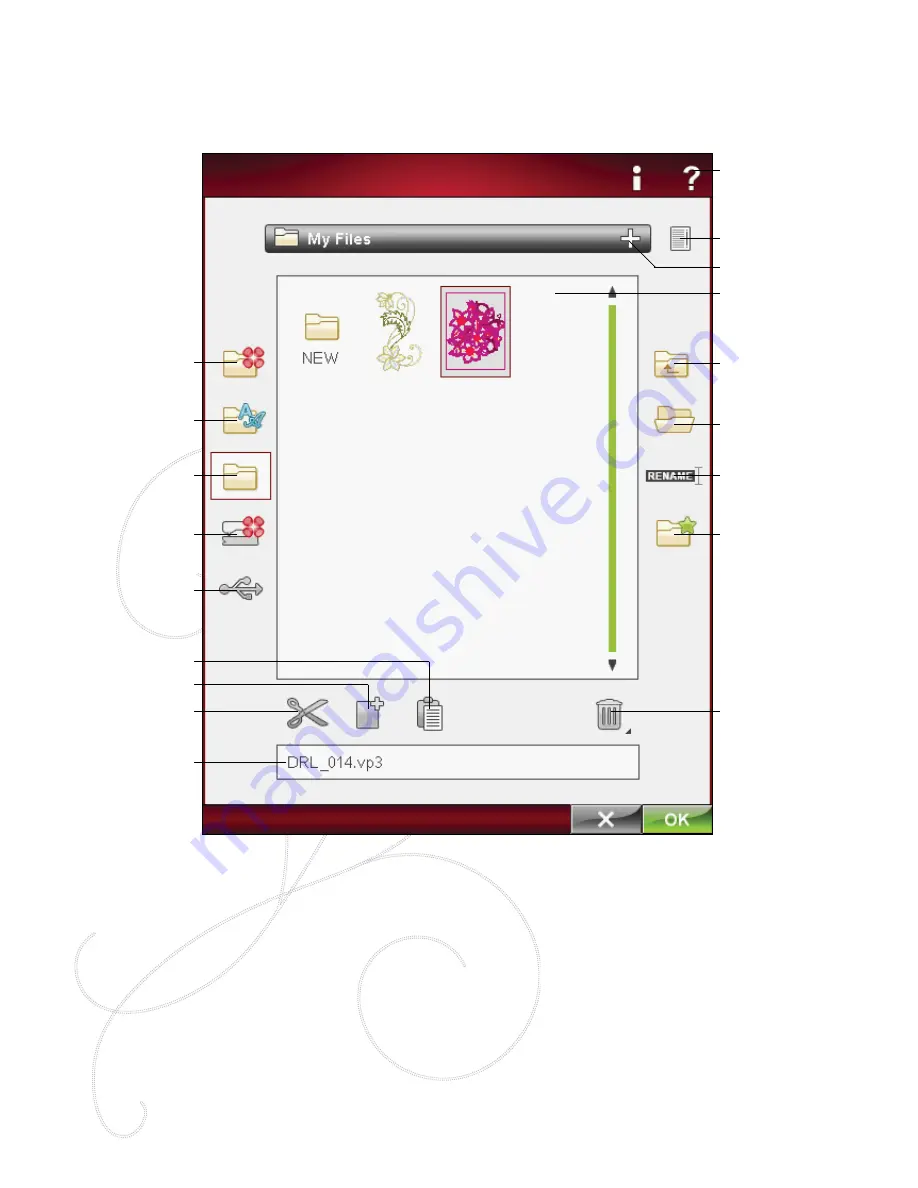
The File Manager is used to open, organize, add, move, remove and copy your designs, fonts and stitch files. Use either 

built-in memory or an external device connected to your machine for storing designs and files. 

My Files

My Fonts

My Designs

Built-in Designs

External Devices

Cut

Copy

Paste

Delete

Move up one folder

Open folder

Rename a file or 

folder

Create new folder

Name of selected file

Drop down menu

List view

Quick Help

Selection Area

file Manager - overview of iCons

file forMaTs

Your machine can load the following file formats:
•  .SHV, .DHV, .VP3, .VIP, .HUS, .PEC, .PES, .PCS, .XXX, .SEW, .JEF, 

.EXP, .10* and .DST (embroidery files)

•  .SH7 (stitch files),
•  .VF3 (embroidery font files) 
•  and also .TXT and .HTM/HTML-files.

Note: If  the file type or file version is not supported by your machine, or the file is 

damaged, it is shown in the selection area as an 

unrecognized file.

Summary of Contents for Designer Ruby Deluxe

Page 1: ...User s Guide KEEPING THE WORLD SEWING ...

Page 2: ...fingers away from all moving parts Special care is required around the sewing machine needle Always use the proper needle plate The wrong plate can cause the needle to break Do not use bent needles Do not pull or push fabric while stitching It may deflect the needle causing it to break Wear safety glasses Switch the sewing machine off 0 when making any adjustment in the needle area such as threadi...

Page 3: ...Settings Functions 3 1 Large Interactive Screen 3 2 Common Icons Functions 3 2 OK 3 2 Cancel 3 2 Touch Hold 3 2 Toolbar 3 2 Start Menu 3 2 Sewing Embroidery Mode 3 2 Quick Help 3 3 Extended toolbar 3 3 Stitch Menu 3 3 How to Select a Stitch 3 3 Font Menu 3 3 Selecting a Font 3 3 Design Menu 3 4 Selecting a Design 3 4 EMBROIDERY ADVISOR 3 4 File Manager 3 4 SET Menu 3 5 Stitch Settings 3 5 Sewing S...

Page 4: ...rder of selected design 7 7 Touch functions 7 8 Undo 7 9 Redo 7 9 Mirror Side to Side and End to End 7 9 Delete 7 9 Duplicate 7 9 How to select designs 7 10 Advanced selection 7 10 Program Embroidery fonts 7 11 Embroidery Edit Pop up messages 7 12 Embroidery Stitch Out 8 1 To enter Embroidery Stitch Out 8 2 Embroidery Stitch Out Overview of icons 8 2 Design Positioning 8 3 Design Positioning Exerc...

Page 5: ...Getting to knowyour machine 1 ...

Page 6: ...anel 14 Main spool pin 15 Bobbin winding thread guide 16 Auxiliary spool pin 17 Bobbin winder 18 Thread cutter for bobbin winding 19 Bobbin winder lever 20 Handwheel 21 Large Interactive Screen 22 Built In USB ports 23 Stylus holder 24 ON OFF switch connectors for power cord and foot control Rear Side 25 Handle 26 Free arm 27 Embroidery unit connection socket Needle Area 28 Sensor One Step Buttonh...

Page 7: ...Embroidery unit release button underside 38 Embroidery arm 39 Embroidery hoop attachment 40 Level adjustment feet 41 Embroidery unit socket Accessories Included Accessories 42 Stylus 43 Thread net 44 Edge Quilting guide 45 Felt pad 2 46 USB embroidery stick 1 GB 47 Screwdriver 48 Seam ripper 49 Brush 50 2 spool caps large 1 attached on the machine at delivery 51 Spool cap medium attached on the ma...

Page 8: ...s cording for corded buttonholes Blindhem Foot D This foot is used for blindhem stitches The inner edge of this foot guides the fabric The right toe of the foot is designed to ride along the hem edge 7 Zipper Foot E This foot can be snapped on either to the right or to the left of the needle This makes it easy to sew both sides of the zipper Move needle position to right or left to sew closer to z...

Page 9: ...tive Stitch Foot B Transparent A clear foot for decorative sewing makes it easy to match stitches Same tunnel on the underside as Presser Foot B 7 Sensor One Step Buttonhole Foot Plug into the machine then enter the desired buttonhole length to sew Sensor One Step Buttonholes The middle mark measures a 5 8 15 mm from fabric edge Self Adhesive Glide Plates Used for Presser Foot C Sensor One Step Bu...

Page 10: ... Zigzag For overcasting mending sewing on patches and elastics on loosely woven fabrics A A16 Overcast Stitch Seam and overcast in one step along the edge or trim later For light stretch and non stretch fabrics J A17 Stretch Seam Overcast Stitch Seam and overcast in one step along the edge or trim later For medium and medium heavy stretch fabrics B A18 Double Overlock Stitch Seam and overcast in o...

Page 11: ...inforced Darning Stitch Darn and mend work clothes jeans table cloths and linen towels Stitch over hole touch reverse for continuous darning and auto stop A A33 Bartack Manual Reinforce pockets shirts openings belt loops as well as at lower end of a zipper B A34 Gathering Stitch For gathering A A35 Belt Loop Stitch For securing belt loops A A36 Three Step Zigzag For overcasting mending sewing on p...

Page 12: ...s buttonholes increase length and width of the buttonhole Use thicker thread Sensor Buttonh Foot C B7 Rounded Heirloom Buttonhole For hand look on fine and delicate fabrics Sensor Buttonh Foot C B8 Keyhole Buttonhole Square end for tailored jackets coats etc Sensor Buttonh Foot C B9 Heavy Duty Buttonhole With reinforced bartacks Sensor Buttonh Foot C B10 Leather Buttonhole Straight Stitch For leat...

Page 13: ... 1 13 C Pictogram Stitches Pictogram satin elements to program original satin stitch designs D Heirloom Stitches For hemstitching smocking and sewing on lace and trims E Quilt Stitches Stitches for all types of quilting techniques ...

Page 14: ...othes and projects H Scallop Stitches Create scallop details and finish edges with beautiful scallop stitches J Vintage Stitches A selection of quilt stitches for crazy patch quilting and decorative stitching F Appliqué Stitches For sewing appliqués with different effects ...

Page 15: ...ited number of combinations Stitches are formed with side motion The stitch width can be up to 40 mm wide or more L Decorative Stitches For decorative sewing M Crafting Stitches For decorative stitches to embellish crafts N Fashion Stitches Fashion stitches to decorate clothing and accessories ...

Page 16: ...g and patching using the free arm T 8 way Stitches Straight stitch and reinforced straight stitch in eight different directions without turning the fabric U My Stitches Save your own personally adjusted and favorite stitches and stitch programs ...

Page 17: ...ty Stitches Sew special techniques including candlewicking and edging Extra accessories may be needed Use Quick Help for detailed information Block Alphabet Outline block Alphabet Z Decorative Tapering Stitches Decorative stitches with tapering ...

Page 18: ...1 18 Script Alphabet Cyrillic Alphabet Hiragana Alphabet Brush Line Alphabet ...

Page 19: ...2SET UP ...

Page 20: ...nnect the power cord to the rear socket on the bottom right side of the machine 2 3 Press the ON OFF switch to ON to turn on power and light 3 For the USA and Canada This sewing machine has a polarized plug one blade wider than the other To reduce the risk of electric shock this plug is intended to fit in a polarized outlet only one way If the plug does not fit fully in the outlet reverse the plug...

Page 21: ...e spool cap and the thread spool Vertical Position Lift the spool pin up and all the way to the right Lock the spool pin in the vertical position by slightly pressing it down Slide on the large spool cap For spools smaller than the medium size spool cap or when using specialty threads place a felt pad under the thread spool to prevent the thread from reeling off too fast For larger spools the felt...

Page 22: ...hread the needle automatically The needle must be in the up position to use the Built In needle threader We also recommend lowering the presser foot 1 Use the handle to pull the needle threader all the way down The threader hook G swivels through the needle eye 2 Place the thread from the back over the hook F and under the thread hook G 3 Let the needle threader gently swing back The hook pulls th...

Page 23: ...ol should rotate in a counterclockwise direction when the thread reels off the spool 6 RIGHT NEEDLE Thread the machine as before but this thread should lie between the right thread tension discs A and outside the needle thread guide B Thread the right needle manually Note Activate and choose the correct needle width in Sewing Settings in SET Menu to prevent damage on the needle or the presser foot...

Page 24: ... of the thread firmly when starting to wind Once the bobbin begins to wind cut the excess thread Note It is important that you cut the thread end close to the bobbin When the bobbin is full the bobbin winder lever will move back and the winding will stop automatically The pop up message closes Remove the bobbin and cut the thread using the bobbin winding thread cutter Winding Specialty Threads We ...

Page 25: ... thread cutter Note Make sure that the thread does not touch the cap of the horizontal spool pin when winding the bobbin If it does place the cap and spool higher on the vertical spool pin Inserting the Bobbin 1 Remove the bobbin cover by sliding it towards you 2 Place the bobbin in the bobbin case It drops in only one way with the logo facing up The thread unreels from the left of the bobbin The ...

Page 26: ... Universal Needle A Universal needles have a slightly rounded point and come in a variety of sizes For general sewing in a variety of fabric types and weights Stretch Needle B Stretch needles have a special scarf to eliminate skipped stitches when there is a flex in the fabric For knits swimwear fleece synthetic suedes and leathers Embroidery Needle C Embroidery needles have a special scarf a slig...

Page 27: ...tabilizers are used with stable woven fabrics Place underneath fabric for decorative stitching or hoop with the fabric when embroidering Tear away excess stabilizer after stitching Iron on Tear Away Iron on tear away is a totally stable stabilizer that has a slick side that will iron on to fabric It is recommended for knits and all unstable fabrics Fuse it to the wrong side of the fabric before de...

Page 28: ...ed in this port Connect the other end of the cable to your PC Note Install the Embroidery Machine Communication CD before connecting the machine to your PC To remove carefully pull the USB embroidery stick or the plug of the USB cable out straight Using the USB embroidery stick The External Device icon in File Manager is only activate when a device is connected to the machine USB port When loading...

Page 29: ...mbroidery Machine Communication Software option from the menu 4 Follow the instructions in the Installation Wizard When asked to enter your Installation Code enter the following number 9200 5 In the 5D Configure Wizard under MyMachines select your machine type HUSQVARNA VIKING DESIGNER RUBY deLuxe or Type M sewing and embroidery machine Under Send I or Send 2 select HUSQVARNA VIKING DESIGNER RUBY ...

Page 30: ...arted from the Send tab of 5D Configure Viewing and Printing PDF Guides To find all the Reference and Sample Guides for your 5D Embroidery System software go to Start All Programs 5D Embroidery System then choose Reference Guides or Sample Guides Choose the relevant folder then select the desired PDF Guide Double click on the desired name to launch the relevant pdf file if you have Adobe Acrobat i...

Page 31: ...3SeTTINGS FUNCTIONS ...

Page 32: ...roidery Edit to Embroidery Stitch Out by touching the GO icon in the lower right corner of the Large Interactive Screen see chapter 8 This section of the User s Guide will guide you through the basic settings and functions of your machine Learn how to navigate the functions and settings on the Large Interactive Screen and how to use the function buttons on the machine sewing head Detailed descript...

Page 33: ...justments The look of the Extended toolbar will change depending on whether Sewing Mode or Embroidery Mode is active Design Menu and EMBROIDERY ADVISOR are only available in Embroidery Mode Stitch Menu When opening this menu you will find several different stitch menus in the drop down list see chapter 1 for stitch descriptions How to Select a Stitch To select a stitch first select a stitch menu F...

Page 34: ...nt to embroider on and follow the recommendations The EMBROIDERY ADVISOR feature also gives you tips when embroidering on special fabrics or using special threads Touch OK to close the EMBROIDERY ADVISOR feature File Manager The File Manager is used to open organize add move remove and copy your designs fonts and stitch files Use either built in memory or an external device connected to your machi...

Page 35: ...ings will only be valid for the stitch that is currently selected If another stitch is selected or the same stitch is selected again the stitch value is reset to the default value Default number is black EXCLUSIVE SENSOR SYSTEM Feature Sensor Foot Pressure Thanks to the Sensor Foot Pressure the machine actually senses the thickness of the fabric embroidery or stitching to sew over it smoothly and ...

Page 36: ...the Stitch Width Safety function when using a straight stitch needle plate or a straight stitch presser foot The needle position is locked to center for all stitches to prevent damage to the needle presser foot or needle plate When turning on the machine with this setting activated and for every stitch selection that is not a straight stitch a pop up message informs you that it is set to straight ...

Page 37: ...t Lift When selected the Sensor Presser Foot Lift is activated The presser foot will raise to pivot height for example when stopping to sew with the needle in the down position When deselected the presser foot will stay lowered even if the machine stops with the needle in down position or after a thread cut FIX Auto When the FIX Auto is activated the machine will begin a stitch with FIX stitches I...

Page 38: ...he most suitable hoop among the ones you have entered in the Hoop Selection Auto Smart Save When Auto Smart Save is selected the machine will do a Smart Save periodically while embroidering and also when you stop embroidering Note When the Auto Smart Save is activated it will take longer to enter Embroidery Stitch Out Thread Manufacturer Touch to select preferred thread manufacturer You can select...

Page 39: ...g for all stitches and or embroidery Default setting is Normal Once you have increased or decreased the value in the Settings menu the Thread Tension control icon or Thread Portioning control icon will change to red Note Contact you authorized HUSQVARNA VIKING dealer if you experience Thread Tension Thread Portioning problems that cannot be helped with the Tension Portioning Compensations Sensor Q...

Page 40: ...es or special techniques may require the use of Thread Tension for best results Deselect the deLuxe Stitch System icon to switch to Thread Tension Read more about the deLuxe Stitch System on page 4 9 Presser Foot Height for Embroidery Adjust the height of the presser foot in embroidery stitch out mode Some embroideries may build up under the presser foot If there is not enough space between the pr...

Page 41: ...ngs will be affected if the volume setting is changed Screen Settings Touch Screen Adjust When touching the icons on the screen the screen might need calibration to adjust to your touch Touch to open a view for calibrating the touch screen Follow the instructions on the screen to calibrate the screen Lock Screen If there is the possibility of bumping the Large Interactive Screen and changing the s...

Page 42: ...ious page The right arrow takes you to the next page if there is one Index Index shows the Help topics in alphabetical order Category Category shows the Help topics divided into categories following the structure of the User s Guide Table of Contents My info My info contains the owner s name machine s software information and serial number Text You can open and read text and HTML files on your mac...

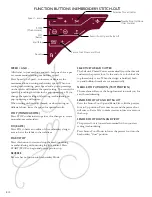
Page 43: ...r Function buttons Embroidery Mode functions are in brackets FIX Baste Sewing Mode FIX is used to tie off a stitch FIX is automatically activated when you select a stitch use the Selective Thread Cutter select Stitch Re Start STOP or by pressing FIX while you are sewing At the beginning your machine sews a few tie off stitches and continues with the selected stitch Press FIX while sewing and your ...

Page 44: ...op sewing Embroidery Stitch Out The machine will move the hoop forward towards you for easy thread trimming Needle Stop Up Down Trim Position Speed and STOP Monochrome FIX Baste Reverse Start Stop SelectiveThread Cutter Sensor Foot Down and Pivot Sensor Foot Up and Extra Lift EXCLUSIVE SENSOR SYSTEM Thanks to the EXCLUSIVE SENSOR SYSTEM feature the presser foot continuously senses the thickness of...

Page 45: ...4Sewing ...

Page 46: ...h Extended SEWING ADVISOR Stitch Selection Area ScrollThrough Menus ALT icon Stitch Start Stitch Selected Exclusive SEWING ADVISOR Stitch Re Start Sewing Mode In Sewing Mode you can select stitches adjust and sew them Your selected stitch will be shown in actual size in the stitch field The recommendations and machine settings will be shown at the top You can also go to Program mode to create your...

Page 47: ...ead systems warp lengthwise and weft crosswise that intersect at right angles A knit fabric is made of one thread system with interlaced stitches A knit fabric usually has stretch As a general rule enter Woven for stable fabrics that have no stretch and Stretch for fabrics that have stretch Suggested Fabrics A woven light chiffon organza batiste silk wool challis etc B woven medium calico quilting...

Page 48: ... is not recommended by your machine Extended SEWING ADVISOR The Extended SEWING ADVISOR feature identifies each icon with text Open it by touching the Extended SEWING ADVISOR icon Select your desired fabric and sewing technique by touching the buttons The stitch selected by the Exclusive SEWING ADVISOR feature and its settings are shown to the left and you can adjust the width length and mirror th...

Page 49: ...ove the stitch to the right and to move the stitch to the left when using a straight stitch The machine has a maximum of 29 needle positions for a straight stitch When ALT is selected on a stitch that has width the edge position of the stitch can be moved from right to left The stitch position can only be changed to the limit of the maximum stitch width Changing the stitch position will also limit...

Page 50: ...can set the button size Measure your button and enter the button size in the button size control Button Sew On When sewing a button you can set the number of stitch repeats Touch the or to increase or decrease the number of stitch repeats see 4 16 Stitch Density The stitch density control adjusts the density the distance between the individual satin stitches that make up the entire stitch The dens...

Page 51: ...e space between the presser foot and the fabric and eliminate the skipped stitches Note Be careful not to reduce the presser foot height too much The fabric must still move freely under the presser foot To adjust the presser foot height in Free Motion Floating mode touch the Presser Foot height control to make adjustments Free Motion Spring Action Select Free Motion Spring Action to activate the F...

Page 52: ...he Sensor Foot Up and Extra Lift or press the Selective Thread Cutter to cut needle and bobbin thread and raise the foot When the needle stops in the down position the presser foot raises to pivot position You can also lower the presser foot and the needle with your foot control If you tap your foot control once you will lower the presser foot If you tap the foot control twice the needle will be l...

Page 53: ...y thread Adjust Thread Tension Thread Portioning For the best stitch appearance and durability make sure the threads meet evenly between the two fabric layers If the bobbin thread is visible on the top side of the fabric the Thread Tension Thread Portioning is too tight Reduce the Thread Tension Thread Portioning If the needle thread is visible on the underside of the fabric the Thread Tension Thr...

Page 54: ...owers automatically Sew a seam When finished touch the Selective Thread Cutter The Selective Thread Cutter cuts top and bobbin threads and the presser foot raises so you can remove your project fabric Stretch light cut in two select Stretch light fabric and Seam technique The Exclusive SEWING ADVISOR feature selects a stretch stitch use Presser foot A and size 75 stretch needle as recommended sew ...

Page 55: ...ISOR feature selects a three step zigzag stitch use Presser foot J and size 80 needle as recommended Place the edge of a single thickness of fabric under presser foot J with the wire guide along the edge of the fabric The three step zigzag stitch sews over the wire guide to keep the edge of the fabric flat sew Step on the foot control The presser foot lowers automatically Sew to overcast the edge ...

Page 56: ...r Exclusive SEWING ADVISOR feature will select the best one for your fabric and make all adjustments automatically fabric Stretch light cut in two select Stretch light and Seam Overcast on the Exclusive SEWING ADVISOR feature use Presser foot J and size 75 stretch needle as recommended sew Place fabric pieces right sides together Put the fabric in position under the presser foot with the wire guid...

Page 57: ...needle should just catch the edge of the folded fabric If neccessary adjust the stitch width as needed to barely catch the fold by touching or on the width adjustment icon on your Large Interactive Screen After finishing your seam touch the Selective Thread Cutter Baste Basting is temporary stitching for fitting garments gathering and marking The SEWING ADVISOR feature automatically sets a long st...

Page 58: ...chine stops with the needle in the fabric and raises the presser foot Insert the multipurpose tool from behind Both sides of the multipurpose tool are raised Use the side which corresponds closest to the thickness of the seam Step on the foot control to lower the presser foot and continue sewing slowly over the thick seam Stop sewing again just in front of the seam notice how the needle is in the ...

Page 59: ...R feature selects buttonholes that should not be sewn with the Sensor One Step Buttonhole Foot Sew the Buttonhole Fold fabric in two and place stabilizer underneath Mark the buttonhole placement on your fabric with your Pictogram Pen Set the length of the buttonhole Place fabric under Sensor One Step Buttonhole Foot The measurement wheel can be raised by lifting it which makes it easier to place t...

Page 60: ...ven medium select Woven medium and Button on the Exclusive SEWING ADVISOR feature The feed teeth are lowered automatically use Size 80 needle and the multipurpose tool to create a thread shank as recommended Snap off presser foot sew Place fabric multipurpose tool and button under the ankle with the holes in the button lined up with the swing of the needle Check the swing of the needle using the m...

Page 61: ...automatically when the bartack is completed Manual Bartack Decide the length of your bartack manually with stitch A2 33 sew Place fabric under the presser foot Press Sensor Foot Down and Pivot twice and adjust the fabric if necessary Step on the foot control the Sensor Foot lowers automatically and stitch Your machine will sew a straight stitch until you press Reverse Your machine will then sew in...

Page 62: ...sewing machine will start to sew across the top of the patch from the top left corner as shown on the screen Press reverse or the 4 Direction Sewing icon and adjust fabric if necessary Step on the foot control The presser foot lowers automatically Sew across the top and touch the 4 way symbol or the reverse button to change sewing direction The direction of the stitch on the screen will change Sew...

Page 63: ...edium on your Exclusive SEWING ADVISOR feature menu T 8 way stitches use Thread the top thread with embroidery thread and use bobbin thread for the bobbin Use presser foot B and size 80 needle as recommended sew Touch the Program icon Select stitch G1 4 Select T1 and click three times on the straight stitch to the right Select stitch G1 4 Select T1 and click three times on the straight stitch to t...

Page 64: ...t of beginning and end you wish to have on your stitch Note For narrower satin stitch adjust the stitch width Start sewing The machine will sew the tapered point and then continue with a satin stitch at the selected width When the satin is as long as desired press the reverse button This will start the tapering of the end Once the stitch is finished press the Selective Thread Cutter button Press t...

Page 65: ...e sewing without closing the pop up message Check Needle Thread The machine stops automatically if the needle thread runs out or breaks Re thread the needle thread close the pop up message and start sewing again Remove Sensor One Step Buttonhole Foot The Sensor One Step buttonhole foot is used only for buttonholes A pop up message will advise you to remove it for all other sewing Twin Needle The f...

Page 66: ...he machine or choose a stitch not suitable for Stitch Width Safety Main motor overloaded If you are sewing on very heavy fabric or if the machine is blocked when sewing the main motor can get overloaded When the main motor and power supply are no longer overloaded the OK button will be enabled Touch OK to resume sewing ...

Page 67: ...5PROGRAM ...

Page 68: ...t be available when opening Program mode after activating Embroidery Mode and vice versa The created stitch program will not be transferred to the other mode Note If Sewing Mode is active and your stitch program is ready to be sewn you can also close the active function by pressing the foot control or by pressing the Start Stop button Not all stitches are available to program A pop up message will...

Page 69: ...to a design when loaded to Embroidery Edit and cannot be opened for editing again Edityour Stitch or Lettering Program Insert a Stitch or Letter Move the cursor where you want to add a stitch or letter Select the desired stitch you want to insert It will be placed at the cursor Adjust Text and Stitches You can mirror adjust length and width or change the density of the selected stitch in the same ...

Page 70: ... certain place in your programmed stitch This is useful for example at the end of the stitch program if you want to sew it only once or to create a stitch program in several rows Insert the thread cut if you want the machine to tie off and cut the threads and raise the presser foot Move the cursor to the position where you want to add a command Press the button and an icon will be added into the p...

Page 71: ...rwriting of the old stitch Touch OK to replace the old stitch with the new one Touch Cancel to close the pop up message and choose another saving position Cancel Save Process To cancel the save process close the window with OK instead of touching any storing position The saving window will close and you return to the previous screen Delete Saved Stitch or Program To delete a saved stitch or progra...

Page 72: ... Mode is active your stitch program will be loaded to Embroidery Edit as a design If you want to Edit your Stitch touch the Edit Stitch icon Program pop up messages Not a Programmable Stitch Some stitches are not possible to insert in a stitch program for example buttonholes and four direction stitches Stitch Program Out of Range The stitch you are trying to add will make the stitch program too lo...

Page 73: ...6EMBROIDERY SET UP ...

Page 74: ...ery hoop connector B Outer hoop C Inner hoop D Quick release E Retaining screw F Ribs for fitting the clips G Center marks Sensor Q foot The Sensor Q foot is always recommended for embroidery This foot is also used for Free Motion sewing quilting and embroidering on especially thick or spongy fabric When removing the embroidery unit from the box for the first time be sure the shipping brace on the...

Page 75: ...e hoop for positioning Touch OK The machine will calibrate and the embroidery arm will move to the ready position Note DO NOT calibrate the machine with the embroidery hoop attached as this can damage the needle presser foot hoop and or the embroidery unit Be sure to clear all materials from around the machine before calibrating so that the embroidery arm does not bump into anything while calibrat...

Page 76: ...e fabric should be taut in the hoop for the best results Note When embroidering additional designs on the same fabric open the quick release move the hoop to the new position on the fabric and close the quick release When changing type of fabric you might need to adjust the pressure using the retaining screw Do not force the quick release Slide on the hoop Slide the hoop connector into the hoop at...

Page 77: ...a bobbin with bobbin thread 2 Touch the Start Menu The Design Menu opens to select a design Touch the design you want to stitch out and it will load to Embroidery Edit 3 Hoop a piece of fabric and slide the hoop onto the embroidery arm 4 When you are ready to embroider switch from Embroidery Edit to Embroidery Stitch Out by touching the GO icon on the task bar 5 Thread the machine with the first c...

Page 78: ... pop up message will appear on the screen asking you to cut the thread end Cut the thread and press Start Stop to continue embroidering 7 When the first color is completed your machine cuts the thread end and stops A pop up message appears asking you to change thread color Re thread with the next color and continue embroidering by pressing Start Stop Hold the thread end The machine will trim the t...

Page 79: ...7EMBROIDERY EDIT ...

Page 80: ... about the Information menu on page 3 12 Load a Stitch To load a stitch touch the Stitch Menu icon on the Extended toolbar Select a menu and the Program window will open Touch your desired stitch stitch program and touch OK to load to Embroidery Edit Read more about how to make a stitch program in chapter 5 Load a buttonhole Buttonholes can be embroidered in a hoop Touch the Stitch Menu icon on th...

Page 81: ...y Hoops List You can adjust the My Hoops List by choosing the wanted hoops in Hoop Selection under Machine Settings Read more about Hoop Selection on page 3 8 Pan Total number of stitches in design combination Selected hoop Stitch out order of selected design Embroidery field My Hoops Resize Color Edit Edit Stitch Program Save to My Designs Zoom In Zoom Out Zoom to Hoop Zoom to Box Zoom to All Ste...

Page 82: ...made in a specific type to get the best effect When enlarging or reducing a design the stitches in the fill area will be affected There are two ways to handle the fill type and style in the design to be resized 1 The default setting will not retain fill type This is the fastest way to resize a design However the fill areas in the design may look different than the original 2 When Retain Fill Type ...

Page 83: ...Please use 5D Embroidery Software to resize very large and complex designs It is available to purchase from your local authorized dealer Always start with the original design when resizing This is to ensure the best possible stitch quality If a resized design is saved and then resized again it can cause stitch irregularities For the best resize result always start with a design in original size De...

Page 84: ...ange then touch Select Equal to select all identical color blocks in the color block list Add Remove Color Selection is automatically activated If two or more different color blocks are selected Select Equal will select all identical color blocks of all selected colors On screen display of selected and non selected color blocks Selected color blocks are shown in 2 dimensional or 3 dimensional view...

Page 85: ...Position icon to move the embroidery arm to Park Position for storing the embroidery unit Move to Hoop Touch Move to Hoop to move any design that is outside the hoop area into the hoop area The design will be placed at the outer most edge of the hoop Zoom Zoom in Zoom out Zoom in or out of the embroidery field Use Zoom In to get a close up of an area within the embroidery design Use to Zoom Out Zo...

Page 86: ...t the proportions are locked This is indicated with a closed padlock in the Control Center icon To unlock just touch the padlock Height and width can now be changed individually If you move the stylus on the screen towards the center of the selected design s the size will decrease If you move the stylus from the center of the selected design s the size will increase Use the Control to fine tune No...

Page 87: ...uch the Mirror End to End icon Delete When you touch the Delete icon the selected design s will be deleted from the embroidery field If more than one design is selected a pop up message will ask you to confirm the deletion Touch Hold the Delete icon to delete all the designs in the embroidery field A pop up message to confirm the delete all designs will appear Duplicate Touch the Duplicate icon to...

Page 88: ...e affected by your changes Select All 6 If you want to select all designs simply touch the Select All icon All the designs on your screen will be selected You can now move delete duplicate position scale mirror resize and or rotate them 1 Selected Design s have a red box around them 2 Marked and Selected Design s have a red dotted box around them 3 A black dotted box around a design means it is ma...

Page 89: ...adjust an existing text already in Embroidery Edit In that case select the text and touch the Edit Stitch icon Note If the text is created of stitch fonts the Program window will open instead To use the Editor Use the stylus and touch the letters you want to add to the text The text is shown in the text area with the cursor at the active letter Use the arrows to step forward and backward You can c...

Page 90: ... to make contains too many stitches Your design combination can have a maximum of approximately 500 000 stitches Embroidery combination is too complex This pop up message appears for one of the following reasons The design combination contains too many color blocks There are too many designs in the combination ...

Page 91: ...8EMBROIDERY STITCH OUT ...

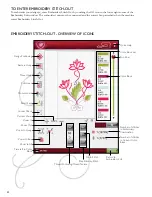
Page 92: ...p attached when the machine enters Embroidery Stitch Out Design Positioning Monochrome Move Hoop Full screen Corner Check Baste in Hoop Quick Help Scroll bar Number of stitches in Current Color Block Number of stitches in Embroidery Combination Color Block Zoom Out Zoom In Zoom to Hoop Zoom to All Zoom to Box Return to Embroidery Edit Thread Portioning ThreadTension Step Stitch by Stitch Time left...

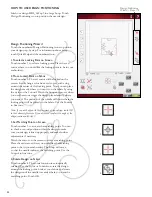
Page 93: ...is very useful Note If you just want to move your embroidery in Embroidery Stitch Out open the Design Positioning window and move your design using the Control or your stylus Use Zoom and Pan to be sure that you are placing the design exactly where you want it Fine tune with the arrows in the Control Zoom to Cursor Maximizes the zoom and pans the embroidery area so the cursor position is centered ...

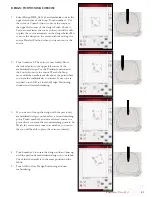
Page 94: ...ou want it The position of the needle will show where the locking point will be placed on the fabric Use the Control to fine tune Note If you are happy with the placement of your design touch OK in the bottom right corner If you also need to adjust the angle of the design continue with step 3 3 Set Matching Point on Screen Touch number 3 to activate the matching point You can to check a second pos...

Page 95: ...osition function and the Control to move the cursor Watch the hoop move until the needle is exactly above the point where you want the embroideries to connect Once you are satisfied touch OK to close the Design Positioning window and start embroidering 3 If you want to line up the design with the previously embroidered design you can select a second matching point Touch number 3 and move the red c...

Page 96: ...basting techniques Move Hoop Use the Move Hoop functions to move the embroidery arm to different positions Current Stitch Position When you want to return to the current stitch position and continue embroidering where the embroidery was interrupted touch the Current Stitch Position icon You can also press the Start Stop button once to return to the current stitch position and start to embroider Pa...

Page 97: ...chine off or lose power it is easy to bring up the design ready to stitch from the same position Go to the start menu at to the bottom of the Designs and touch the Smart Save icon Corner Check Corner Check can be used to trace the four corners of the design so that you can see where the design will be on the fabric Touch the corner check icon Each time you touch the icon it will move the hoop in t...

Page 98: ...xe Stitch System The deLuxe Stitch System has two ways to control the needle thread Thread Tension and Thread Portioning The deLuxe Stitch System improves the correct balance between needle thread and bobbin thread Your machine will automatically use Thread Portioning when possible to get the best result Thread Portioning automatically and continuously measures the fabric thickness to portion the ...

Page 99: ...lor in the first design loaded is thread number 2230 of Robison Anton Rayon 40 weight If you have questions about other abbreviations of thread manufacturers go to your 5D Embroidery Software Configure program installed with your Machine Communication program and enter the Thread Manager There you can find information about thread manufacturers and thread type abbreviations To make changes to the ...

Page 100: ...baste the fabric to the stabilizer START STOP Press this button to start and stop the machine sewing or embroidering without using the foot control Press START STOP to begin and press again to stop REVERSE Reverse has no function in Embroidery Mode SELECTIVE THREAD CUTTER The Selective Thread Cutter automatically cuts the threads and raises the presser foot At the end of a color block the top thre...

Page 101: ...ead the machine The next recommended color number is shown in the pop up message Cut Thread End After changing the thread the machine will sew a few stitches and then stop so you can cut the thread end Note When Automatic Jump Stitch Trim is selected in the SET menu the thread end will be cut automatically Simply remove the thread tail that has been cut Bobbin Thread low move to Bobbin Position Wh...

Page 102: ...and this pop up message is shown insert the corresponding cutwork needle Touch OK and press the Start Stop button to resume Note These cutwork designs can also be stitched out without the cutwork needles but will then have to be cut manually Main motor overloaded If the machine is blocked when embroidering the main motor can get overloaded When the main motor and power supply are no longer overloa...

Page 103: ...9FILE MANAGER ...

Page 104: ...ed to your machine for storing designs and files My Files My Fonts My Designs Built in Designs External Devices Cut Copy Paste Delete Move up one folder Open folder Rename a file or folder Create new folder Name of selected file Drop down menu List view Quick Help Selection Area FIle Manager overview of icons File Formats Your machine can load the following file formats SHV DHV VP3 VIP HUS PEC PES...

Page 105: ...reate folders in My Designs folder You can reach Designs menu from the Extended toolbar and My Designs in File Manager If you want to open several designs at one time click on the ones you want to open Touch Hold on the last one All the designs will open in Embroidery Edit My Fonts Store embroidery font files in My Fonts You can reach the fonts from the Extended toolbar and the My Fonts in File Ma...

Page 106: ...er icon or Touch Hold to open it The contents of the folder will be shown in the selection area Open a File To open a file click on the file with your stylus and touch OK You can also Touch Hold on the file to open it Move Up One Folder Level Use the Move up one folder level icon to step up through the levels of folders You can step up all the way to the first level In the selection area you will ...

Page 107: ...der Touch Paste The file or folder is now stored in a new location and is removed from the previous location Copy a File or Folder Use Copy and Paste to copy a file or folder to another place Select the file or folder then touch Copy Open the folder where you want to place the file or folder Touch Paste The file or folder is now stored here and the original file or folder also remains in the origi...

Page 108: ...store files in the built in memory When the memory is full you can move them to an external device by using the Cut and Paste functions When only 15 of the memory is left your machine will alert you once If you continue to fill the memory it will not remind you again until the memory is completely full System Busy When the machine is loading saving moving files or performing a function that takes ...

Page 109: ...10MAINTENANCE ...

Page 110: ...area under the bobbin case after sewing several projects or any time you notice an accumulation of lint in the bobbin case area Remove the bobbin case holder A covering the front part of the bobbin case by lifting it up Remove the bobbin case B by lifting it up Clean with the brush Note Use caution when cleaning around the Selective Thread Cutter knife C Put the bobbin case and the bobbin case hol...

Page 111: ... needle bent or blunt Insert a new needle Is the needle too small for the thread Change the needle to the proper size for the thread Is the needle plate hole damaged Change the needle plate Did you thread the machine properly Check how the machine is threaded If needed rethread the machine Are you using poor thread with slubs or thread which has become dry Change to a new high quality thread purch...

Page 112: ...e feed teeth Remove the needle plate and clean the feed teeth with a brush Free Motion setting is on Turn off Free Motion setting in Sewing Mode Thread loops are forming on the underside of the embroidery design Has the embroidery built up too much to move freely under the presser foot Attach Sensor Q foot If using the R foot increase the presser foot height in Machine Settings in SET menu in smal...

Page 113: ...e Needle 2 6 while Embroidering or Sewing 2 7 Bobbin winding thread guide 1 6 Browse File Manager 9 3 Brush 1 7 Brush Line Alphabet 1 17 Built In Designs 9 3 Built In needle threader 1 6 2 4 Button 4 4 Buttonhole 4 4 4 15 Embroidered 4 16 Load 7 2 Manual 4 16 Buttonhole Foot C 1 8 Buttonhole Foot Sensor One Step 1 9 Buttonhole Foot socket 1 6 Buttonhole Stitches 1 12 Button reed 1 7 Button ruler 1...

Page 114: ... 4 7 11 Embroidery Foot R 1 9 Embroidery hoop attachment 1 7 6 2 Embroidery hoop connector 6 2 Embroidery Is Finished 8 12 Embroidery Machine Communication CD 2 10 2 11 10 11 Embroidery Machine Communication module 2 12 Embroidery Mode 3 2 Embroidery Needle 2 8 Embroidery Stitch Out 3 2 3 13 3 14 6 5 Embroidery Text Editor 3 3 Embroidery thread 1 8 2 9 Embroidery unit 1 7 connect 6 3 remove 6 3 Em...

Page 115: ...overview 1 6 Machine Settings 3 5 Main motor overloaded 4 22 8 12 Main spool pin 1 6 2 3 2 6 Manual Buttonhole 4 16 Matching Point 8 4 Mirror End to End 4 2 4 6 5 2 7 3 7 9 Mirroring 4 6 Mirror Side to Side 4 2 4 6 5 2 7 3 7 9 Monochrome 3 13 8 2 8 7 8 10 Move a File or Folder 9 5 Move Hoop 8 2 8 6 Move to Hoop 7 3 7 7 Move up one folder 9 2 Move Up One Folder Level 9 4 Multipurpose tool 1 7 2 8 4...

Page 116: ... 1 7 Quilt Stitches 1 13 R Raise and Lower the Presser Foot 4 8 Raise needle 8 12 Redo 7 9 Re Load a Stitch Program 5 6 Remaining Embroidery Time by Color 8 7 Remove from the USB Port 2 10 Remove Sensor One Step Buttonhole Foot 4 21 Remove the embroidery unit 6 3 Rename a File or Folder 9 2 9 5 Replace a Stitch or Letter 5 3 Replacing the Needle Plate 10 2 Resize 7 3 7 4 Retain Fill Type 7 4 Retai...

Page 117: ... 7 2 Stitch Density 4 6 Stitch fonts 3 3 Stitch Length 4 2 4 5 5 2 Stitch Menu 3 3 4 4 5 2 Stitch Menu Name 4 2 Stitch out order of selected design 7 7 Stitch Overview 1 10 Stitch program commands 5 4 Stitch Program Out of Range 5 6 Stitch Re Start 4 2 4 5 Stitch Selected 4 2 Stitch Selection Area 4 2 Stitch Settings 3 5 4 5 4 9 Stitch Start 4 2 Stitch Submenus 3 3 Stitch Width 4 2 4 5 5 2 Stitch ...

Page 118: ...ot E 1 8 Zoom 7 7 8 7 Zoom In Zoom Out 7 3 7 7 8 2 8 7 Zoom to All 5 3 7 3 7 7 8 2 Zoom to Box 7 3 7 7 8 2 8 7 Zoom to Cursor 8 3 Zoom to Hoop 7 3 7 7 8 2 8 7 You have purchased a modern updatable sewing and embroidery machine As we regularly release software updates it is possible that there may be some differences between the machine software and the software described in the User s Guide Consul...

Page 119: ...ts If in doubt please contact your retailer for guidance Intellectual Property Patents protecting this product are listed on a label positioned underneath the Sewing Machine VIKING DESIGNER DESIGNER RUBY DELUXE DELUXE 5D PICTOGRAM SEWING ADVISOR EMBROIDERY ADVISOR KEEPING THE WORLD SEWING and EXCLUSIVE SENSOR SYSTEM are trademarks of KSIN Luxembourg II S ar l HUSQVARNA and the crowned H mark are t...

Page 120: ...www husqvarnaviking com 413 33 96 26B English InHouse 2012 KSIN Luxembourg II S ar l All rights reserved Printed in China on environmentally friendly paper ...

Reviews: