7:10
how To seleCT designs
When loading designs into Embroidery Edit, the last design
loaded is selected by default. A selected design has a red
box around it. A selected embroidery font text has a blue
box around it.
select one design
To select one design you can either touch the design on
the screen or touch the Step Through Designs icon. The
Step Through Designs icon allows you to select one of the
designs on your screen if you wish to alter it in some way.
Every time you touch the Step Through Designs icon, you
will select the next design in the order in which they were
loaded.
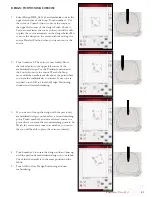
1. In Embroidery Edit, touch Start on the toolbar to
open the Extended toolbar. The Design Menu will
open.
2. Select a design from the dropdown list by touching it.
3. Touch the Duplicate icon three times. The last design
will have a red box around it which means that it is
selected.
4. If you want to select the first design you inserted,
touch the Step Through Designs icon. Every time you
touch that icon, you will move to the next design in the
order they have been loaded.
5. Once you have selected the design you want, you can
delete, duplicate, position, scale, mirror, resize, and/
or rotate it. Only the design that is selected that will be
affected by your changes.
select all
6. If you want to select all designs, simply touch the
Select All icon. All the designs on your screen will
be selected. You can now move, delete, duplicate,
position, scale, mirror, resize and or rotate them.
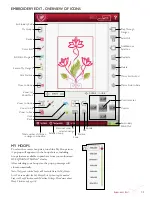
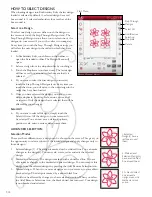
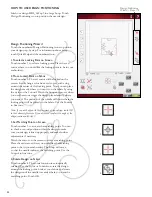
1. Selected
Design(s) have a
red box around
them.
2. Marked and
Selected Design(s)
have a red dotted
box around them.
3. A black dotted
box around a
design means it is
marked and not
active.
Step Through
Designs
Select All
Add/Remove
Selection
Start Menu
Duplicate
Delete
advanCed seleCTion
selection Modes
There are three different ways a design can be chosen on the screen. This gives you
the opportunity to select a subset of the loaded designs and apply changes only to
those designs.
1. Selected design (1) - The design is marked with a solid red line. You can make
changes to the design(s). You can scale, rotate, resize and edit the selected
design.
2. Marked and Selected - The design is marked with a dotted red line. You are
able to make changes to the marked and selected design. You can remove this
design from the selected designs by pressing the Add/Remove Selection icon.
3. Marked design - When two or more designs are on your screen, you are able to
mark a design. The design is marked by a dotted black line.
It will not be affected by changes such as scale and rotation. When you select
the Add/Remove Selections icon, the black dotted box turns red. Your design
is now marked and selected.
Summary of Contents for Designer Ruby Deluxe
Page 1: ...User s Guide KEEPING THE WORLD SEWING ...
Page 5: ...Getting to knowyour machine 1 ...
Page 18: ...1 18 Script Alphabet Cyrillic Alphabet Hiragana Alphabet Brush Line Alphabet ...
Page 19: ...2SET UP ...
Page 31: ...3SeTTINGS FUNCTIONS ...
Page 45: ...4Sewing ...
Page 67: ...5PROGRAM ...
Page 73: ...6EMBROIDERY SET UP ...
Page 79: ...7EMBROIDERY EDIT ...
Page 91: ...8EMBROIDERY STITCH OUT ...
Page 103: ...9FILE MANAGER ...
Page 109: ...10MAINTENANCE ...


