background image

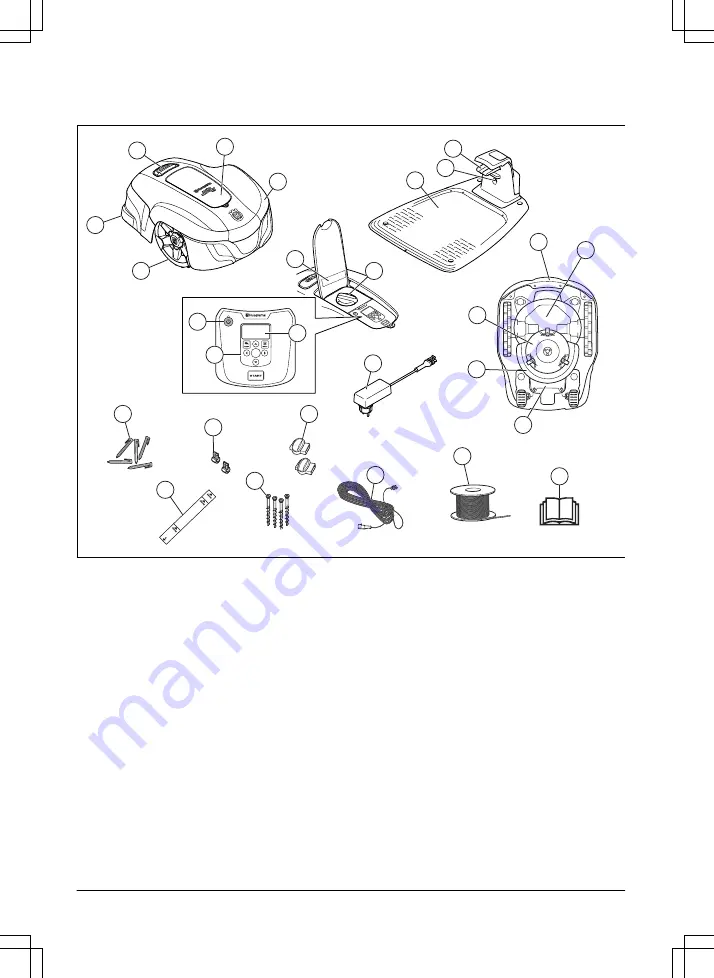
1.2 Product overview

OK

OK

11

13

12

6

16

17

15

14

18

10

9

24

19

26

20

22

23

21

25

27

7

8

1

2

3

5

4

The numbers in the figure represent:
1. Body
2. Hatch to display and keypad
3. Stop button
4. Rear wheels
5. Front wheels
6. Charging station
7. Contact strips
8. LED for operation check of the charging

station, boundary wire and guide wire

9. Cutting height adjustment
10. Rating plate
11. Display
12. Keypad
13. ON/OFF button
14. Cutting system
15. Blade disc

16. Handle
17. Chassis box with electronics, battery and

motors

18. Battery cover
19. Power supply (the appearance of the power

supply may differ depending on market)

20. Stakes
21. Measurement gauge for help when installing

the boundary wire (the measurement gauge

is broken loose from the box)

22. Connector for the loop wire
23. Screws for securing the charging station
24. Couplers for loop wire
25. Low voltage cable
26. Loop wire for boundary loop and guide wire
27. Operator’s Manual and Quick Guide

4 - Introduction

982 - 001 - 12.12.2018

Summary of Contents for 115H

Page 1: ...EN English Operator s manual 115H Read the operator s manual carefully and make sure that you understand the instructions before you use the product ...

Page 2: ...19 3 9 After the installation of the product 20 3 10 To do the product settings 20 4 Operation 4 1 The ON OFF button 26 4 2 To start the product 26 4 3 Operating modes 26 4 4 Stop 27 4 5 Switch off 27 4 6 To charge the battery 28 4 7 Adjust the cutting height 28 5 Maintenance 5 1 Introduction maintenance 29 5 2 Clean the product 29 5 3 Replace the blades 30 5 4 Software update 30 5 5 Battery 31 5 ...

Page 3: ...sqvarna regularly updates the appearance and function of the products Refer to Support on page 3 The product is a robotic lawn mower The product has a battery power source and cuts the grass automatically Collection of grass is not necessary The operator selects the operation settings with the keys on the keypad The display shows the selected and possible operation settings and the operation mode ...

Page 4: ...y 12 Keypad 13 ON OFF button 14 Cutting system 15 Blade disc 16 Handle 17 Chassis box with electronics battery and motors 18 Battery cover 19 Power supply the appearance of the power supply may differ depending on market 20 Stakes 21 Measurement gauge for help when installing the boundary wire the measurement gauge is broken loose from the box 22 Connector for the loop wire 23 Screws for securing ...

Page 5: ... emission to surroundings The product s emissions are set out in Technical data on page 45 and on the rating plate It is not permitted to dispose this product as normal household waste Ensure that the product is recycled in accordance with local legal requirements The low voltage cable must not be shortened extended or spliced Do not use a trimmer nearby the low voltage cable Be careful when trimm...

Page 6: ...Do not discard the battery into fire and do not expose the battery to a heat source Do not immerse the battery into water 6 Introduction 982 001 12 12 2018 ...

Page 7: ... date Time format Date format Language Country Reset all user setting About Security Lawn Coverage Installation General Low Medium Change PIN code New loop signal Security level Advanced Area 1 3 How How often How far Disable Reset Test More Starting point Drive Past Wire ECO mode Mower house High Connect Home New pairing Remove paired devices 982 001 12 12 2018 Introduction 7 ...

Page 8: ... lamp on page 26 2 The Start button is used to start the operation of the product 3 The Menu button is used to go to the main menu Note The Menu button is also used as a Back button that is when moving back up in the menu lists 4 The Mode button is used to choose operating mode for example Main area or Park 5 The OK button is used to confirm the chosen settings in the menus 6 The arrow keys are us...

Page 9: ...ctions in the manual are not obeyed Note Used to give more information that is necessary in a given situation 2 2 General safety instructions The following system is used in the Operator s Manual to make it easier to use Text written in italics is a text that is shown on the display of the product or is a reference to another section in the Operator s Manual Text written in bold is one of the butt...

Page 10: ...concerning use of the appliance in a safe way and understand the hazards involved Local regula tions may restrict the age of the operator Cleaning and mainte nance shall not be made by children without supervision Never connect the power supply to an outlet if the plug or cord is damaged Worn or damaged cord increase the risk of electric shock Only charge the battery in the included charging stati...

Page 11: ...rom the machine Supervise children Use the operating mode Park or turn off the product when persons especially children or animals are in the work area It is recommended to program the product for use during hours when the area is free from activity e g at night Refer to To set the schedule on page 21 Consider that certain species e g hedgehogs are active at night They can potentially be harmed by...

Page 12: ...oduct and other types of wireless systems such as remote controls radio transmitters hearing loops underground electric animal fencing or similar Metal objects in the ground for example reinforced concrete or anti mole nets can result in a stoppage The metal objects can cause interference with the loop signal which then can lead to a stoppage Operation and storage temperature is 0 50 C 32 122 F Te...

Page 13: ...ever use a high pressure washer to clean the product Never use solvents for cleaning Inspect the product weekly and replace any damaged or worn parts Refer to Introduction maintenance on page 29 2 3 5 In the event of a thunderstorm To reduce the risk of damage to electrical components in the product and the charging station we recommend that all connections to the charging station are disconnected...

Page 14: ...e grass may be higher than expected When the product has cut the grass for some time the perceived sound level is much lower 3 3 Before the installation of the product Make a blueprint of the work area and include all obstacles Make a mark on the blueprint where to put the charging station the boundary wire and the guide wire Make a mark on the blueprint where the guide wire connects to the bounda...

Page 15: ...engths are available as accessories CAUTION Make sure that the blades on the product do not cut the low voltage cable CAUTION Do not put the low voltage cable in a coil or below the charging station plate The coil causes interference with the signal from the charging station 3 3 3 To examine where to put the boundary wire CAUTION If the work area is adjacent to water bodies slopes precipices or a ...

Page 16: ... the slope with boundary wire For slopes steeper than 15 along the outer edge of the lawn put the boundary wire 20 cm 8 in A from the edge For slopes adjacent to a public road put a fence or a protective wall along the outer edge of the slope A 15 0 30 3 3 3 2 Passages A passage is a section that has boundary wire on each side and that connects 2 work areas The passage must be a minimum of 60 cm 2...

Page 17: ...wire minimum 30 cm 12 in from the boundary wire Do not make sharp bends when you install the guide wire If the work area has a slope put the guide wire diagonally across the slope 3 3 5 Work area examples B D A C If the charging station is put in a small area A make sure that the distance to the boundary wire is at a minimum 2 m 6 6 ft If the work area has a passage B make sure that the distance t...

Page 18: ...ry wire or the guide wire on page 19 7 Connect the wires to the charging station Refer to To install the boundary wire on page 18 and To install the guide wire on page 18 8 Attach the charging station to the ground with the supplied screws CAUTION Do not make new holes in the charging station plate CAUTION Do not put your feet on the charging station 3 4 2 To install the boundary wire 1 Put the bo...

Page 19: ...he stakes hold the boundary wire and the guide wire against the ground Note The wire is overgrown with grass and not visible after a few weeks 3 6 To bury the boundary wire or the guide wire Cut a groove in the ground with an edge cutter or a straight shovel Put the boundary wire or the guide wire 1 20 cm 0 4 8 in into the ground 3 7 To change the position of the boundary wire or the guide wire 1 ...

Page 20: ...forming on the lawn Refer to To set the starting point on page 23 Note The product always runs to the left of the guide wire as seen facing the charging station If the distance on the left side of the starting point is less than 0 6 m 2 ft the calibration process is interrupted For the widest possible guide corridor make sure that the distance from the starting point to the boundary wire is minimu...

Page 21: ... 80 15 h Days week h day Schedule settings 7 15 07 00 22 00 7 am 10 pm 3 10 2 3 To set the schedule 1 Do steps 1 3 in To get access to the menu on page 20 2 Use the arrow buttons and the OK button to move through the menu structure Schedule Advanced Overview 3 Use the arrow buttons and the OK button to select the day 4 Use the left arrow button to select the period 5 Push the OK button 6 Enter the...

Page 22: ...button to select the level of security 4 Push the OK button 3 10 3 2 To change the PIN code 1 Do steps 1 3 in To get access to the menu on page 20 2 Use the arrow buttons and the OK button to move through the menu structure Settings Security Advanced Change PIN code 3 Enter the new PIN code 4 Push the OK button 5 Enter the new PIN code 6 Push the OK button 7 Make a note of the new PIN code Refer t...

Page 23: ...nu on page 20 2 Use the arrow buttons and the OK button to move through the menu structure Settings Lawn Coverage Area 1 3 Disable 3 Push the OK button 4 Push the BACK button 3 10 4 5 To reset the Lawn Coverage settings You can reset the Lawn Coverage settings for each area and use the factory setting 1 Do steps 1 3 in To get access to the menu on page 20 2 Use the arrow buttons and the OK button ...

Page 24: ...Avoid house collisions 3 Push the BACK button Note If Avoid house collisions is selected it can result in grass that is not cut around the charging station 3 10 9 Automower Connect Home The product can connect to mobile devices that have the Automower Connect app installed Automower Connect is a free app for your mobile device The short range interaction with the product is called Automower Connec...

Page 25: ...n to move through the menu structure Settings General Country 3 Use the arrow buttons to select country and then push the BACK button 3 10 10 4 To reset all user settings 1 Do steps 1 3 in To get access to the menu on page 20 2 Use the arrow buttons and the OK button to move through the menu structure Settings General Reset all user settings 3 Use the right arrow button to select Proceed with rese...

Page 26: ...ss the ON OFF button to make the product active again The product is disabled when the indicator lamp is not lit WARNING It is only safe to carry out inspection or maintenance on the product when the product is disabled The product is disabled when the lamp on the ON OFF button is not lit 4 2 To start the product 1 Open the hatch to the keypad 2 Push the ON OFF button The display is lit up 3 Use t...

Page 27: ...t the schedule on page 21 4 3 5 Override schedule The schedule settings can be temporarily overridden by selecting Override schedule It is possible to override the schedule for 3 h It is not possible to override a standby period 4 3 6 Spot cutting Spot cutting is useful for quickly mowing an area where the grass has been mown less than in other parts of the garden You must manually move the produc...

Page 28: ...g station Slide the product in as far as possible to ensure proper contact between the product and the charging station Refer to contact and charging strips in Product overview on page 4 3 The display shows a message that charging is in progress 4 7 Adjust the cutting height The cutting height can be varied from MIN 5 cm 2 in to MAX 9 cm 3 6 in CAUTION During the first weeks after a new installati...

Page 29: ... is disabled when the indicator lamp on the ON OFF button is not lit WARNING Wear protective gloves 5 2 Clean the product It is important to keep the product clean A product with large amounts of grass stuck to it will not cope as well with slopes It is recommended to clean using a brush Husqvarna offers a special cleaning and maintenance kit as an accessory Contact your Husqvarna central service ...

Page 30: ...he same time to obtain a balanced cutting system Use Husqvarna original blades embossed with the crowned H mark logotype refer to Guarantee terms on page 47 5 3 1 To replace the blades 1 Press the STOP button 2 Open the hatch 3 Press the ON OFF button for 3 seconds to turn off the product OK 4 Check that the indicator lamp on the ON OFF button is not lit 5 Turn the product upside down Place the pr...

Page 31: ...tery WARNING Use only original batteries recommended by the manufacturer Product safety cannot be guaranteed with other batteries Do not use non rechargeable batteries The appliance must be disconnected from the supply mains when removing the battery 1 Press the ON OFF button for 3 seconds to turn off the product Check that the indicator lamp on the ON OFF button is not lit 2 Set the cutting heigh...

Page 32: ...ervice prior to winter storage Regular winter service will maintain the product in good condition and create the best conditions for a new season without any disruptions Service usually includes the following Thorough cleaning of the body the chassis the blade disc and all other moving parts Testing of the products s function and components Checking and if required replacing wear items such as bla...

Page 33: ...this chapter faults and symptoms are described and can guide you if the product does not operate as expected More suggestions for steps to take in the event of malfunction or symptoms can be found on www husqvarna com 982 001 12 12 2018 Troubleshooting 33 ...

Page 34: ... damaged Check that it is also properly connected to the charging station and to the power supply The boundary wire is not connected to the charging station Check that the boundary wire connec tors are fitted properly to the charging station Replace connectors if dam aged Refer to To install the boundary wire on page 18 Boundary wire broken Find out where the break is Replace the damaged section o...

Page 35: ...a bles close by Try moving the boundary wire The product finds it hard to distinguish the signal from another product installa tion close by Place the product in the charging sta tion and generate a new loop signal Empty battery The product cannot find the charging station Check that the charging station and the guide wire are installed in accordance with the instructions Refer to To install the g...

Page 36: ...rging station and check that the charging strips and contact strips make good contact An object is obstructing the product Remove the object The charging station is tilted or bent Confirm that the charging station is placed on a fully flat and horizontal ground The charging station must not be tilted or bent Stuck in charging station There is an object in the way of the product preventing it from ...

Page 37: ...If the problem remains the message requires action by authorized service technician Electronic problem Loop sensor prob lem front rear Charging system problem Tilt sensor prob lem Temporary prob lem Temporary battery problem Temporary battery or software related issue in the product Restart the product Disconnect and reconnect the battery If the problem remains the message requires action by autho...

Page 38: ...r to Indicator lamp in the charging station on page 39 Settings restored Confirmation that a Reset all user set tings has been carried out This is normal No action required Guide not found The guide wire is not connected to the charging station Check that the guide wire connector is tightly connected to the charging sta tion Refer to To install the guide wire on page 18 Break in the guide wire Fin...

Page 39: ...ng station Refer to To install the guide wire on page 18 Break in the boundary loop Find out where the break is Replace the damaged section of the loop with a new loop wire and splice using an origi nal coupler Yellow flashing light The guide wire is not connected to the charging station Check that the guide wire connector is properly connected to the charging sta tion Refer to To install the guid...

Page 40: ... to put the charging station on page 14 The product runs at the wrong time The product clock needs to be set Set the clock Refer to To set the time date on page 24 The start and stop times for mowing are incorrect Reset the start time and stop time set tings for mowing Refer to To reset the schedule setting on page 21 The product vi brates Damaged blades lead to imbalance in the cutting system Ins...

Page 41: ...e the cutting height and then successively lower it Accumulation of grass by the blade disc or around the motor shaft Check that the blade disc rotates freely and easily If not screw off the blade disc and remove grass and foreign ob jects Refer to Clean the product on page 29 6 6 Find breaks in the loop wire Breaks in the loop wire are usually the result of unintentional physical damage to the wi...

Page 42: ... the guide wire and the boundary wire in the charging station Start by switching connection L and GUIDE If the indicator lamp is lit with a solid green light then the break is somewhere on the boundary wire between L and the point where the guide wire is connected to the boundary wire thick black line in the illustration GUIDE L Guide To rectify the fault you will need boundary wire connector s an...

Page 43: ...s the difference between a solid green light and a flashing blue light Then follow instruction in step 5 below 4 If indicator lamp still flashes blue in step 3 above Put L and GUIDE back in their original positions Then switch R and GUIDE If indicator lamp now is lit with a solid green light then disconnect L and connect a new boundary wire to L Connect the other end of this new wire at the middle...

Page 44: ...Refer to Clean the product on page 29 Keep the product in a dry frost free space Keep the product with all wheels on level ground during storage or use a Husqvarna wall hanger If you keep the charging station indoors disconnect and remove the power supply and all the connectors from the charging station Put the end of each connector wire in a container with grease Note If you keep the charging sta...

Page 45: ...Ah Art No 590 21 42 03 Power supply V 28 V DC 100 240 Low voltage cable length m 5 Mean energy consumption at maximum use 8 kWh month in a 1600 m2 work area Charge current A DC 1 3 Average mowing time min 60 Average charging time min 60 Boundary wire antenna 115H Operating Frequency Band Hz 300 80000 Maximum Radio frequency power mW 60m 1 25 1 Maximum active output power to antennas in the frequen...

Page 46: ... guide loop m 250 IP classification 115H Product IPX5 Charging station IPX5 Power supply IPX4 Bluetooth 115H Operating frequency band MHz 2400 2484 Maximum transmitted power dBm 8 Husqvarna AB does not guarantee full compatibility between the product and other types of wireless systems such as remote controls radio transmitters hearing loops underground electric animal fencing or similar The produ...

Page 47: ...Damage caused by water seepage from using a high pressure washer or from being submerged under water for example when heavy rain forms pools of water Damage caused by lightning Damage caused by improper battery storage or battery handling Damage caused by using a battery that is not a Husqvarna original battery Damage caused by not using Husqvarna original spare parts and accessories such as blade...

Page 48: ...nce that may cause undesired operation WARNING To comply with RF exposure requirements please maintain a separation distance of at least 20 cm 7 inches from any part of the product Models with a hatch The supplied label shall be attached to the product according to figure below This device contains the module FCC ID XXX1YYYY2ZZZ Models without a hatch The supplied label shall be attached to the pr...

Page 49: ... interference will not occur in a particular installation If this equipment does cause harmful interference to radio or television reception which can be determined by turning the equipment off and on the user is encouraged to try to correct the interference by one or more of the following measures Reorient or relocate the receiving antenna Increase the separation between the equipment and receive...

Page 50: ...50 Applicable to US CA market 982 001 12 12 2018 ...

Page 51: ...982 001 12 12 2018 Applicable to US CA market 51 ...

Page 52: ...AUTOMOWER is a trademark owned by Husqvarna AB Copyright 2019 HUSQVARNA All rights reserved www husqvarna com Original instructions 1140739 95 2018 12 12 ...

Reviews: