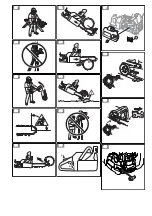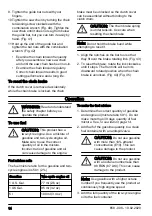
5. As the felling back cut nears the hinge, the
tree starts to fall. Make sure that the tree
can fall in the correct direction and not rock
rearward and pinch the saw chain. Stop the
cut before the felling back cut is complete
to prevent this. Use wedges of wood,
plastic or aluminium to open the cut and let
the tree fall along the necessary line of fall.
(Fig. 57)
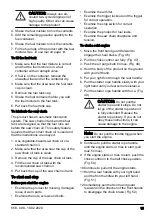
6. When the tree begins to fall, remove the
product from the cut, stop the engine, put
the product down, then use the retreat path
planned. Be alert for overhead limbs falling
and watch your footing. (Fig. 58)
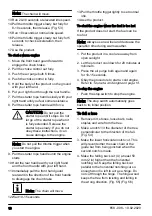
To limb a tree
1. Use larger limbs to hold the log off the
ground.
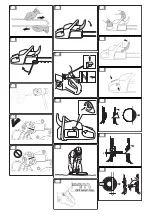
2. Remove small limbs in one cut. (Fig. 59)
3. Cut branches that have tension from the
bottom to the top to prevent pinching the
saw chain or the guide bar.
To buck a log
CAUTION:
Do not let the saw
chain touch the ground.
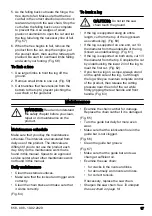
• If the log is supported along its entire
length, cut from the top of the log (known
as overbucking). (Fig. 60)
• If the log is supported on one end, cut 1/3
the diameter from the underside of the log
(known as underbucking) . (Fig. 61)
• If the log is supported on both ends, cut 1/3
the diameter from the top. Complete the cut
by underbucking the lower 2/3 of the log to
meet the first cut. (Fig. 62)
• If you buck a log on a slope, always stand
on the uphill side of the log. Cut through
the log while you maintain complete control
of the product, then release the cutting
pressure near the end of the cut while
firmly gripping the rear handle and front
handle. (Fig. 63)
Maintenance
WARNING:
Read and understand
the safety chapter before you clean,
repair or do maintenance on the
product.
Maintenance schedule
Make sure that you obey the maintenance
schedule. The intervals are calculated from
daily use of the product. The intervals are
different if you do not use the product each
day. Only do the maintenance work that is
found in this manual. Speak to an approved
service center about other maintenance work
not found in this manual.
Daily maintenance
• Clean the external surfaces.
• Make sure that the lockout and trigger work
correctly.
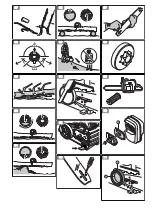
• Clean the chain brake and make sure that
it works correctly.
(Fig. 64)
• Examine the chain catcher for damage.
Replace the chain catcher if it is damaged.
(Fig. 65)
• Turn the guide bar daily for more even
wear.
• Make sure that the lubrication hole in the
guide bar is not clogged.
(Fig. 66)
• Clean the guide bar groove.
(Fig. 67)
• Make sure that the guide bar and saw
chain get sufficient oil.
• Examine the saw chain:
• for cracks in the rivets and links.
• for abnormally worn rivets and links.
• for correct tension.
If necessary, replace the saw chain.
• Sharpen the saw chain. See
.
658 - 008 - 10.02.2020
17
Summary of Contents for 120 Mark II
Page 3: ...27 28 29 30 31 32 33 34 35 A B 36 A 37 38 39 40 ...
Page 4: ...41 42 43 44 45 46 47 48 49 50 51 52 53 54 X 55 Y 56 ...
Page 5: ...57 58 59 60 61 62 63 64 65 66 67 68 69 A 70 C D 71 ...
Page 6: ...72 A B C 73 A 74 A 75 76 Ø 77 A 78 A B C 79 80 81 82 83 84 ...
Page 574: ...574 658 008 10 02 2020 ...
Page 575: ...658 008 10 02 2020 575 ...

