background image

English – 35

TECHNICAL DATA

Approved accessories 232R

Type

Cutting attachment guard, Art. no.

Centre hole in blades/cutters, Ø 25,4 mm

Arbor shaft thread M10

Grass blade/grass cutter

Grass 255-4 (Ø 255 4 teeth) 

503 74 40-01

Grass 255-8 (Ø 255 8 teeth) 

503 74 40-01

Multi 255-3 (Ø 255 3 teeth)

503 74 40-01

Multi 275-4 (Ø 275 4 teeth)

503 74 40-01

Saw blade

Maxi X 200-26 (Ø 200 26 teeth)

503 77 39-01

Plastic blades

Tricut Ø 300 mm

503 74 50-01

Trimmer head

S35

503 74 50-04

T35

503 74 50-04

Trimmy Hit

503 74 50-04

Trimmy Hit Pro

503 74 50-04

Trimmy Fix

503 74 50-04

Superauto II

503 74 50-04

Support cup

Fixed 

-

Approved accessories 235R, 235FR

Type

Cutting attachment guard, Art. no.

Centre hole in blades/cutters, Ø 25,4 mm

Output shaft thread M12

Grass blade/grass cutter

Multi 255-3 (Ø 255 3 teeth)

537 33 16-01

Multi 275-4 (Ø 275 4 teeth)

537 33 16-01

Multi 300-3 (Ø 300 3 teeth)

537 33 16-01

Saw blade

Scarlet 200-22 (Ø 200 22 teeth)

537 38 77-01

Plastic blades

Tricut Ø 300 mm

537 33 16-01 / 537 34 94-01

Trimmer head

Trimmy S II

537 33 16-01 / 537 34 94-01

T35, T35x

537 33 16-01 / 537 34 94-01

T45x

537 33 16-01 / 537 34 94-01

S35

537 33 16-01 / 537 34 94-01

F35

537 33 16-01 / 537 34 94-01

Auto 55

537 33 16-01 / 537 34 94-01

Support cup

Fixed 

-

With ball bearing 

-

Summary of Contents for 227R

Page 1: ...E E E En n n ng g g gl l l li i i is s s sh h h h 232R 235R 235FR Operator s manual EPA Please read the operator s manual carefully and make sure you understand the instructions before using the machine ...

Page 2: ...als come closer than 15 metres Machines fitted with saw blades or grass blades can be thrown violently to the side when the blade comes into contact with a fixed object This is called blade thrust The blade is capable of amputating an arm or leg Always keep people and animals at least 15 metres from the machine Arrows which show limits for handle positioning Always wear approved protective gloves ...

Page 3: ...usting the harness and clearing saw 19 FUEL HANDLING Fuel safety 20 Fuel 20 Fueling 21 STARTING AND STOPPING Check before starting 22 Starting and stopping 22 WORKING TECHNIQUES General working instructions 24 MAINTENANCE Carburetor 29 Muffler 31 Cooling system 31 Bevel gear 32 Air filter 32 Spark plug 32 Maintenance schedule 33 TECHNICAL DATA Technical data 34 FEDERAL EMISSION CONTROL WARRANTY ST...

Page 4: ... and market high quality motor driven products for forestry and gardening as well as for building and construction industry Your purchase gives you access to professional help with repairs and service whenever this may be necessary If the retailer who sells your machine is not one of our authorized dealers ask for the address of your nearest servicing dealer It is our wish that you will be satisfi...

Page 5: ...tch 9 Throttle lockout 10 Support eyes for harness 11 Cylinder cover 12 Starter handle 13 Fuel tank 14 Choke control 15 Air purge 16 Air filter cover 17 Handle adjustment 18 Locking nut 19 Support flange 20 Support cup 21 Drive disc 22 Trimmer head 23 Socket spanner 24 Operator s manual EPA 25 Transport guard 26 Allen key 27 Locking pin 28 Harness 29 Start throttle button ...

Page 6: ...ading Maintenance All covers guards and handles must be fitted before starting Ensure that the spark plug cap and ignition lead are undamaged to avoid the risk of electric shock The machine operator must ensure that no people or animals come closer than 15 metres while working When several operators are working in the same area the safety distance should be at least twice the tree height and no le...

Page 7: ...s This movement is controlled by two independent return springs This arrangement means that the throttle control is automatically locked at the idle setting Make sure the throttle control is locked at the idle setting when the throttle lockout is released Press the throttle lockout and make sure it returns to its original position when you release it Check that the throttle control and throttle lo...

Page 8: ...ine s vibration damping system reduces the transfer of vibration between the engine unit cutting equipment and the machine s handle unit Regularly check the vibration damping units for cracks or deformation Check that the vibration damping element is undamaged and securely attached Quick release There is an easily accessible quick release fitted at the front as a safety precaution in case the engi...

Page 9: ...screen will cause the engine to overheat and may lead to serious damage Locking nut A locking nut is used to secure some types of cutting attachment When fitting tighten the nut in the opposite direction to the direction of rotation of the cutting attachment To remove it undo the nut in the same direction as the cutting attachment rotates CAUTION The nut has a left hand thread When loosening and t...

Page 10: ...uge An incorrectly sharpened or damaged blade increases the risk of accidents Keep the correct setting on the saw blade Follow our instructions and use the recommended setting tool An incorrectly set saw blade increases the risk of jamming and blade thrust and damage to the saw blade IMPORTANT Only use cutting attachments with the guards we recommend See the chapter on Technical data Refer to the ...

Page 11: ...essary wear to the blade and clearing saw Make sure that the blade is well supported when you file it Use a 5 5 mm round file with a file holder The filing angle is 15 File alternate teeth to the right and those in between to the left If the blade has been heavily pitted by stones it may be necessary to dress the top edges of the teeth with a flat file in exceptional cases If so this should be don...

Page 12: ...ng a cord the engine must throw out the cord radially from the trimmer head and overcome the resistance of the grass being cleared The length of the cord is also important A longer cord requires greater engine power than a shorter cord of the same diameter Make sure that the cutter on the trimmer guard is intact This is used to cut the cord to the correct length To increase the life of the cord it...

Page 13: ...tly Put on the harness and hang the machine from the support hook Now make a final adjustment so that the machine is in a comfortable working position when it hangs from the harness Tighten the knob Fitting the handlebar 235R 235FR Remove the screw at the rear of the throttle handle Slide the throttle handle onto the right side of the handlebar see diagram Align the screw hole in the throttle hand...

Page 14: ...rd to the cutting attachment Assembling the cutting equipment Fitting a blade guard grass blade and grass cutter 232R WARNING When fitting the cutting attachment it is extremely important that the raised section on the drive disc support flange engages correctly in the centre hole of the cutting attachment If the cutting attachment is fitted incorrectly it can result in serious and or fatal person...

Page 15: ...e blade guard combination guard A onto the fitting on the shaft and secure with the bolt CAUTION Ensure that the guard extension is removed Use the recommended blade guard See the Technical data section Fit the drive disc B on the output shaft Turn the blade shaft until one of the holes in the drive disc aligns with the corresponding hole in the gear housing Insert the locking pin C in the hole to...

Page 16: ...cket spanner with a shaft that is long enough to allow this The arrow in the diagram shows the area where you should operate the socket spanner when loosening or tightening the nut Fitting the blade guard and saw blade 235R 235FR Remove the mounting plate H Fit the adapter I and bracket J with the two screws K as shown Fit the blade guard A to the adapter using the 4 screws L as shown CAUTION Alwa...

Page 17: ...ng hole in the gear housing Insert the locking pin C in the hole to lock the shaft To fit the trimmer head first separate the two halves see diagram Proceed as follows Insert a finger into the centre hole of the cover I while grasping the cover with your other fingers Using the index finger and thumb of your other hand release the two catches J that engage in the cut outs in the bottom half K Pull...

Page 18: ...antle follow the instructions in the reverse order Fitting other guards and cutting attachments 232R Fit the trimmer guard combination guard A intended for use with the trimmer head plastic blades Secure the trimmer guard combination guard using four screws L and the support plate M as shown Fit the drive disc B on the output shaft Turn the blade shaft until one of the holes in the drive disc alig...

Page 19: ...ork much easier Adjust the harness for the best working position Tension the side straps so that the weight is evenly distributed across both shoulders Correct height 1 Forestry clearing Adjust the support strap so that the support hook is around 10 cm below your hip The blade should be angled forward a little 2 Grass clearing The support hook should hang around 20 cm below your hip so that the bl...

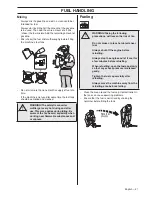
Page 20: ...ixed to ensure that the correct mixture is obtained When mixing small amounts of fuel even small inaccuracies can drastically affect the ratio of the mixture Gasoline CAUTION Always use a quality gasoline oil mixture with an octane rating of at least 87 octane RON MON 2 If your machine is equipped with a catalytic converter see chapter on Technical data always use a good quality unleaded gasoline ...

Page 21: ...nk can cause operating problems Ensure that the fuel is well mixed by shaking the container before filling the tank WARNING The catalytic converter muffler gets very hot during and after use This also applies during idling Be aware of the fire hazard especially when working near flammable substances and or vapours WARNING Taking the following precautions will lessen the risk of fire Do not smoke o...

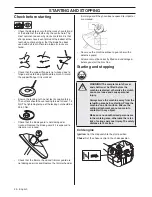
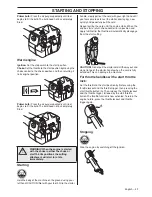
Page 22: ...d if it is exposed to impact or is cracked Check that the trimmer head and trimmer guard are not damaged or cracked Replace the trimmer head or trimmer guard if they have been exposed to impact or are cracked Never use the machine without a guard nor with a defective guard All covers must be correctly fitted and undamaged before you start the machine Starting and stopping Cold engine Ignition Set ...

Page 23: ...he cord until the engine starts When the engine starts return choke control to run position and apply full throttle the throttle will automatically disengage from the start setting CAUTION Do not pull the starter cord all the way out and do not let go of the starter handle when the cord is fully extended This can damage the machine For throttle handles with a start throttle lock Set the throttle t...

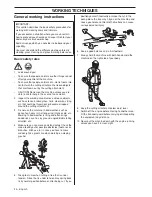
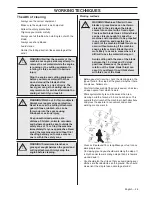
Page 24: ...care when working on sloping ground 5 Take great care when cutting a tree that is under tension A tree that is under tension may spring back to its normal position before or after being cut If you position yourself incorrectly or make the cut in the wrong place the tree may hit you or the machine and cause you to lose control Both situations can cause serious personal injury 6 Keep a good balance ...

Page 25: ... cutting equipment before you remove material that has wound around the blade shaft as otherwise there is a risk of injury The bevel gear can get hot during use and may remain so for a while afterwards You could get burnt if you touch it WARNING Watch out for thrown objects Always wear approved eye protection Never lean over the cutting attachment guard Stones rubbish etc can be thrown up into the...

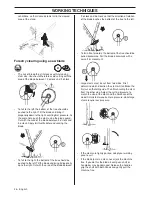
Page 26: ...gonally up to the right Cut with the area of the blade between 3 o clock and 5 o clock so that the direction of rotation of the blade pushes the bottom of the tree to the left To fell a tree forwards the bottom of the tree should be pulled backwards Pull the blade backwards with a quick firm movement Large stems must be cut from two sides First determine which direction the stem will fall Make the...

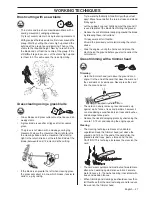
Page 27: ...up rest lightly against the ground It is used to protect the blade from hitting the ground Reduce the risk of material wrapping around the blade by following these instructions 1 Always work at full throttle 2 Avoid the previously cut material during the return stroke Stop the engine unclip the harness and place the machine on the ground before you start to collect the cut material Grass trimming ...

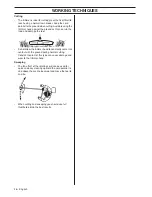
Page 28: ...awn and damage the tool Do not allow the trimmer head to constantly come into contact with the ground during normal cutting Constant contact of this type can cause damage and wear to the trimmer head Sweeping The fan effect of the rotating cord can be used for quick and easy clearing up Hold the cord parallel to and above the area to be swept and move the tool to and fro When cutting and sweeping ...

Page 29: ...c setting is richer than the optimal setting and should be maintained for the first few hours the machine is in use The carburettor should then be finely adjusted Fine adjustment should be carried out by a skilled technician CAUTION If the cutting attachment rotates when the engine is idling the idle adjustment screw T should be turned anti clockwise until the cutting attachment stops Rec idle spe...

Page 30: ...ne should not be under load when you adjust the high speed jet H You should therefore remove the cutting attachment nut support flange and drive disc before adjusting the high speed jet H Apply full throttle and turn the high speed jet H very slowly clockwise until the engine slows down Then turn the high speed jet H very slowly anticlockwise until the engine starts to run unevenly Now turn the hi...

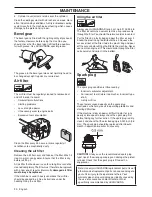
Page 31: ... special spark arrestor screen If your machine has this type of muffler you should clean the screen at least once a week This is best done with a wire brush On mufflers without a catalytic converter the screen should be cleaned weekly or replaced if necessary On mufflers fitted with a catalytic converter the screen should be checked and if necessary cleaned monthly If the screen is damaged it shou...

Page 32: ...er Oiling the air filter Always use HUSQVARNA filter oil art no 531 00 92 48 The filter oil contains a solvent to make it spread evenly through the filter You should therefore avoid skin contact Put the filter in a plastic bag and pour the filter oil over it Knead the plastic bag to distribute the oil Squeeze the excess oil out of the filter inside the plastic bag and pour off the excess before fi...

Page 33: ...ed Replace the trimmer head if necessary X Check that the locking nut of the cutting equipment is tighten correctly X Check that nuts and screws are tight X Check that there are no fuel leaks from the engine tank or fuel lines X Check that the transport guard for the blade is intact and that it can be secured correctly X Check the starter and starter cord X Check that the vibration damping element...

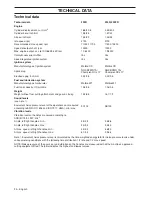
Page 34: ...O 8893 kW rpm 1 1 8400 1 3 9000 Catalytic converter muffler Yes Yes Speed regulated ignition system Yes Yes Ignition system Manufacturer type of ignition system Walbro CD Walbro CD Spark plug NGK BPMR 7A Champion RCJ 7Y NGK BPMR 7A Champion RCJ 7Y Electrode gap inch mm 0 02 0 5 0 02 0 5 Fuel and lubrication system Manufacturer type of carburetor Walbro WT Walbro WT Fuel tank capacity US pint litre...

Page 35: ...o 503 74 50 04 Trimmy Fix 503 74 50 04 Superauto II 503 74 50 04 Support cup Fixed Approved accessories 235R 235FR Type Cutting attachment guard Art no Centre hole in blades cutters Ø 25 4 mm Output shaft thread M12 Grass blade grass cutter Multi 255 3 Ø 255 3 teeth 537 33 16 01 Multi 275 4 Ø 275 4 teeth 537 33 16 01 Multi 300 3 Ø 300 3 teeth 537 33 16 01 Saw blade Scarlet 200 22 Ø 200 22 teeth 53...

Page 36: ...ve any questions regarding your warranty rights and responsibilities you should contact your nearest authorized servicing dealer or call Husqvarna Forest Garden at 1 800 487 5963 WARRANTY COMMENCEMENT DATE The warranty period begins on the date small nonroad engine is delivered LENGTH OF COVERAGE Husqvarna Forest Garden warrants to the initial owner and each subsequent purchaser that the engine is...

Page 37: ...ut charge to the owner if the part is under warranty EMISSION CONTROLWARRANTY PARTS LIST 1 Carburetor and internal parts 2 Intake pipe airfilter holder and carburetor bolts 3 Airfilter and fuelfilter covered up to maintenance schedule 4 Ignition System 1Spark Plug covered up to maintenance schedule 2Ignition Module 5 Muffler with catalytic converter MAINTENANCE STATEMENT The owner is responsible f...

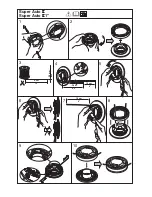
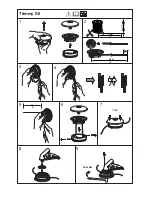
Page 38: ...1 Super Auto II Super Auto II 1 2 3 4 5 6 7 8 9 10 4 0 m 13 2 4 mm 095 2 0 m 6 5 6 6 15 cm 15 cm ...

Page 39: ......

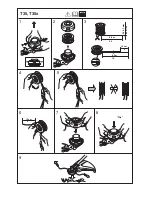
Page 40: ...T35 T35x Clic 1 2 3 5 6 7 9 8 5 m 28 4 8 4 3 m 14 2 4 2 7 mm 095 106 10 cm 4 6 15 cm ...

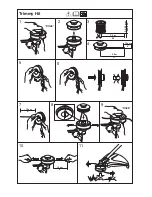
Page 41: ...1 Trimmy Hit 2 3 4 5 6 7 8 9 10 11 Click Click 7 0 m 23 12 cm 5 3 5 m 11 15 cm 6 2 0 2 4 mm 080 095 15 cm 6 ...

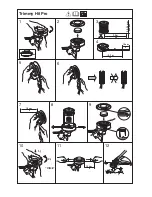
Page 42: ...1 Trimmy Hit Pro 2 5 6 7 8 9 10 12 Click 3 4 7 5 m 25 2 0 2 4 mm 080 095 15 cm 6 3 7 m 12 1 2 11 15 cm 6 15 cm 6 ...

Page 43: ...1 2 3 4 5 6 7 8 9 35 50 NM 15 cm 6 Clic 3 5 m 11 7 0 m 23 2 4 3 3 mm 095 130 12 cm 5 Trimmy SII ...

Page 44: ......

Page 45: ... Clic 1 2 3 5 6 7 10 11 8 5 m 28 4 8 4 2 m 14 2 4 2 7 mm 095 106 10 cm 4 6 15 cm S35 ...

Page 46: ...1 2 4 3 2 4 2 7 mm 095 106 4 25 m 14 4 25 m 14 B 6 15 cm A 6 15 cm S35 5 ...

Page 47: ... Clic 1 2 3 5 6 7 9 10 m 32 4 8 4 3 m 14 2 7 3 3 mm 106 13 10 cm 4 6 15 cm T45 T45x ...

Page 48: ......

Page 49: ......

Page 50: ......

Page 51: ......

Page 52: ...1151187 95 z S2o 5 z S2o 5 2008 10 15 ...

Reviews: