background image

For Husqvarna Parts Call 606-678-9623 or 606-561-4983

www.mymowerparts.com

Summary of Contents for 23 L

Page 1: ...23 26 32 LC L 531 03 00 75 Workshop Manual For Husqvarna Parts Call 606 678 9623 or 606 561 4983 www mymowerparts com ...

Page 2: ...t includingstale fuel dirt abrasives moisture rust corrosion or any adverse reactiondue to incorrectstorage habits Failureto operate or maintainthe unit in accordancewith the Owner s Operator smanual or instructionsheet furnished by Husqvarna Alterationsor modificationsthat affectthe units performance operation safety durability change its intended use or cause failure of compliancewith current re...

Page 3: ...TEMS Spark Plug Replacement Checking for Spark Ignition Switch CARBURETOR FUEL SYSTEMS Air Filter Removal Cleaning Carburetor Acceleration Deceleration Checks Speed Mixture Adjustments CLUTCH SYSTEM Clutch Removal Installation Starter Rope Removal Installation CYLINDER PISTON RING Piston Cylinder Replacement Ring Replacement CRANKCASE Reed ValveReplacement Crankshaft Removal Bearings Replacement S...

Page 4: ...es when it should accelerate see Acceleration Check Loss of cutting power which cannot be corrected by cleaning the air filter See High Speed Mixture Adjustment Engine does not return to idle from full throttle within 2 seconds see Deceleration Check Engine will not run See Trouble Shooting Chart Only then if the carburetor requires adjustment begin with Basic Carburetor Settings NOTES For Husqvar...

Page 5: ... oz Champion CJ 14 025in O 635 mm 012in O 3O5 mm Husqvarna 50 1 080in 2mmdia 15in 38 2 cm 17in 43 2 cm SPECIFICATION ENGINE TYPE DISPLACEMENT ENGINE RPM Maximum Operating Idle IGNITION CARBURETOR STARTER MUFFLER CUTTING PATH FUELTANK SPARK PLUG SPARK PLUGGAP MODULE AIRGAP LUBRICATION CUTTING LINE For Husqvarna Parts Call 606 678 9623 or 606 561 4983 www mymowerparts com ...

Page 6: ...UTION THE LINE LIMITER IS LOCATED ON UNDERSIDE OF SHIELD AND HAS A KNIFE EDGE THAT IS SHARP AND CAN CUT YOU NOTE 1 Match the key raised area on the shield with V slot on drive shaft housing NOTE Rest the bottom of shield on top of the shoulder not the dust cup of drive shaft housing 2 Install shield bracket and screws as shown NOTE I It is easier to start the screws with a screwdriver and finish t...

Page 7: ...r Adjustments 2 See Throttle CableSection 3 See Clutch Section Cuttingattachment turnsat idlespeed 1 Replace orsee Assembly 2 See Carburetor Adjustments 3 See Clutch System 1 Drive shaftisbroken ornotengaged 2 Carburetor requires adjustments 3 Clutch requires repair Cuttingheadstopsundera loadordoesn t turnwhentheengine isaccelerated 1 2 3 4 5 1 Lineimproperly routed inhead 2 Lineimproperly wound ...

Page 8: ...d pull straight off 3 4 5 Remove lock ring and spool Thoroughly clean dirt and debris from all parts Carefully check all parts for damage and replace as needed REPLACE ALL DAMAGED PARTS TRIMMER HEAD PARTS THAT ARE CHIPPED OR DAMAGED IN ANY WAY CAN FLY APART AND CAUSE SERIOUS INJURY For Husqvarna Parts Call 606 678 9623 or 606 561 4983 www mymowerparts com ...

Page 9: ...hread trimmer head onto arbor shaft by rotating head clockwise for curve shaft units counter clockwise for straight shaft units against dust cap and tighten by hand 4 To remove trimmer head reverse steps INSTALLING SPOOL WITH LINE thru 3 Use only Husqvarna pre wound spools with 2mm 080 inch diameter line Use of anything other than Husqvarna spools or line may result in breakage line welding and im...

Page 10: ...ounterclockwise on Tap N Go II 10 Depress top button and pull on the H line to change spool from locked position to operating position 11 To get correct line length lOcm or 4 inches as measured spool to the tip of each line press tap button and pull on line again from I For Husqvarna Parts Call 606 678 9623 or 606 561 4983 www mymowerparts com ...

Page 11: ... 7 Place spool in hub Make sure trimmer line is not caught between rim of the spool and the hub 8 Align lock ring over the three catches on the hub Push lock ring down onto hub and turn clockwise as shown I For Husqvarna Parts Call 606 678 9623 or 606 561 4983 www mymowerparts com ...

Page 12: ... coat of drive shaft lubricant to entire surface of drive shaft 8 Replace drive shaft in drive shaft housing Turn shaft until it seats in bottom housing To check this turn drive shaft by hand Trimmer head should rotate 9 Reassemble drive shaft housing into engine Follow steps 1 2 in reverse order and tighten the clutch shroud screws securely For Husqvarna Parts Call 606 678 9623 or 606 561 4983 ww...

Page 13: ...ndle then remove barrel end of throttle cable from the throttle trigger Carefully pull throttle cable out of foam grip 1 3 Loosen clutch shroud screws and remove drive shaft housing from engine 1 For Husqvarna Parts Call 606 678 9623 or 606 561 4983 www mymowerparts com ...

Page 14: ...ead with the correct post holes shown 4 Install screw through cable attachment head with a 4mm hex wrench 5 Place throttle cable end into hole on adjustment side of carburetor and reinstall fuel line NOTE Be sure the carburetor gasket is properly positioned before reinstalling the carburetor For Husqvarna Parts Call 606 678 9623 or 606 561 4983 www mymowerparts com ...

Page 15: ...ver SEE AIR FILTER SECTI Remove the two screws securing choke plate and carburetor assembly Remove fuel line and plug to avoid gas leakage Remove throttle cable from carburetor 6 Remove the 4mm screw securing cable attachment head and remove cable from I 7 around clip Pull cable out from engine to For Husqvarna Parts Call 606 678 9623 or 606 561 4983 www mymowerparts com ...

Page 16: ...cess to the spark plug 2 Remove ignition lead from spark plug 3 Unscrew spark plug counterclockwise using a 3 4 socket 4 The spark plug electrode gap is 0 025 in 635mm 5 When installing a new plug tighten it 1 4 turn past finger tight 6 Replace spark plug lead and top cover for LC units 16 I For Husqvarna Parts Call 606 678 9623 or 606 561 4983 www mymowerparts com ...

Page 17: ... Be sure impulse hole on carburetor aligns with pulse hole on shroud and mounting 7 gasket does not interfere with pulse passage Reinstall screws choke into carbu shroud assembly 8 9 Reinstall air filter Reinstall throttle c 1 thru 3 page 13 15 For Husqvarna Parts Call 606 678 9623 or 606 561 4983 www mymowerparts com ...

Page 18: ...tle trigger mounted on the trimmer shaft STEPS 1 THRU 4 ARE FOR LC MODELS ONLY I 1 Remove screw housing 2 Remove the PI Iand Iillip nut from throttle trigger screw from switch cover 3 Disconnect wires from underside of starter housing as shown 4 Carefully pull out wiring assembly and replace as necessary 5 On RLC models remove clutch housing clutch and starter housing assembly as shown in starter ...

Page 19: ...des 3 If no spark occurs test with a new spark plug or test plug 4 Ifstil switc onlof 5 6 no spark occurs disconnect leads for on off i Pull starterrope again If aspark occurs the switch is faulty and should be replaced If there is still no spark check the ignition connec L 2 tion leads and contacts for poor connections dirt 1 breakage or damaged installation Check ignition Y module air gap it sho...

Page 20: ...See page 23 4 Follow instructions in Deceleration Check DECELERATION CHECK 1 2 3 4 Allow engine to idle then squeeze throttle trigger fully Allow engine to run at full speed for 1 to 2 seconds Release throttle trigger to idle position and listen to deceleration of engine It must return to a smooth idle within 1to 2 seconds a IF PERFORMANCE IS SATISFACTORY proceed to step 4 b IFENGINESLOWLYORERRATI...

Page 21: ...E SOLVENT TO AVOIDCREATING A FIRE HAZARD Squeeze the filter and allow to air dry CAUTION MAKE SURE AIR FILTER I I SECURELYFITTED INTO CORNERS OF COVER TO KEEP DUST FROM 1 ENTERING THE ENGINE AND CAUSING DAMAGE Reinstall air filter cover Make sure choke exit slot is placed over choke lever 19 For Husqvarna Parts Call 606 678 9623 or 606 561 4983 www mymowerparts com ...

Page 22: ...ed below 1 Rotate the low and high speed mixture screw clockwise to a lightly seated position DO NOT TURN THE SCREWS UNTIL THEY ARE TIGHT AS DAMAGE TO THE NEEDLE SEATS CAN OCCUR 2 Turn the low speed mixture and high speed mixture screws one full turn counterclockwise ADJUSTING PROCEDURE PREPARATION 1 Use a fresh oil fuel mix ofliusqvama 50 to 1 oil I I I 3 Make sure line extends to length allowed ...

Page 23: ...er or carbon buildup on muffler outlets etc Please see Trouble Shooting Chart before proceeding with carburetor adjustment Very small adjustments can effect engine performance It isvery important to turn the screw a very small amount per adjustment and test performance before making any further adjustments Each adjustment shouldbe nomore than the width of the slot of the adjusting screw This is a ...

Page 24: ...AMAGE TO ENGINE CAN OCCUR 1 HIGH SPEED MIXTURE ADJUSTMENT IDLE E 1 Support drive shafthousing sotrimmerhead attachment is off the ground and will not make contact with any objects 2 Allow the engine to warm up 2 to 3 minutes NOTE Preform step 3 at full throttle Turn high speed mixture screw counterclockwise rich slowly until the engine begins to run rough Then turn the high speed mixture screw slo...

Page 25: ... 4 Idle adjustment should be preformed prior to low speed adjustment for accurate carburetor setting Allow engine to warm up 2 to 3 minutes Turn low speed mixture screw slowly clockwise untilengine speed startsto drop lean without stalling the engine Note this position Turn low speed mixture screw counterclockwise until engine speed increases then starts to drop again rich without stalling the eng...

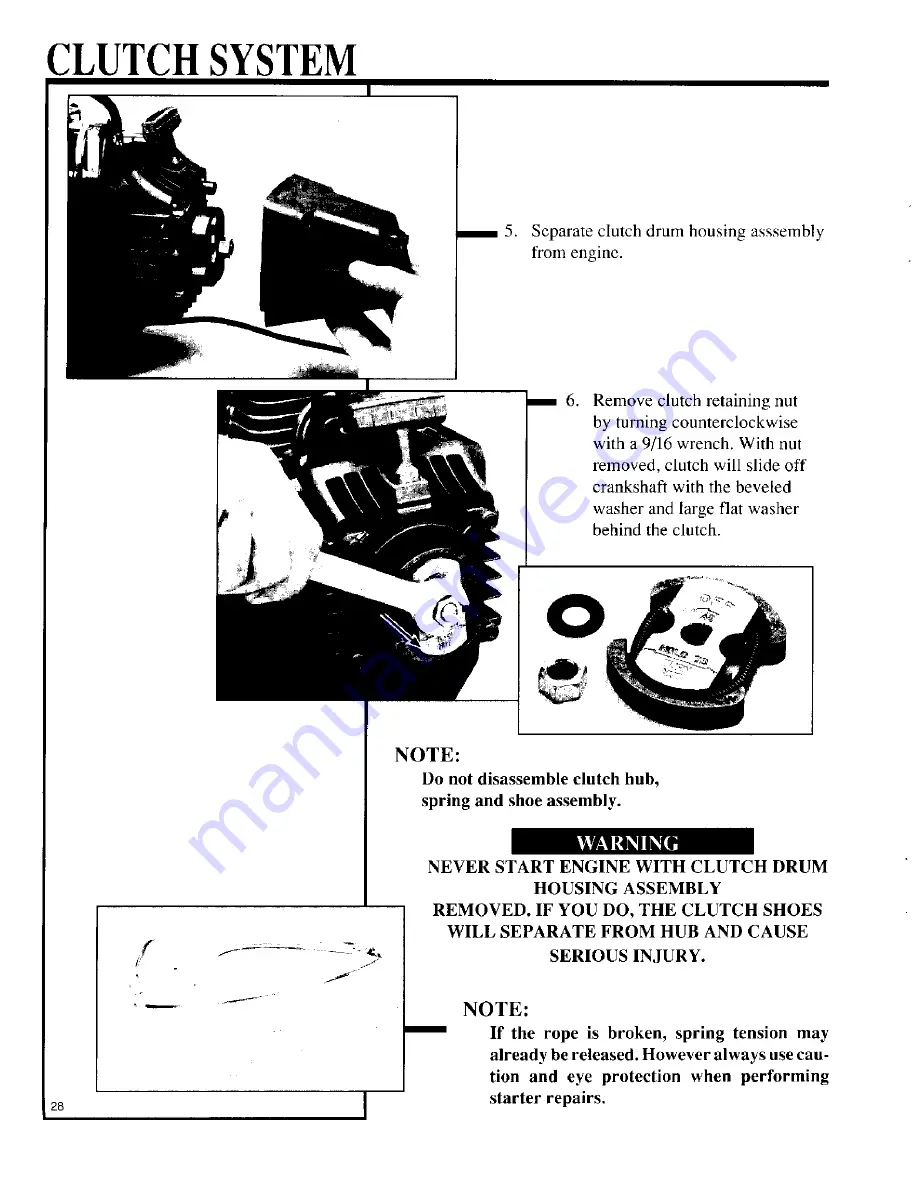
Page 26: ...YPE OF MOTORIZED TOOL ON THE CLUTCH 4 OR ELSE THE CLUTCH CAN FLY APART ND CAUSE SERIOUS INJURY 9 Remove nut with a 9 16 inch wrench turn counterclockwise as shown on clutch 1 NOTE Clutch will slide off the crankshaft intact Do not disassemble 10 To reassemble reverse steps 1 9 For Husqvarna Parts Call 606 678 9623 or 606 561 4983 www mymowerparts com ...

Page 27: ...t piston stop part number 5025033 01 into spark plug opening and tighten NOTE For the following steps 4 thru 6 refer to Throttle Cable section 4 Remove screw and nut from throttle trigger housing 5 Hold throttle trigger away from foam grip and remove barrel end of throttle cable from throttle trigger 6 Carefully pull throttle cable out of foam grip 7 Remove the 4 clutch shroud screws with a 4mm he...

Page 28: ...her behind the clutch I NOTE Do not disassemble clutch hub spring and shoe assembly NEVER START ENGINE WITH CLUTCH DRUM HOUSING ASSEMBLY REMOVED IF YOU DO THE CLUTCH SHOES WILL SEPARATE FROM HUB AND CAUSE SERIOUS INJURY NOTE If the rope is broken spring tension may already be released However always use cau tion and eye protection when performing starter repairs For Husqvarna Parts Call 606 678 96...

Page 29: ...ect sparkplug wire For LC models remove switch wires from igni 1 tion coil at this time 2 3 Remove the four screws holding clutch drum housing and starter assembly On throttle trigger mounted switches it will be necessary to disconnect wires from 4 underside of starter housing assembly J Insert a piston stop A part number 5025033 0 A into the spark plug hole and tighten 27 For Husqvarna Parts Call...

Page 30: ...lockwise on 26 LC RLC and 32 RL 5 Align notch on pulley with the housing notch next to the retaining tab 6 Insert a center punch into the hole that the notches form to hold pulley in position 7 Use a 1 5mm diameter 42 inch long piece of Husqwmna replacement rope 8 Move at least 3m 10 feet away from fuel tank with replacement rope With a match melt both ends of replacement rope to prevent fraying 9...

Page 31: ...S INJURY 8 If starter spring is under tension cut starter rope just below starter handle to release starter spring tension NOTE If the rope is broken spring tension may already F be released Always use eye protection when 7 working on starter repairs r I 11 Starter spring may now be removed as necessary I 10 Remove pulley retaining tab s as s Carefully remove pulley without di starter spring from ...

Page 32: ... retaining springs with pliers Using a 5mm hex wrench part number 5025057 01 remove two cylinder head bolts Slide cylinder off unit to expose piston 6 Using a needle nose pliers remove wrist pin retaining clips as shown from one side of piston Note piston position Pis ton locating pin faces right side of unit from operators position 7 Using adrift lightly tap wrist pin out and remove piston and wr...

Page 33: ...g by ex your fingers enough to Expand new ring only enough to slide it over top of piston into ring groove Use caution not to scar piston when installing new piston ring The ring is located on the piston by a locating pin The ends of the piston ring is cut only to fit one way As shown To reinstall cylinder reverse steps in piston and cylinder removal and replacement section 1thru 6 33 For Husqvarn...

Page 34: ...six 4mm hex head screws at back of carburetor area as shown 5 Separate engine from back plate housing as shown 6 Remove two phillips head screws retaining reed valve assembly 7 Replace reed valve and reinstall reed valve back plate with Phillips head screws NOTE Be sure when reinstalling reed valve back plate that the bend faces outward For Husqvarna Parts Call 606 678 9623 or 606 561 4983 www mym...

Page 35: ... removal section 11 Connecting rod bottom bearing protrudes out far ther on one side This side upon installation goes toward reed valve side u 11 5 Thread clutch retaining nut on crankshaft until it is flush with the top of crankshaft as shown r 12 Remove flywheel 13 Remove key in crankshaft as showl A I 3 For Husqvarna Parts Call 606 678 9623 or 606 561 4983 www mymowerparts com ...

Page 36: ...eplacement is necessary use tool 5025082 01 to remove outer bearing the inner bearing will come out with crankshaft to remove inner bearing from crankshaft use a bearing puller 17 Remove snap ring behind outer bearing if seal replacement is necessary NOTE You do not need to remove inner snap ring This acts as a locator for reseating seal and inner bearing For Husqvarna Parts Call 606 678 9623 or 6...

Page 37: ...gs with bearing g Tap in inner bearing against snap ring with service tool number 5025082 01 ease ocator Turn case over and tap in new seal against other side of inner snap ring locator Install outer snap ring that was removed in step 17 located be hind outer bearing Tap in outer bearing with CRANKCAS For Husqvarna Parts Call 606 678 9623 or 606 561 4983 www mymowerparts com ...

Page 38: ...NOTES 38 For Husqvarna Parts Call 606 678 9623 or 606 561 4983 www mymowerparts com ...

Reviews: