92
– English
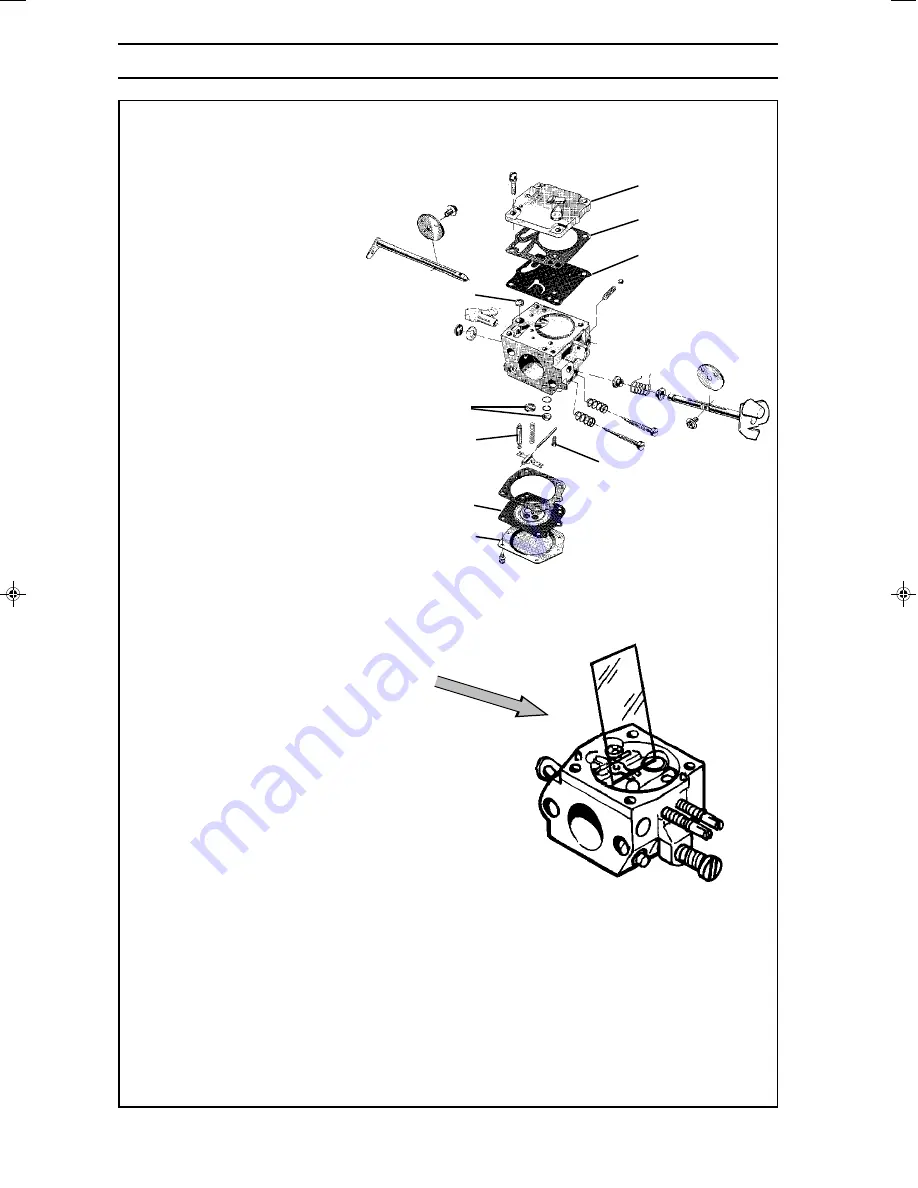
CARBURETTOR
1. If the throttle and choke valves, shafts,
lever arms and springs have been
dismantled these must be reassembled.
Lubricate the shaft bearings using a
light oil.
2. Fit the plugs (J). See page 91.
3. Fit the high and low jet screws and
springs. NOTE! Do not tighten the
screws against the seats. This can
damage the seats and needle tips.
4. Fit the fuel screen (D) by using the
handle of a small screwdriver.
5. Fit the pump diaphragm (G), gasket
(F) and cover (E) on the pump unit.
6. Fit the needle valve (C) with lever arm,
shaft and spring and tighten screw (H).
7. Check, using or a ruler or the like, that
the lever arm is level with the chamber
floor. See the figure to the lower right.
The lever arm can be bent if necessary
to achieve the correct settings.
8. Fit the control diaphragm (B) with
gasket and cover (A) on the metering
unit.
9. Carry out a pressure test.
See page 100.
Tillotson HS 228 B
Maintain a high level of cleanliness when
reassembling the carburettor. Even small
particles of dirt can cause operating
problems.
A
B
H
E
F
G
J
C
D
Eng, p 83-124
96-09-13, 11.10
92
Summary of Contents for 268K, 272K
Page 1: ...101 88 55 26 Workshop Manual Husqvarna Chain Saws ...
Page 21: ...English 21 SERVICE DATA 15 4 6 4 3 28 4 ...
Page 23: ...English 23 SERVICE DATA 20 4 2 4 28 2 9 3 2 9 6 2 2 13 ...
Page 25: ...English 25 SERVICE DATA 3 4 2 3 2 3 25 30 2 3 2 3 2 3 2 3 8 10 2 3 2 3 3 4 20 2 3 ...
Page 27: ...English 27 SERVICE DATA 15 25 12 14 8 10 3 4 3 4 3 4 3 5 3 4 3 4 1 2 ...
Page 29: ...English 29 254 SERVICE DATA 5 3 2 28 4 10 20 4 13 4 9 3 5 ...
Page 31: ...English 31 SERVICE DATA 2 2 28 4 9 20 4 5 13 4 4 5 3 9 5 ...
Page 33: ...English 33 272 268 272 61 SERVICE DATA 3 4 28 4 10 15 4 3 3 5 14 6 4 6 1 1 3 1 3 9 3 ...
Page 35: ...English 35 SERVICE DATA 6 4 35 11 20 7 7 3 17 3 4 7 7 6 4 3 1 9 ...
Page 37: ...English 37 SERVICE DATA 30 40 10 12 5 6 6 2 3 4 5 3 5 3 5 5 6 20 22 5 12 14 ...
Page 39: ...English 39 SERVICE DATA 5 4 40 12 20 4 12 17 10 8 9 4 6 5 5 7 3 3 ...


