background image

325S25     

GB-9

 WARNING

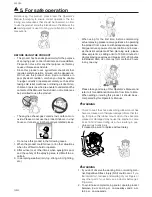
•  Highly  combustible. When  refueling,  switch  the 

engine off and keep well away from naked flames.

•  After filling the tank with fuel, firmly tighten the cap.


a

b

  Starting engine

 WARNING

•  Before starting the engine, make sure that the spray 

lever (spray valve) is completely returned. Starting 

with the spray lever still pulled out is dangerous, as 

chemical fluid may spray out of the nozzle as soon as 

the engine is started.


•  To start the engine, place the sprayer on an even and 

stable surface or platform. If the sprayer is unstable, 

the reaction on starting etc. may cause it to fall.

 IMPORTANT

•  Do not allow the chemical fluid or water in the tank to 

run out while the engine is running. If the engine runs 

empty it may cause breakage of the spray pump.

•  Make sure that the gear oil is filled until the middle of 

9. Operation

the check-window. If it is not enough, loose the upper 

bolt and fill the gear oil. (SAE40CC)


(1)

(2)

(3)

1.  Press the primer at the bottom of the carburetor a few 

times with your finger until the fuel starts to flow through 

the transparent pipe.


 NOTE

•  There is no need to operate the primer when restarting 

immediately after stopping the engine, provided there 

is fuel left in the fuel tank.

2.  Lift the choke lever on the right of the air cleaner until 

it is in the “closed” position, then open the throttle 

lever on the main unit side about 1/3-1/2 from the 

“slow” position.


8. Chemical filling

 WARNING

•  Chemical  substances  should  be  handled  correctly, 

observing the precautions marked on the container. 

Some chemicals are extremely hazardous to humans 

and animals, and handling errors can cause serious 

poisoning or even fatal accidents.

•  When  not  in  use,  chemical  substance  containers 

should be stored separately from other containers out 

of the reach of children.

• 

 IMPORTANT

•  Do not fill the chemical tank with undiluted fluid. This 

could cause the gasket and valves to lose their du-

rability.

  Procedure for filling

1.  Use a bucket or other suitable container and dilute the 

chemical to the requisite strength.

2.  Place the sprayer on an even and stable surface and 

remove the chemical tank cap.

3.  Fill the tank by passing chemical through the strainer.

4.  When filling is complete, firmly tighten the cap.

a.  strainer

•  Chemical tank capacity: 25 litres

a.  cap

b.  fuel tank

a.  air cleaner

b.  choke lever

c.  close

d.  open

e.  transparent pipe

f.  primer

g.  throttle lever

h.  fast

i.  slow

(1) bolt

(2) window

(3) drain bolt

Summary of Contents for 325S25

Page 1: ... and make sure you understand the instructions before using the machine Lea detenidamente el manual de instrucciones y asegúrese de entender su contenido antes de utilizar la máquina Leia as instruções para o uso com toda a atenção e compreenda o seu conteúdo antes de fazer uso da máquina GB 2 15 ES 16 29 PT 30 42 ...

Page 2: ...serve the precaution may result in the risk of death or serious injury IMPORTANT Failure to observe the precaution may result in damage or mal function of the product NOTE Other additional explanations that may be of use when operat ing the product 1 Parts location Contents 1 Parts location 2 2 Specification 3 3 Symbols in the manual 3 4 Symbols on the machine 3 5 For safe operation 4 6 Set up 7 7...

Page 3: ...rk plugs CHAMPION RCJ 6Y Starter system Recoil starter type Stopping system Primary cable short circuit Air cleaner Dry type Standard accessories 1 spray rod 1 rod 1 cock 1 grip 1 joint 1 hose 1 plug wrench When nozzle supplied is attached Nozzle and back belt are not included Due to product improvements these specifications are subject to change without notice 2 Specification 3 Symbols in the man...

Page 4: ...r times when eyesight is poor and the safety of the spraying area is difficult to as certain 3 In worsening weather rain fog strong wind lightning etc When using for the first time before commencing actual spraying please receive guidance in operating the product from a person with adequate experience Fatigue reduces powers of concentration and increas es the riskof accidents When planning work pl...

Page 5: ...t during transportation When transporting in a vehicle please use a rope or similar to fix the sprayer firmly to the cargo trailer in an upright position Please do not transport by bicycle or motorbike as this is dangerous PRECAUTIONS CONCERNING FUEL The engine of this product is fueled by mixed gasoline that includes highly combustible fuel Do not refuel or store fuel containers where there is an...

Page 6: ...e riod of time please have your health checked regularly Please carry out spraying in a planned fashion keep ing a daily record of the date and time of spraying the chemicals used the target pest contents of the work duration of the work and other details Please keep the following points in mind when select ing or using protective gear A Protective clothing Choose clothing that is cool to wear and...

Page 7: ...ightly screw the cock onto the grip 5 Tightly screw the rod onto the cock 6 Tightly screw the spray rod onto the rod 6 Set up Adjusting spray pressure 325S25 has a pressure regulating dial to change spray pressure Set the pressure at a level appropriate to the spray conditions Set the pressure regulating dial as follows Turn in a clockwise direction to increase the pressure Turn in a counterclockw...

Page 8: ...epending on oil ingredients sufficient agitation is nec essary for the engine to last long Be careful that if the agitation is insufficient there is an increased danger of early piston seizing due to abnormally lean mixture 5 Put a clear indication on the outside of the container to avoid mixing up with gasoline or other containers 6 Indicate the contents on outside of container for easy identific...

Page 9: ...e primer when restarting immediately after stopping the engine provided there is fuel left in the fuel tank 2 Lift the choke lever on the right of the air cleaner until it is in the closed position then open the throttle lever on the main unit side about 1 3 1 2 from the slow position 8 Chemical filling WARNING Chemical substances should be handled correctly observing the precautions marked on the...

Page 10: ...ation p5 to 7 Before lifting the sprayer onto your back check that the chemical tank and fuel tank caps are tightly closed When spraying do not point the nozzle at your face or at other people animals etc If the sprayer is tilted too much chemical fluid or fuel may leak out through the air holes in the cap When using always try to maintain an upright posture IMPORTANT If the chemical tank becomes ...

Page 11: ...ove all dirt If the filter is too clogged please replace it with a new one a Fuel filter IMPORTANT If the fuel filter is clogged the engine speed may be limited or speed fluctuations may occur If the engine is operated without a fuel filter dirt will ac cumulate in the carburetor and cause it to malfunction Spark plug WARNING Do not touch the spark plug with your bare hands im mediately after oper...

Page 12: ...tenance NOTE Warm up the engine before adjusting the idling speed Throttle wire play Throttle wire play should be 1 to 2 mm After completely returning the throttle lever take the throttle wire at the carburetor end in your fingers and give a light tug If the play is too great or too small readjust the position of the wire retaining nut Loosen the lock nut and turn the wire retaining nut clockwise ...

Page 13: ...gine comes to a natural stop 5 Remove the spark plug and put a few drops 1 to 2 cc of 2 cycle oil inside the engine After pulling the starter rope 2 or 3 times return the spark plugs to their original position and stop in compressed position 6 After oiling the throttle lever and other metal parts with anti corrosive oil cover the sprayer and store indoors in a low humidity location 10 Maintenance ...

Page 14: ...rrect GAP 0 6 to 0 7 mm spark plug disconnected retighten Case 2 Engine starts but does not keep running hard re starting CHECK PROBABLE CAUSES ACTION fuel tank incorrect fuel or staled fuel drain it and use correct fuel carburetor adjustment screw out of normal range adjust to normal range muffler cylinder exhaust port carbon is built up wipe away air cleaner clogged with dust wash cylinder fin f...

Page 15: ......

Page 16: ...levar a fallo mecánico avería o daños NOTA Esta marca indica sugerencias o directrices útiles a la hora de utilizar el producto 1 Ubicación de las piezas 1 Cebador 2 Cubierta del filtro de aire 3 Palanca del estrangulador 4 Tanque de combustible 5 Arrancador 6 Palanca de aceleración 7 Interruptor de encendido 8 Varilla rociadora 9 Mango 10 Dial de regulación de la presión 11 Tapón de vaciado de fl...

Page 17: ...e Arrancador de retroceso Sistema de parada Cortocircuito del cable primario Filtro de aire Tipo seco Accesorios incluidos 1 varilla rociadora 1 varilla 1 grifo 1 mango 1 union 1 manguera 1 llave Cuando la tobera incluida est instalada La boquilla y el cinturon trasero no vienen incluidos Con el propósito de introducir mejoras estas especificaciones est n sujetas a cambios sin previo aviso 2 Espec...

Page 18: ...ste producto en los siguientes casos 1 Cuando el producto pueda dares vuelta o en otras situaciones en que sea difícil sostener u operar el producto 2 Después de la puesta del sol o en otras situaciones en que la visibilidad no sea buena y sea difícil garantizar la seguridad del rea a rociar 3 Bajo condiciones de mal tiempo lluvia niebla vientos fuertes rayos etc Al usar el producto por primera ve...

Page 19: ...nocturno No permita el ingreso de ninos animales etc al rea de pulverización de sustancias químicas Antes de comenzar a rociar inspeccione completa mente las toberas de pulverización y compruebe si hay algúntipo de anormalidad como por ejemplo tornillos sueltos o una conexión poco segura de la manguera de pulverización fugas de combustible empaquetaduras de líquidos defectuosas o rotas o danos en ...

Page 20: ...un funcionamiento seguro ya que podría sufrir quemaduras debido a las altas temperaturas PRECAUCIONES POSTERIORES A LA PULVER IZACION Selle las sustancias químicas sin uso y gu rdelas fuera del alcance de los ninos No simplemente deseche los envases de sustancias químicas vacíos sino que h galo en forma segura ya sea quem ndolos enterr ndolos o por medio de otro método similar Asimismo tome todas ...

Page 21: ... e manguera rociadora f tuerca de conexión g toma de salida h vástago PRECAUCIONES DURANTE EL PANTENIMIEN TO Para mantener las funciones del producto efectúe periódicamente las inspecciones de mantenimiento indicadas en este manual Cuando sea necesario realizar algún trabajo de mantenimiento o reemplazo de piezas no indicados en este manual consulte el proveedor del producto o al distribuidor de p...

Page 22: ...ción de garantía limitada Por otra parte el desgaste y cambio normal en el producto sin influencia funcional no est cubierto por la garantía También tenga cuidado si en el manual de in strucciones en la parte sobre el uso no est contemplados detalles como la mezcla de gasolina etc es posible que esto no sea cubierto por la garantía Combustible ADVERTENCIA La gasolina es muy inflamable Evite fumar ...

Page 23: ... llene el depósito de sustancias químicas con el líquido sin diluir Esto podría reducir la durabilidad de las empaquetaduras y v lvulas Procedimiento de llenado 1 Use un cubo u otro recipiente apropiado y diluya la sustancia química según se requiera 2 Ponga el pulverizador sobre una superficie estable y quite la tapa del depósito de sustancias químicas 3 Llene el depósito haciendo pasar la sustan...

Page 24: ...atamente en caso de emer gencia 1 Baje completamente la palanca de aceleración y permita que el motor se enfríe durante 1 a 2 minutos a baja velocidad 2 Mantenga presionado el interruptor situado a la izquierda del marco del pulverizador hasta que el motor se haya detenido completamente IMPORTANTE Excepto en casos de emergencia evite detener el motor mientras tira del gatillo regulador Pulverizaci...

Page 25: ...ma de vapor 4 Al terminar de trabajar cierre al grifo completamente y reduzca la velocidad del motor c a b b Limpieza una vez finalizada la operación de pulverización 1 Suelte el tapón de vaciado de fluido transfiera la solu ción química que quede en el depósito a un contenedor apropiado y procésela correctamente considerando todos los factores relativos a la seguridad 2 Vierta aproximadamente 5 l...

Page 26: ...stada al dedo y después apriétala un cuarto de giro con una llave de cubo Ajuste del motor A pesar de que el motor es ajustado antes de salir de la f brica tras un uso repetido y prolongado a veces podr requerir reajuste o mantenimiento Consulte a su distribuidor para detalles sobre operaciones de inspección y mantenimiento distintas de las que se indican a continuación Velocidad de marcha mínima ...

Page 27: ...ntarse mucho durante su funcionami ento y contravenir esta instrucción podría dar lugar a quemaduras graves Cuando revise la máquina para asegurarse de que está bien antes de utilizarla revise el área alred edor del silenciador y elimine cualquier viruta u hoja que se haya pegado al cortador de maleza No hacerlo podría dar lugar a que el silenciador se sobrecalentara y que a su vez esto causara qu...

Page 28: ...liminación Cuando decida deshacerse de la m uina el combustible o aceite para la máquina asegúrese de seguir el regla mento de su localidad 1 Limpie el depósito de soluciones químicas y la tobera consulte la p ina 12 2 Quite la suciedad del pulverizador e inspecciónelo para determinar si presentan algún dano o flojedad y en caso de descubrir alguna anormalidad corríjala debidamente a modo de prepa...

Page 29: ...e la bujía incorrecta corríjala DISTANCIA 0 6 0 7 mm bujía de encendido desconectada apriétela de nuevo Caso 2 El motor arranca pero se para arranque en seco VERIFICACIÓN POSIBLES CAUSAS ACCIÓN tanque del combustible combustible incorrecto o viejo drénelo y llénelo con el combustible adecuado tornillo de ajuste del carburador excede el límite norma ajústelo a la medida normal silenciador cilindro ...

Page 30: ...ões que devem ser seguidas ou conduzirá à falha mecânica avaria ou danos NOTA Esta marca indica sugestões ou indicações úteis na utilização do produto 1 Localização dos componentes Índice 1 Localização dos componentes 30 2 Características 31 3 Símbolos no manual 31 4 Símbolos na máquina 31 5 Para operação em segurança 32 6 Equipar 35 7 Combustível 36 8 Enchimento com químicos 37 9 Operação 37 10 M...

Page 31: ...N RCJ 6Y Sistema de arranque Tipo arrancador de retrocesso Sistema de paragem Curto circuito do cabo prim rio Filtro de ar Tipo seco Acessórios padrão 1 haste de spray 1 haste 1 registro 1 alça 1 junção 1 esguicho 1 chave de vela Quando o bocal fornecido est conectado Bocal e cinta traseira n o est o inclu dos Em função de aperfei oamento de produtos estas especificaçoes est o sujeitas a alteraçoe...

Page 32: ... ou qualquer outro lugar com pouca ventilação Não utilize este produto nas seguintes condiçoes 1 Quando houver possibilidade da queda do produto ou em situaçoes nas quais seja difícil segurar ou operar o produto 2 Depois do pôr do sol ou em ocasioes onde a visão seja prejudicada e seja difícil se certificar a segurança da área a ser pulverizada 3 Quando a condição do tempo estiver ruim e piorando ...

Page 33: ...idades tais como parafusos ou conexoes de spray soltos vazamento de combustícel vedação de fluídos quebrada ou com defeito ou danos na alça PRECAUÇÕES PARA OTRANSPORTE DOS PRODU TOS QUÍMICOS Quando estiver transportando os produtos químicos tome muito cuidado para evitar derramamentos no caso de sacos rasgados vidros quebrados ou tampas soltas Não transporte os produtos químicos em recipientes que...

Page 34: ... elétrico 5 Para operação em segurança Não toque o silencioso as velas de ignição ou outras partes met licas durante o funcionamento do motor ou logo após de desligá lo pois você corre o risco de se queimar como conseqüência de altas temperaturas PRECAUÇÕES DEPOIS DA PULVERIZAÇÃO Por favor feche recipientes dos produtos químicos não utilizados e armazene fora do alcance de crianças Não descarte os...

Page 35: ...r em danos e acidentes sérios du rante a operação 5 Para operação em segurança Não toque no silenciador ou nas velas de ignição com as mãos desprotegidas logo depois de desligar o mo tor Existe o risco de se queimar como conseqüência de altas temperaturas Para repor partes utilize peças originais da Husq varna ou marcas projetadas pela Husqvarna MANUTENÇÃO DAS ETIQUETAS 1 Por favor mantenha todas ...

Page 36: ...dientes do óleo é necessária uma forte agitação para o motor durar Tome cuidado pois se a agitação for insuficiente aumenta o perigo de gripagem dos pistões devido a uma mistura anormalmente pobre 5 Ponha uma indicação clara no exterior dos recipi entes para evitar misturar com gasolina ou outros recipientes 6 Indique o conteúdo no exterior do recipiente para uma fácil identificação ABASTECIMENTO ...

Page 37: ...mente fechada Arrancar com a alavanca de pulverização puxada para cima perigoso porque o fluido químico pode sair para fora do bico logo que o motor arranque Para iniciar o motor coloque o pulverizador numa superfície ou plataforma plana e est el Se o pulveri zador estiver inst el a reacção ao arrancar etc pode causar a sua falha IMPORTANTE Não deixe fluidos químicos ou ua no tanque saírem para fo...

Page 38: ...tanque de combustível tém os bujões bem apertados Ao pulverizar não aponte o bico para a sua face nem para outras pessoas animais etc Se o pulverizador estiver demasiado inclinado o fluido químico ou o combustível podem derramar através dos orifícios de ar do bujão Ao utilizar tente manter sempre uma postura direita IMPORTANTE Se o reservatório para químicos ficar vazio durante a pulverização redu...

Page 39: ...combustível estiver obstruído a veloci dade do motor pode ficar limitada ou podem ocorrer flutuações de velocidade Se o motor estiver a funcionar sem um filtro de com bustível a sujidade ir acumular se no carburador e causar mau funcionamento Velas de ignicao AVISO Não toque na vela de ignição com as mãos nuas imediatamente depois da operação porque pode queimar se devido alta temperatura Após cad...

Page 40: ... a velocidade de ralenti Jogo de fios do estrangulador O jogo de fios do estrangulador deve ser de 1 a 2 mm Após retrair completamente a alavanca do estrangu lador segure no fio do estrangulador na extremidade do carburador com os seus dedos e d um ligeiro puxão Se o jogo for demasiado grande ou demasiado pequeno reajuste a posição da porca de retenção do fio Desap erte a porca de bloqueio e rode ...

Page 41: ...loqueios Note que é necessário remover a tampa superior e inferior para observar a parte superior do cilindro IMPORTANTE Se o desperdício se agarrar e causar bloqueios em redor do respirador de tomada de entrada de ar de arrefecimento ou por entre as barbatanas do cilindro pode causar o sobrea quecimento do motor e isso por sua vez pode causar falha mecânica em parte do aparador de arbustos LUBRIF...

Page 42: ...LGA 0 6 0 7 mm vela de ignição desligada re apertar Caso 2 O motor arranca mas não se mantém a trabalhar difícil tornar a arrancar VERIFICAR CAUSAS PROVÁVEIS ACÇÃO depósito de combustível combustível incorrecto ou combustível drene o e coloque com parado busível correcto parafuso de ajustamento do carburador intervalo fora do normal ajustar o intervalo ao normal silenciador cilindro porto de escap...

Page 43: ......

Page 44: ...115 42 60 38 z V 8 ...

Reviews: