background image

30 – 

English

FEDERAL AND CALIFORNIA EMISSIONS CONTROL WARRANTY STATEMENT

YOUR WARRANTY RIGHTS AND 
OBLIGATIONS

The EPA (U.S. Environmental Protection Agency), CARB 
(California Air Resources Board), Environment Canada and 
Husqvarna Forest & Garden are pleased to explain the 
emissions control system’s warranty on your 2007 and later 
small off-road engine. In U.S. and Canada, new equipment that 
use small off-road engines must be designed, built, and 
equipped to meet the applicable Federal or Californian 
stringent anti-smog standards. Husqvarna Forest & Garden 
must warrant the emissions control system on your small off-
road engine for the period listed below provided there has been 
no abuse, neglect or improper maintenance of your equipment. 
Your emissions control system may include parts such as the 
carburetor, ignition system, catalytic converter, fuel tank, filters 
and other associated components. Also, included may be 
hoses, belts, connectors, sensors, and other emission-related 
assemblies. Where a warrantable condition exists, Husqvarna 
Forest & Garden will repair your small off-road engine at no 
cost to you including diagnosis, parts and labor.

MANUFACTURER

′′′′

S WARRANTY 

COVERAGE

The emissions control system is warranted for two years. If any 
emissions-related part on your equipment is defective, the part 
will be repaired or replaced by Husqvarna Forest & Garden.

OWNER

′′′′

S WARRANTY RESPONSIBILITIES

As the small off-road engine owner, you are responsible for 
performance of the required maintenance listed in your 
operator’s manual. Husqvarna Forest & Garden 
recommends that you retain all receipts covering 
maintenance on your small off-road engine, but Husqvarna 
Forest & Garden cannot deny warranty solely for the lack of 
receipts or your failure to ensure the performance of all 
scheduled maintenance.

As the small off-road engine owner, you should however be 
aware that the Husqvarna Forest & Garden may deny you 
warranty coverage if your small off-road engine or a part 
has failed due to abuse, neglect, or improper maintenance 
or unapproved modifications.

You are responsible for presenting your small off-road 
engine to a Husqvarna Forest & Garden distribution center 
or service center as soon as the problem exists. The 
warranty repairs should be completed in a reasonable 
amount of time, not to exceed 30 days. If you have any 
questions regarding your warranty coverage, you should 
contact Husqvarna Forest & Garden at 1-800-487-5963.

WARRANTY COMMENCEMENT DATE

The warranty period begins on the date the engine or 
equipment is delivered to an ultimate purchaser.

LENGTH OF COVERAGE

Husqvarna Forest & Garden warrants to the ultimate 
purchaser and each subsequent owner that the engine or 
equipment is designed, built, and equipped so as to conform 
with all applicable regulations adopted by EPA and CARB, and 
is free from defects in materials and workmanship that causes 
the failure of a warranted part for a period of two years.

WHAT IS COVERED

REPAIR OR REPLACEMENT OF PARTS

 Repair or 

replacement of any warranted part under the warranty must be 
performed at no charge to the owner at a warranty station. 
Warranty services or repairs will be provided at all Husqvarna 
Forest & Garden distribution centers that are franchised to 
service the subject engines. Throughout the emissions 
warranty period of two years, Husqvarna Forest & Garden 
must maintain a supply of warranted parts sufficient to meet 
the expected demand for such parts.

WARRANTY PERIOD

 Any warranted part that is scheduled for 

replacement as required in the maintenance schedule, is 
warranted for the period of time prior to the first scheduled 
replacement point for that part. If the part fails prior to the first 
scheduled replacement, the part will be repaired or replaced 
by Husqvarna Forest & Garden at no cost. Any such part 
repaired or replaced under warranty is warranted for the 
remainder of the period prior to the first scheduled 
replacement point for the part. Any warranted part that is not 
scheduled for replacement as required in the maintenance 
schedule, is warranted for two years. If any such part fails 
during the period of warranty coverage, it will be repaired and 
replaced by Husqvarna Forest & Garden at no cost. Any such 
part repaired or replaced under the warranty is warranted for 
the remaining warranty period. Any warranted part that is 
scheduled only for regular inspection in the maintenance 
schedule will be warranted for a period of two years. A 
statement in such written instructions to the effect of ”repair or 
replace as necessary” will not reduce the period of warranty 
coverage. Any such part repaired or replaced under warranty 
will be warranted for the remaining warranty period.

DIAGNOSIS

 The owner must not be charged for diagnostic 

labor that leads to the determination that a warranted part is in 
fact defective, provided that such diagnostic work is performed 
at a warranty station.

CONSEQUENTIAL DAMAGES

 Husqvarna Forest & Garden is 

liable for damages to other engine components proximately 
caused by a failure under warranty of any warranted part.

EMISSION WARRANTY PARTS LIST

1

Carburetor and internal parts

2

Intake pipe, airfilter holder and carburetor bolts.

3

Airfilter and fuelfilter covered up to maintenance schedule.

4

Spark Plug, covered up to maintenance schedule

5

Ignition Module

6

Muffler with catalytic converter

7

Fuel tank

WHAT IS NOT COVERED

All failures caused by abuse, neglect or improper maintenance 
are not covered.

ADD -ON OR MODIFIED PARTS

Add-on or modified parts that are not exempted by CARB or 
EPA may not be used. The use of any non-exempted add-on or 
modified parts will be grounds for disallowing a warranty claim. 
Husqvarna Forest & Garden will not be liable to warrant failures 
of warranted parts caused by the use of a non-exempted add-
on or modified part.

HOW TO FILE A CLAIM

If you have any questions regarding your warranty rights and 
responsibilities, you should contact your nearest authorized 
servicing dealer or call Husqvarna Forest & Garden at 1-800-
487-5963.

WHERE TO GET WARRANTY SERVICE

Warranty services or repairs are provided through all 
Husqvarna Forest & Garden authorized servicing dealers.

MAINTENANCE, REPLACEMENT AND 
REPAIR OF EMISSION-RELATED PARTS

Any replacement part may be used in the performance of any 
warranty maintenance or repairs and must be provided without 
charge to the owner. Such use will not reduce the warranty 
obligations of the manufacturer.

MAINTENANCE STATEMENT

The owner is responsible for the performance of all required 
maintenance, as defined in the operator’s manual.

Summary of Contents for 326R X-SERIES

Page 1: ...E E E En n n ng g g gl l l li i i is s s sh h h h 326RX series Operator s manual EPA Please read the operator s manual carefully and make sure you understand the instructions before using the machine ...

Page 2: ...es or grass blades can be thrown violently to the side when the blade comes into contact with a fixed object This is called blade thrust The blade is capable of amputating an arm or leg Always keep people and animals at least 15 metres from the machine Arrows which show limits for handle positioning Always wear approved protective gloves Wear sturdy non slip boots Only use non metallic flexible cu...

Page 3: ...ade 13 Fitting a trimmer guard and Superauto II 1 trimmer head 13 Fitting other guards and cutting attachments 14 Adjusting the harness and clearing saw 15 Standard harness 15 FUEL HANDLING Fuel safety 16 Fuel 16 Fueling 17 STARTING AND STOPPING Check before starting 18 Starting and stopping 18 WORKING TECHNIQUES General working instructions 20 MAINTENANCE Carburetor 24 Muffler 26 Cooling system 2...

Page 4: ... and market high quality motor driven products for forestry and gardening as well as for building and construction industry Your purchase gives you access to professional help with repairs and service whenever this may be necessary If the retailer who sells your machine is not one of our authorized dealers ask for the address of your nearest servicing dealer It is our wish that you will be satisfi...

Page 5: ...linder cover 12 Starter handle 13 Fuel tank 14 Choke control 15 Air purge 16 Air filter cover 17 Handle adjustment 18 Locking nut 19 Support flange 20 Support cup 21 Drive disc 22 Trimmer head 23 Socket spanner 24 Operator s manual 25 Transport guard 26 Allen key 27 Locking pin 28 Harness 29 Start throttle button 30 Part throttle dial 31 Adjusting screw for throttle cable 32 Spark plug cap and spa...

Page 6: ...ine operator must ensure that no people or animals come closer than 15 metres while working When several operators are working in the same area the safety distance should be at least twice the tree height and no less than 15 metres WARNING The ignition system of this machine produces an electromagnetic field during operation This field may under some circumstances interfere with pacemakers To redu...

Page 7: ...ed at the idle setting Make sure the throttle control is locked at the idle setting when the throttle lockout is released Press the throttle lockout and make sure it returns to its original position when you release it Check that the throttle control and throttle lockout move freely and that the return springs work properly See instructions under the heading Start Start the machine and apply full ...

Page 8: ... that requires you to free yourself from the machine and harness See instructions under the heading Adjusting the harness and clearing saw Check that the harness straps are correctly positioned Once the harness and machine have been adjusted check that the harness quick release works correctly Muffler The muffler is designed to keep noise levels to a minimum and to direct exhaust fumes away from t...

Page 9: ...ays ensure that your hand is shielded by the blade guard when doing this Always use a socket spanner with a shaft that is long enough to allow this The arrow in the diagram shows the area where you should operate the socket spanner when loosening or tightening the nut The nylon lining inside the locking nut must not be so worn that you can turn it by hand The lining should offer a resistance of at...

Page 10: ...lade Check the cutting attachment for damage or cracks A damaged cutting attachment should always be replaced Sharpening grass cutters and grass blades See the cutting attachment packaging for correct sharpening instructions Sharpen blades and cutters using a single cut flat file IMPORTANT Only use cutting attachments with the guards we recommend See the chapter on Technical data Refer to the inst...

Page 11: ...rer to suit a particular engine size This is especially important when a fully automatic trimmer head is used Only use the recommended cutting attachment See the chapter on Technical data Smaller machines generally require small trimmer heads and vice versa This is because when clearing using a cord the engine must throw out the cord radially from the trimmer head and overcome the resistance of th...

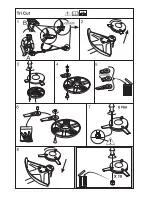
Page 12: ...ndlebar clockwise so that the throttle handle rests against the engine Now twist the handlebar around the shaft Tighten the knob Fit the transport guard to the cutting attachment Assembling the cutting equipment Fitting a blade guard grass blade and grass cutter Hook the blade guard combination guard A onto the fitting on the shaft and secure with the bolt CAUTION Use the recommended blade guard S...

Page 13: ...in the hole to lock the shaft Place the blade D and support flange F on the output shaft Fit the nut G The nut must be tightened to a torque of 35 50 Nm 3 5 5 kpm Use the socket spanner in the tool kit Hold the shaft of the spanner as close to the blade guard as possible To tighten the nut turn the spanner in the opposite direction to the direction of rotation Caution left hand thread When looseni...

Page 14: ... direction to the direction of rotation Caution left hand thread Fit the bottom half of the trimmer head K to the cover I by pressing them together with the cut outs on the bottom half aligned with the catches on the cover To dismantle follow the instructions in the reverse order Fitting other guards and cutting attachments Fit the trimmer guard combination guard A intended for use with the trimme...

Page 15: ...ight is evenly distributed across both shoulders Correct height Adjust the shoulder strap so that the cutting attachment is parallel to the ground Correct balance Let the cutting attachment rest lightly on the ground If you use a saw blade it should balance about 10 cm above the ground to prevent contact with stones and the like Adjust the position of the suspension ring to balance the clearing sa...

Page 16: ...ixed to ensure that the correct mixture is obtained When mixing small amounts of fuel even small inaccuracies can drastically affect the ratio of the mixture Gasoline CAUTION Always use a quality gasoline oil mixture with an octane rating of at least 87 octane RON MON 2 If your machine is equipped with a catalytic converter see chapter on Technical data always use a good quality unleaded gasoline ...

Page 17: ...nk can cause operating problems Ensure that the fuel is well mixed by shaking the container before filling the tank WARNING The catalytic converter muffler gets very hot during and after use This also applies during idling Be aware of the fire hazard especially when working near flammable substances and or vapours WARNING Taking the following precautions will lessen the risk of fire Do not smoke o...

Page 18: ...ing and stopping Starting Primer bulb Press the air purge repeatedly until fuel begins to fill the bulb The bulb need not be completely filled Choke Set the choke control in the choke position Hold the body of the machine on the ground using your left hand CAUTION Not with your foot Grip the starter handle slowly pull out the cord with your right hand until you feel some resistance the starter paw...

Page 19: ...NCTION RX RDX It is possible to set the engine for part throttle operation using the dial on the side of the throttle handle Turn the dial up to decrease the part throttle rpm Turn the dial down to increase the part throttle rpm When you have set the part throttle rpm you will feel increased resistance when you press the throttle trigger This increased resistance makes it easier to maintain a cons...

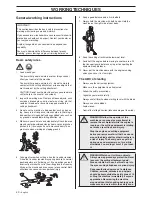
Page 20: ...t guard before carrying or transporting the equipment any distance 10 Never put the machine down with the engine running unless you have it in clear sight The ABC of clearing Always use the correct equipment Make sure the equipment is well adjusted Follow the safety precautions Organise your work carefully Always use full throttle when starting to cut with the blade Always use sharp blades Avoid s...

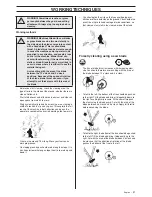
Page 21: ... right Tilt the blade and bring it diagonally down to the right exerting firm pressure At the same time push the stem using the blade guard Cut with the area of the blade between 3 o clock and 5 o clock Apply full throttle before advancing the blade To fell to the right the bottom of the tree should be pushed to the left Tilt the blade and bring it diagonally up to the right Cut with the area of t...

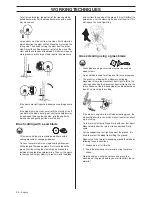
Page 22: ... the stems to the required height Now try to reach in with the blade and cut from the centre of the group If it is still difficult to gain access cut the stems high up and let them fall This will reduce the risk of jamming Grass clearing using a grass blade Grass blades and grass cutters must not be used on woody stems A grass blade is used for all types of tall or coarse grass The grass is cut do...

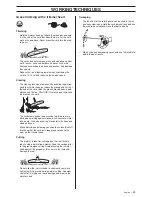
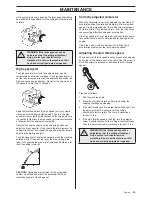
Page 23: ...rd wears quicker and must be fed forward more often when working against stones brick concrete metal fences etc than when coming into contact with trees and wooden fences When trimming and clearing you should use less than full throttle so that the cord lasts longer and to reduce the wear on the trimmer head Cutting The trimmer is ideal for cutting grass that is difficult to reach using a normal l...

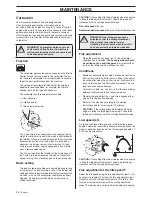
Page 24: ...cutting attachment stops Rec idle speed 2700 rpm Recommended max speed See the Technical data section Fine adjustment When the machine has been run in the carburetor should be finely adjusted The fine adjustment should be carried out by a qualified person First adjust the L jet then the idling screw T and then the H jet Conditions Before any adjustments are made make sure that the air filter is cl...

Page 25: ...e will accelerate without hesitation and burble a little at maximum speed It is also important that the cutting attachment does not rotate at idle If the low speed jet L is set too lean it may cause starting difficulties and poor acceleration If the high speed jet H is set too lean it will result in less power less performance poor acceleration and or damage to the engine If both the L and H jets ...

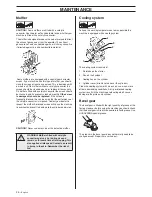
Page 26: ...nspect the muffler A blocked screen will cause the machine to overheat and result in damage to the cylinder and piston CAUTION Never use a machine with a defective muffler Cooling system To keep the working temperature as low as possible the machine is equipped with a cooling system The cooling system consists of 1 Air intake on the starter 2 Fins on the flywheel 3 Cooling fins on the cylinder 4 C...

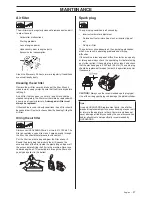
Page 27: ...d the plastic bag to distribute the oil Squeeze the excess oil out of the filter inside the plastic bag and pour off the excess before fitting the filter to the machine Never use common engine oil This would drain through the filter quite quickly and collect in the bottom Spark plug The spark plug condition is influenced by Incorrect carburetor adjustment An incorrect fuel mixture too much or inco...

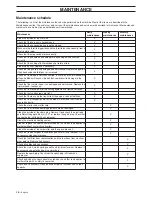
Page 28: ... X Check that the locking nut of the cutting equipment is tighten correctly X Check that nuts and screws are tight X Check that there are no fuel leaks from the engine tank or fuel lines X Check that the transport guard for the blade is intact and that it can be secured correctly X Check the starter and starter cord X Check that the vibration damping elements are not damaged X Clean the outside of...

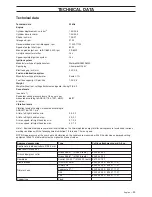
Page 29: ...nch mm 0 02 0 5 Fuel and lubrication system Manufacturer type of carburetor Zama C1Q Fuel tank capacity US pint litre 1 06 0 5 Weight Weight without fuel cutting attachment and guard Lbs kg 10 8 4 9 Sound levels see note 1 Equivalent sound pressure level at the user s ear measured according to ANSI B175 3 1997 dB A min max 88 97 Vibration levels Vibration levels at handles measured according to AN...

Page 30: ...t Garden distribution centers that are franchised to service the subject engines Throughout the emissions warranty period of two years Husqvarna Forest Garden must maintain a supply of warranted parts sufficient to meet the expected demand for such parts WARRANTY PERIOD Any warranted part that is scheduled for replacement as required in the maintenance schedule is warranted for the period of time ...

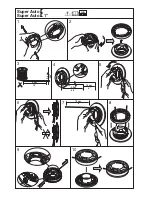
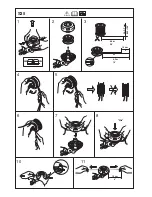
Page 31: ...1 Super Auto II Super Auto II 1 2 3 4 5 6 7 8 9 10 4 0 m 13 2 4 mm 095 2 0 m 6 5 6 6 15 cm 15 cm ...

Page 32: ......

Page 33: ... Clic 1 2 3 5 6 7 10 11 8 5 m 28 4 8 4 2 m 14 2 4 2 7 mm 095 106 10 cm 4 6 15 cm S35 ...

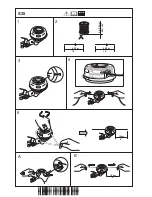
Page 34: ... z RC 5v z RC 5v 1 2 4 3 2 4 2 7 mm 095 106 4 25 m 14 4 25 m 14 B 6 15 cm A 6 15 cm S35 5 ...

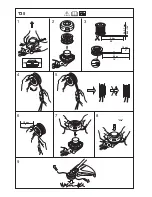
Page 35: ...T35 Clic 1 2 3 5 6 7 9 8 5 m 28 4 8 4 3 m 14 2 4 2 7 mm 095 106 10 cm 4 6 15 cm ...

Page 36: ... z RC 5v 2006 12 06 z RC 5v 1150352 95 ...

Reviews: