background image

6 - English

 NOTE

  To avoid noise complaints, in general, 

operate product between 8 a.m. and 5 

p.m. on weekdays and 9 a.m. to 5 p.m. on 

weekends. 

 NOTE

Check and follow the local regulations as to 

sound level and hours of operations for the 

product.

PRECAUTIONS BEFORE SPRAYING

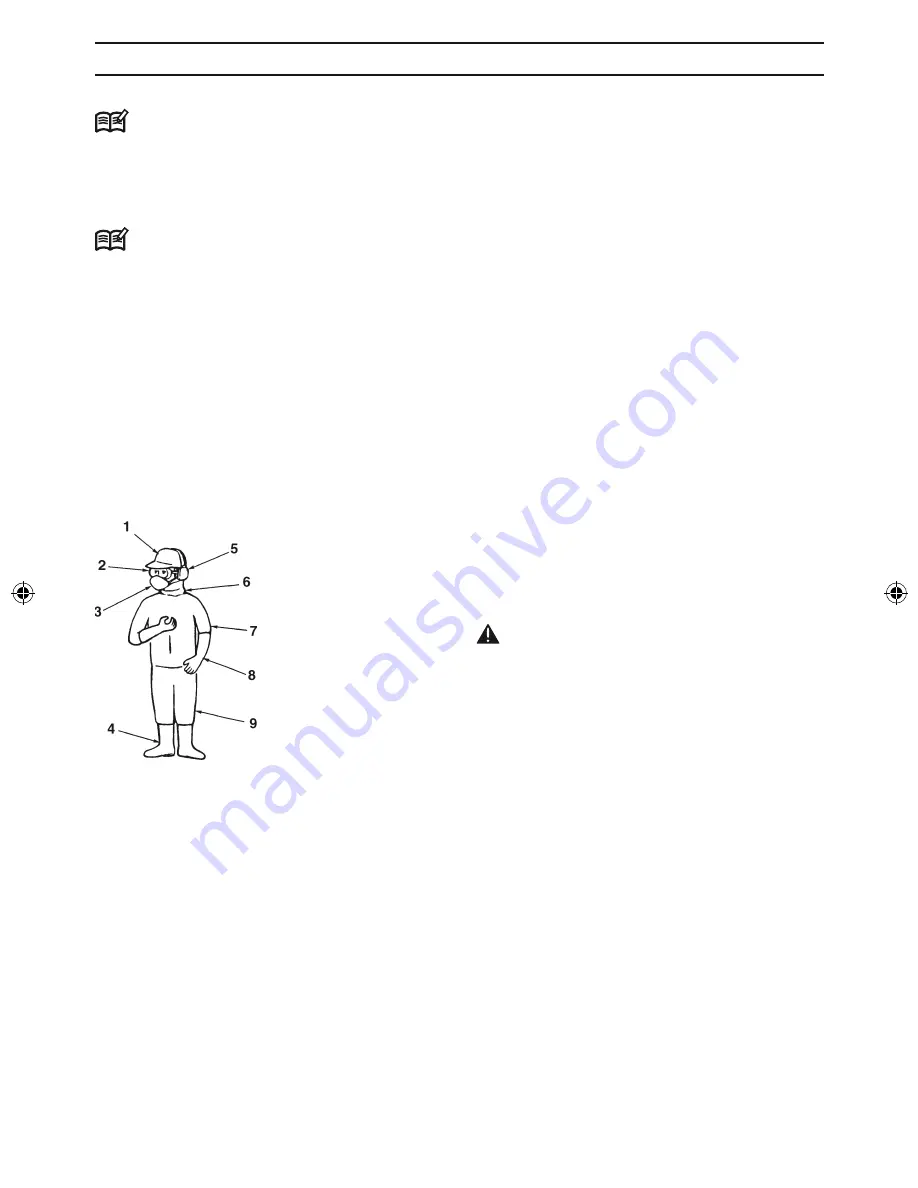
•  Make sure you have the correct protective 

clothing, headgear, rubber gloves and 

boots, a protective mask, goggles, a towel, 

protective cream, etc., to prevent chemicals 

from coming into contact with your skin or 

entering your lungs. When spraying, wear 

this protective gear to prevent any risk of 

injury.


•  S

tore chemicals in a locked storage box, 

locker, or other safe place out of the reach of 

children.

•  Carefully read the instructions for using the 

chemicals, and familiarize yourself with the 

level of toxicity, method of use, etc.

•  Pay all due consideration to the area in 

which you will be spraying, to ensure that 

you do not pollute the water supply, rivers, 

lakes, ponds, etc., or cause any damage to 

residents, passers-by, livestock, etc.

•  Prepare yourself physically on the day before 

spraying, by for example cutting down on 

alcoholic beverages or late-night work.

•  Do not allow children, animals, etc., to enter 

the chemical spraying area.

•  Before spraying, prepare fully by inspecting 

sprayer nozzles and checking for 

abnormalities such as loose screws or spray 

hose connections, fuel leaks, defective 

or broken fluid gaskets, or damage to the 

carrying band.

PRECAUTIONS WHEN TRANSPORTING 
CHEMICALS

• 

When transporting chemicals, handle with 

care to ensure that there is no spillage of 

chemicals from torn bags, broken bottles, or 

loose stoppers.

•  Do not carry chemicals in the same container 

as food.

PRECAUTIONS WHEN TRANSPORTING 
THE SPRAYER

  Do not transport the sprayer while it has 

chemicals or fuel in the tank, as these 

could leak out as a result of impact during 

transportation.

•  When transporting in a vehicle, use a rope or 

similar to fix the sprayer firmly to the cargo 

trailer in an upright position. Do not transport 

by bicycle or motorbike, as this is dangerous.

PRECAUTIONS CONCERNING FUEL

 WARNING

To reduce the risk of fire and burn injury:

a) Handle fuel with care. It is highly flammable.

b) Do not smoke while handing fuel.

c) Do not refuel a hot engine.

d) Do not refuel a running engine.

e) Avoid spilling fuel or oil. Always wipe

unit dry before using.

f ) Move at least 10 ft. (3 meters) away from the 

fueling point before starting the engine.

g) Always store gasoline in a container approved 

for flammable liquids.

h) Make sure the unit is properly assembled and 

in good operating condition.

PRECAUTIONS WHEN REFILLING 
CHEMICALS

• 

Before filling the sprayer tank with chemicals, 

make sure to check if a bottom shutter (outlet 

valve) of the tank is fully closed. Opened shutter 

is dangerous because chemicals will be sprayed 

simultaneously with the engine start.

•  After chemical refilling, firmly tighten the 

tank cap. If not fully tightened the cap may 

become loose during spraying, with the risk 

of physical exposure to the chemicals.

Safety Precautions

1. Protective headgear

2. Protective goggles

3. Protective mask

4. Rubber boots

5. Ear muffs

6. Neck covering

7. Protective clothing

8. Rubber gloves

9. Protective clothing

H1152413-26,362D28,GB.indd   6

2009-10-15   15.58

Summary of Contents for 362D28

Page 1: ......

Page 2: ... 9 Fuel 11 Operation 12 Maintenance 16 Storage 18 Disposal 18 Mist kit Available as accessory 19 Notes on types of warnings WARNING Instructions labeled as shown above concern critical steps or procedures which must be followed in order to prevent accidents which could lead to serious bodily injury or death This mark is used to indicate instructions which must be followed without exception IMPORTA...

Page 3: ... others Symbols on the machine The port to refuel the MIX GASOLINE Position FUEL TANK CAP The direction to open the choke Position CARBURETTOR BODY 3 For safe operation and maintenance symbols are carved in relief on the machine According to these indications be careful not to make a mistake IMPORTANT If the warning label peels off or becomes soiled and impossible to read you should contact the de...

Page 4: ...gle cylinder air cooled 2 cycle gasoline engine Exhaust capacity cc 62 0 Fuel used Lubricating oil gasoline mix Lubricating oil used 2 cycle engine oil Admixture ratio 50 1 Carburetor Diaphragm rotary valve type Ignition system Electronic controlled flywheel magnet type Spark plugs NGK BPMR7A Starter system Recoil starter type Stopping system Primary cable short circuit Air cleaner Half wet type W...

Page 5: ...ersonal protective equipment usage of the chemicals mixing and handling of the chemicals and waste BEFORE USING THE PRODUCT Since this product uses agricultural chemicals that require careful operation misuse can be dangerous Do not use this product when tired or otherwise in poor physical condition or when you may be unable to judge correctly or operate accurately such as after taking cold relief...

Page 6: ...dle with care to ensure that there is no spillage of chemicals from torn bags broken bottles or loose stoppers Do not carry chemicals in the same container as food PRECAUTIONS WHEN TRANSPORTING THE SPRAYER Do not transport the sprayer while it has chemicals or fuel in the tank as these could leak out as a result of impact during transportation When transporting in a vehicle use a rope or similar t...

Page 7: ...lugs or plug cords while the engine is running as you may get an electric shock Do not touch the muffler spark plugs or other metal parts with your bare hands while the engine is running or immediately after stopping the engine as there is the risk of burns due to high temperatures PRECAUTIONS AFTER SPRAYING Seal unused chemicals and store them out of the reach of children Do not simply discard em...

Page 8: ...CAUTIONS In order to maintain the functions of the product regularly carry out the maintenance inspections listed in this Manual When maintenance or parts replacement not indicated in this Manual are required consult your product supplier or nearest HUSQVARNA product dealer Never keep the engine running while carrying out inspections or maintenance Do not modify the sprayer or dismantle the engine...

Page 9: ...sert a part of the earth chain into the gap between the screw and the main body Fix with the screw 2 Apply a clamp large onto the larger end of the attached flexible hose Insert a wire of the earth chain into the hose Securely fit the hose on the elbow 3 Fix the hose securely by tightening the clamp screw using a screwdriver CONNECTION OF BLOWER 1 Flexible hose 2 Clamp 3 Wire 4 Joint 5 Straight pi...

Page 10: ...ge arm 2 Insert the upper end of the rod into the required position hole NOTE In case the rod length does not match with the hole position adjust the length in following manner 1 Put the adjust lever to Full open position 2 Push up the change arm with fingers to Full open position 3 Slacken the lock nut on the lower end of the rod and turn the rod till the upper end of the rod come to High rate po...

Page 11: ...oil and agitate well 4 Pour in the rest of gasoline and agitate again for at least one minute As some oils may be difficult to agitate depending on oil ingredients sufficient agitation is necessary for the engine to last long Be careful that if the agitation is insufficient there is an increased danger of early piston seizing due to abnormally lean mixture 5 Put a clear indication on the outside o...

Page 12: ...our left hand Pull the starter knob slowly until you feel it engage and then give it a vigorous strong pull Avoid pulling the starter rope out to its full extension Do not allow the starter rope to snap back Rewind the rope slowly This will prevent premature damage to the starter 6 Once the engine is running gradually open the choke if it was set closed and let the engine run at idle speed for a m...

Page 13: ...incorrect shutter action due to moisture Remaining chemicals shall be separately put into a storage container within the same day To carry the sprayer by vehicles empty the chemical tank Otherwise chemicals may be tamped down by vibration and cause insufficient output failure Clear button After usages the valve may be locked with contamination in the engine that makes the rope heavy In such a case...

Page 14: ...en the tank cap securely 3 Start the engine and carry the unit on your back SETTING THROTTLE LEVER Set the throttle lever to the full throttle position at the time of spraying work 1 Full throttle 2 Throttle lever SETTING ADJUST LEVER STOPPER To maintain shutter opening at the same level for a spray operation set the regulator lever stopper on the required position 1 Slide the stopper while pullin...

Page 15: ...nditions i e spray area spray equipment walking speed etc set the adjust lever at an adequate position ADJUSTMENT OF DISCHARGE RATE IMPORTANT Discharge rate can be varied according to grade and dryness of chemicals As granular agents are uneasy to distinguish care should be taken not to spray excess volumes To avoid uneven sprays try to keep constant walking speed during the operation Operation ...

Page 16: ...mall wire hook Disconnect the filter assembly from the fuel pipe and unhook the retainer to disassemble it Clean the components with gasoline Spark plug After every 50 hours of operation detach the spark plug and remove dirt from the electrodes with a wire brush or similar The correct electrode gap is 0 6 to 0 7mm When replacing plugs use designated items IMPORTANT If too much fuel is absorbed or ...

Page 17: ...and resulting in personal injury Follow the instructions below to replace the shoulder strap with new one 1 Pass the upper end of the strap through the hanger making the FLAPPED SIDE OUTSIDE 2 Put the end of the strap through the ring on the strap and then push the ring toward the hanger as close as possible Maintenance 1 Ring 2 Flapped side WARNING The flap on the end of the strap works as a stop...

Page 18: ...lity is found correct it thoroughly in preparation for the next time you use the unit 3 Drain the fuel tank 4 Start the engine and leave it in idling condition until all the fuel inside the carburetor is spent and the engine comes to a natural stop 5 Remove the spark plug and put a few drops 1 to 2 cc of 2 cycle oil inside the engine After pulling the starter rope 2 or 3 times return the spark plu...

Page 19: ...ion spraying work supply water into the tank and operate the mister to make sure that there is any leakage or any mechanical failure Repair it if there is any leakage or failure before the solution spraying work Discharge rate Valve travel lit min 1 1 2 2 3 3 4 4 Max Longitudinal coverage Horizontal direction 12 m Vertical direction 12 m COMPONENTS A Tank B Intermediate valve C Mist nozzle ASSEMBL...

Page 20: ......

Reviews: