background image

4

TOOLS REQUIRED FOR ASSEMBLY

A socket wrench set will make assembly easier.  Standard 
wrench sizes are listed.

(1) Utility knife

(1) Tire pressure gauge

(1) Pair of pliers

(1) 9/16" wrench 

OPERATOR’S POSITION (See Fig. 1)

When right or left hand is mentioned in this manual, it 
means when you are in the operating position (standing 
behind tiller handles).

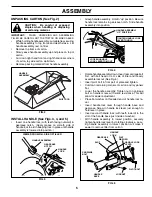
Your new tiller has been assembled at the factory with exception of those parts left unassembled for shipping purposes.  
To ensure safe and proper operation of your tiller all parts and hardware you assemble must be tightened securely.  Use 
the correct tools as necessary to insure proper tightness.

FRONT

OPERATOR’S
POSITION

LEFT

RIGHT

FIG. 1

(1) Hairpin Clip

(1) Carriage Bolt 

3/8-16 UNC x 1 Grade 5

(1) Center Locknut 

3/8-16 UNC

(1) Handle Lock Lever

(1) Flat Washer 13/32 x 1 x 11 Gauge

CONTENTS OF HARDWARE PACK

(2) Handle Locks

(1) Pivot Bolt 
3/8-16 UNC Grade 5

Extra Shear Pins & Clips

ASSEMBLY

Summary of Contents for 500RTT

Page 1: ...500RTT Owner s Manual ...

Page 2: ... Never allow adults to operate the equipment without proper instruction Keep the area of operation clear of all persons par ticularly small children and pets PREPARATION Thoroughly inspect the area where the equipment is to be used and remove all foreign objects Disengage all clutches and shift into neutral before starting the engine motor Do not operate the equipment without wearing ade quate out...

Page 3: ...ON ENGINE AND SHOULD NOT BE USED ON OR NEAR ANY UNIMPROVED FOREST COVERED BRUSH COVERED OR GRASS COVERED LAND UNLESS THE ENGINE S EXHAUST SYSTEM IS EQUIPPED WITH A SPARK ARRESTER MEETING APPLICABLE LOCAL LAWS IF ANY IF A SPARK ARRESTER IS USED IT SHOULD BE MAINTAINED IN EFFECTIVE WORKING ORDER BY THE OPERATOR IN THE STATE OF CALIFORNIA A SPARK ARRESTER IS REQUIRED BY LAW SECTION 4442 OF THE CALIFO...

Page 4: ... been assembled at the factory with exception of those parts left unassembled for shipping purposes To ensure safe and proper operation of your tiller all parts and hardware you assemble must be tightened securely Use the correct tools as necessary to insure proper tightness FRONT OPERATOR S POSITION LEFT RIGHT FIG 1 1 Hairpin Clip 1 Carriage Bolt 3 8 16 UNC x 1 Grade 5 1 Center Locknut 3 8 16 UNC...

Page 5: ...assembly is lowered into position HANDLE ASSEMBLY FIG 3 HANDLE ASSEMBLY GEARCASE NOTCH HANDLE LOCK VIEWED FROM R H SIDE OF TILLER LOOSEN HANDLE LOCK LEVER TO MOVE TIGHTEN HANDLE LOCK LEVER TO HOLD handles_34 CARRIAGE BOLT SLOT GEARCASE HANDLE LOCK FLAT WASHER HANDLE LOCK LEVER PIVOT BOLT LOCKNUT HANDLE BASE FIG 5 Rotate handle assembly down Insert rear carriage bolt first with bolt head on L H sid...

Page 6: ...clip through hole of shift rod to secure FIG 7 FIG 6 END OF CLUTCH CABLE CONTROL BAR CONTROL BAR BRACKET CONTROL BAR BRACKET CLUTCH CABLE ATTACH CLUTCH CABLE See Fig 6 Hook end of clutch cable through hole in control bar bracket CHECK TIRE PRESSURE The tires on your unit were overinflated at the factory for shipping purposes Correct and equal tire pressure is important for best tilling performance...

Page 7: ...EPTH STAKE SHIFT LEVER LEVELING SHIELD RECOIL STARTER HANDLE SHIFT LEVER INDICATOR OUTER SIDE SHIELD FIG 8 MEETS ANSI SAFETY REQUIREMENTS Our tillers conform to the safety standards of the American National Standards Institute DEPTH STAKE Controls depth at which tiller will dig DRIVE CONTROL BAR Used to engage tines LEVELING SHIELD Levels tilled soil OUTER SIDE SHIELD Adjustable to protect small p...

Page 8: ...ontrol bar FORWARD WHEELS ONLY TINES STOPPED Release drive control bar and move shift lever indicator to F forward position Engage drive control bar and tiller will move forward REVERSE WHEELS ONLY TINES STOPPED DO NOT STAND DIRECTLY BEHIND TILLER Release the drive control bar Move throttle control to SLOW position Move shift lever indicator to R reverse position Hold drive control bar against the...

Page 9: ...filler plug and remove plug Engineoilshouldbetopointofoverflowingwhenengine is level For approximate capacity see PRODUCT SPECIFICATIONS on page 3 of this manual All oil must meet A P I Service Classification SG SL For cold weather operation you should change oil for easier starting See oil viscosity chart in the Mainte nance section of this manual To change engine oil see the Maintenance section ...

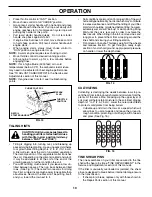
Page 10: ...d wind it may be advisable to till the soil at the end of the growing season to further condition the soil You will find tilling much easier if you leave a row un tilled between passes Then go back between tilled rows See Fig 14 There are two reasons for doing this First wide turns are much easier to negotiate than about faces Second the tiller won t be pulling itself and you toward the row next t...

Page 11: ...k tine operation Check for loose fasteners LUBRICATION Keep unit well lubricated See LUBRICATION CHART c SAE 30 OR 10W 30 MOTOR OIL d REFER TO MAINTENANCE ENGINE SECTION e EP 1 GREASE LUBRICATION CHART c WHEEL HUB d ENGINE c IDLER BRACKET c LEVELING SHIELD HINGES c DEPTH STAKE PIN e RH GEAR CASE GREASE FITTIG MAINTENANCE SCHEDULE REGULAR SERVICE PERIOD 3 ITEM Each use First month or 20 Hrs Every 3...

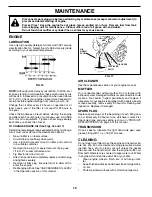
Page 12: ... 4 C Check your engine oil level more frequently to avoid possible engine damage from running low on oil Change the oil after every 25 hours of operation or at least once a year if the tiller is not used for 25 hours in one year Check the crankcase oil level before starting the engine and after each five 5 hours of continuous use Add SAE 30 motor oil or equivalent Tighten oil filler plug securely ...

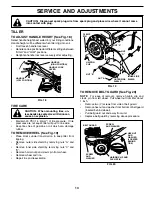
Page 13: ...r oil which can damage rubber TO REMOVE WHEEL See Fig 19 Place blocks under transmission to keep tiller from tipping Remove outer side shield by removing nuts A and B Remove inner side shield by removing nuts C and D Remove hairpin clip and clevis pin from wheel Remove wheel and tire Repair tire and reassemble tire_4 CLEVIS PIN INNER SIDE SHIELD OUTER SIDE SHIELD NUT D HAIRPIN CLIP NUT C NUT A NUT...

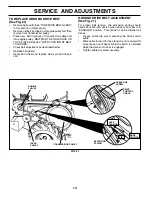
Page 14: ...UST BE IN GROOVE ON TOP OF IDLER PULLEY NOTE POSITION OF BELT TO GUIDES Check belt adjustment as described below Replace belt guard Reposition wheel and replace clevis pin and hairpin clip FIG 21 GROUND DRIVE BELT ADJUSTMENT See Fig 21 For proper belt tension the extension spring should have about 5 8 inch stretch when drive control bar is in ENGAGED position This tension can be attained as follow...

Page 15: ...aintain the superb tilling performance of this machine the tines should be checked for sharpness wear and bending particularly the tines which are next to the transmission If the gap between the tines exceeds 3 1 2 inches 9 cm they should be replaced or straightened as necessary New tines should be assembled as shown in Fig 26 Sharpened tine edges will rotate rearward from above tine_3 TINE TINE 3...

Page 16: ...rburetor when running engine Best carburetor adjustment is obtained when fuel tank is 1 4 full See the adjustment sectin of your engine manual for further instructions ENGINE SPEED The engine speed has been factory set Do not attempt to increase engine speed as it may result in personal injury If you believe the engine is running too fast or too slow take your tiller to an authorized engine servic...

Page 17: ... the engine and let it run until the fuel lines and carburetor are empty Never use engine or carburetor cleaner products in the fuel tank or permanent damage may occur Use fresh fuel next season NOTE Fuel stabilizer is an acceptable alternative in mini mizing the formation of fuel gum deposits during storage Add stabilizer to gasoline in fuel tank or storage container Always follow the mix ratio f...

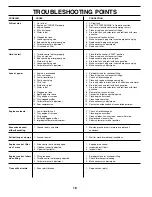
Page 18: ...nd clean carburetor 6 Stale or dirty fuel 6 Drain fuel tank and refill with fresh gasoline 7 Water in fuel 7 Drain fuel tank and carburetor and refill tank with fresh gasoline 8 Clogged fuel tank 8 Remove fuel tank and clean 9 Spark plug wire loose 9 Connect and tighten spark plug wire 10 Dirty engine air screen 10 Clean engine air screen 11 Dirty clogged muffler 11 Clean replace muffler 12 Carbur...

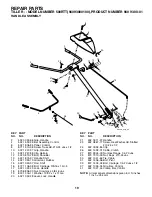
Page 19: ...rol KEY PART NO NO DESCRIPTION 2 532 00 92 66 Grip Handle 4 532 15 92 28 Bar Assembly Control 6 532 18 06 85 Panel Control 8 871 19 10 08 Screw Truss Hd 10 24 unc x 1 2 10 532 12 47 97 Grip Handle 11 532 12 47 88 Clip Hairpin 12 532 08 13 28 Bolt Shoulder 13 532 18 74 97 Handle Shift 14 532 10 93 13 Grommet Rubber 15 532 10 93 37 Rod Shift 16 872 11 06 08 Bolt Carriage 3 8 16 x 1 Gr 5 17 532 10 92...

Page 20: ...led REPAIR PARTS TILLER MODEL NUMBER 500RTT 96093000100 PRODUCT NUMBER 960 93 00 01 MAINFRAME LEFT SIDE KEY PART NO NO DESCRIPTION 25 532 12 47 88 Clip Hairpin 26 532 16 67 92 Guard Belt 27 532 13 28 01 Belt V 28 532 10 46 79 Pulley Idler 29 812 00 00 32 Ring Klip 30 532 15 92 29 Bracket Idler 31 532 10 23 84 Bolt Hex 5 16 16 x 12 32 532 10 21 41 Shaft Idler Arm 33 874 76 06 16 Bolt Hex 3 8 16 x 1...

Page 21: ...0 Nut Hex 3 8 16 10 874 76 05 24 Bolt Hex 5 16 18 x 1 1 2 11 532 12 47 88 Clip Hairpin 12 532 12 68 75 Rivet Drilled 13 532 10 21 90 Tire 532 15 07 40 Rim 532 12 47 18 Tire Valve 15 Engine Honda Model No GC160QHA2 Order parts from Engine Manufacturer NOTE All component dimensions given in U S inches 1 inch 25 4 mm For engine service and replacement parts call the toll free number for your engine m...

Page 22: ...4 810 04 07 00 Washer Lock 7 16 25 873 61 07 00 Nut Hex 7 16 20 27 532 14 30 09 Bearing Shaft Ground Drive L H 28 532 10 63 90 Spacer 0 765 x 1 125 x 1 23 REPAIR PARTS TILLER MODEL NUMBER 500RTT 96093000100 PRODUCT NUMBER 960 93 00 01 TRANSMISSION KEY PART NO NO DESCRIPTION 29 532 10 21 34 Chain 35 50 Pitch 30 532 15 07 37 Ground Shaft Assembly 31 532 14 30 08 Bearing Shaft Ground Drive R H 32 532...

Page 23: ...RT NO NO DESCRIPTION 1 873 90 05 00 Nut Lock Hex Flange 5 16 18 2 532 16 29 52 Shield Side Outer L H 3 532 00 83 93 Pin Stake Depth 4 812 00 00 35 Ring Klip 5 532 18 08 47 Bolt Rdhd Sqnk 5 16 18 x 3 4 6 532 00 83 94 Spring 7 532 00 83 92 Bracket Latch 8 532 10 92 30 Spring Depth Stake 9 532 12 50 14 Shield Tine 10 872 14 05 08 Bolt Carriage 5 16 18 unc x 1 11 873 22 05 00 Nut Hex 5 16 18 12 810 04...

Page 24: ...12 46 60 Retainer Spring Zinc 5 532 13 27 27 Assembly Hub and Plate L H 8 874 61 06 16 Bolt Hex 3 8 24 x 1 9 532 00 44 60 Tine Outer R H 10 532 13 27 28 Assembly Hub and Plate R H 11 532 00 65 55 Tine Inner R H 34 873 54 06 00 Nut Crownlock 3 8 24 NOTE All component dimensions given in U S inches 1 inch 25 4 mm REPAIR PARTS TILLER MODEL NUMBER 500RTT 96093000100 PRODUCT NUMBER 960 93 00 01 TINE AS...

Page 25: ...Placement 6 532 10 21 80 Decal Shift Indicator 7 532 16 23 84 Decal Warning 8 532 18 92 33 Decal Tineshield 9 532 12 00 76 Decal Warning Rotating Tines 532 19 42 46 Manual Owner s English KEY PART NO NO DESCRIPTION 3 2 6 9 REPAIR PARTS TILLER MODEL NUMBER 500RTT 96093000100 PRODUCT NUMBER 960 93 00 01 DECALS 5 1 7 8 ...

Page 26: ... at the time of purchase all claims must be sent to the appropriate manufacturer 4 Lawn and garden attachments are covered by a third party which gives a warranty all claims for warranty should be sent to the manufacturer and 5 Emission Control System components necessary to comply with CARB TIER II and EPA regula tions which are manufactured by third party engine manufacturer SECTION 4 EXCEPTIONS...

Page 27: ...27 SERVICE NOTES ...

Page 28: ...532 19 42 46 11 10 04 TR Printed in U S A ...

Reviews: