background image

WORKING TECHNIQUES

English

 –

 19

Basic working techniques

Always slow the engine to idle speed after each working 
operation. Long periods at full throttle without any load on 
the engine can lead to serious engine damage.

Grass clearing using a grass blade

Grass blades and grass knifes must not be used on 
woody stems.

A grass blade is used for all types of tall or coarse 
grass.

The grass is cut down with a sideways, swinging 
movement, where the movement from right-to-left is 

the clearing stroke and the movement from left-to-
right is the return stroke. Let the left-hand side of the 
blade (between 8 and 12 o’clock) do the cutting.

If the blade is angled to the left when clearing grass, 
the grass will collect in a line, which makes it easier to 
collect, e.g. by raking.

Try to work rhythmically. Stand firmly with your feet 
apart. Move forward after the return stroke and stand 
firmly again.

Let the support cup rest lightly against the ground. It 
is used to protect the blade from hitting the ground.

Reduce the risk of material wrapping around the blade 
by following these instructions: 

1Always work at full throttle.

2Avoid the previously cut material during the return 
stroke.

Stop the engine, unclip the harness and place the 
machine on the ground before you start to collect the 
cut material.

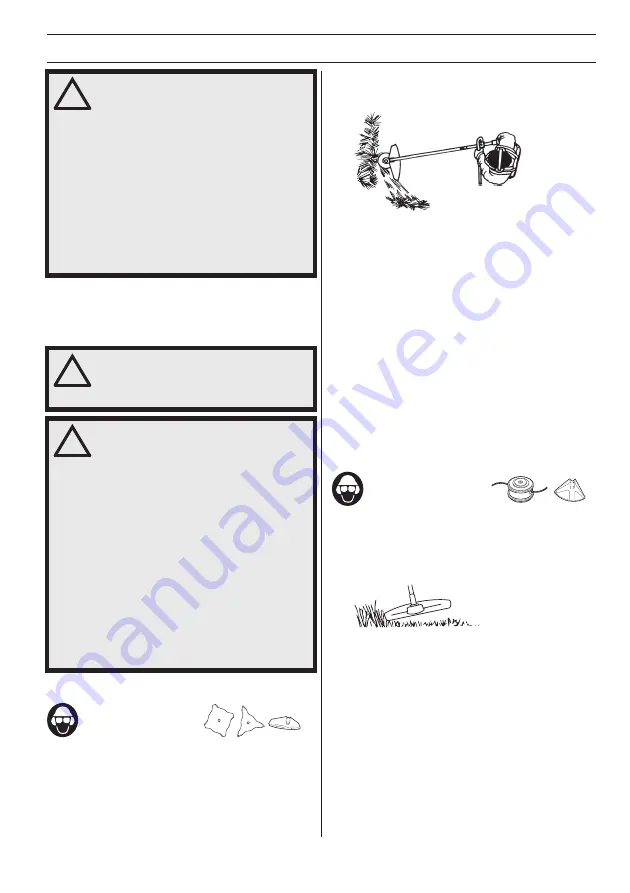
Grass trimming with a trimmer head

Trimming

Hold the trimmer head just above the ground at an 
angle. It is the end of the cord that does the work. Let 
the cord work at its own pace. Never press the cord 
into the area to be cut.

The cord can easily remove grass and weeds up 
against walls, fences, trees and borders, however it 
can also damage sensitive bark on trees and bushes, 
and damage fence posts.

Reduce the risk of damaging plants by shortening the 
cord to 10-12 cm and reducing the engine speed.

!

WARNING! Watch out for thrown objects. 
Always wear approved eye protection. 
Never lean over the cutting attachment 
guard. Stones, rubbish, etc. can be 
thrown up into the eyes causing 
blindness or serious injury.

Keep unauthorised persons at a 
distance. Children, animals, onlookers 
and helpers should be kept outside the 
safety zone of 15 m. (50 ft.) Stop the 
machine immediately if anyone 
approaches. Never swing the machine 
around without first checking behind you 
to make sure no-one is within the safety 
zone.

!

WARNING! Sometimes branches or 
grass get caught between the guard and 
cutting attachment. Always stop the 
engine before cleaning.

!

WARNING! Machines fitted with saw 
blades or grass blades can be thrown 
violently to the side when the blade 
comes into contact with a fixed object. 
This is called blade thrust. A blade thrust 
can be violent enough to cause the 
machine and/or operator to be propelled 
in any direction, and possibly lose 
control of the machine. Blade thrust can 
occur without warning if the machine 
snags, stalls or binds. Blade thrust is 
more likely to occur in areas where it is 
difficult to see the material being cut.

Avoid cutting with the area of the blade 
between the 12 o’clock and 3 o’clock 
positions. Because of the speed of 
rotation of the blade, blade thrust can 
occur if you attempt to cut thick stems 
with this area of the blade.

Summary of Contents for 535RJ

Page 1: ...E E E En n n ng g g gl l l li i i is s s sh h h h 535RJ Operator s manual Please read the operator s manual carefully and make sure you understand the instructions before using the machine ...

Page 2: ...ple and animals at least 15 meters from the machine Arrows which show limits for handle positioning Always wear approved protective gloves Wear sturdy non slip boots Only use non metallic flexible cutting attachments i e trimmer heads with trimmer cord Primer bulb Set the choke control in the choke position Starting instructions Other symbols decals on the machine refer to special certification re...

Page 3: ... blade and grass cutter 13 Fitting other guards and cutting attachments 13 FUEL HANDLING Fuel safety 14 Fuel 14 Fueling 15 STARTING AND STOPPING Check before starting 16 Starting and stopping 16 WORKING TECHNIQUES General working instructions 18 MAINTENANCE Carburetor 21 Muffler 21 Cooling system 22 Bevel gear 22 Air filter 22 Spark plug 23 Maintenance schedule 24 TECHNICAL DATA Technical data 25 ...

Page 4: ...hest priority We develop manufacture and market high quality motor driven products for forestry and gardening as well as for building and construction industry Your purchase gives you access to professional help with repairs and service whenever this may be necessary If the retailer who sells your machine is not one of our authorized dealers ask for the address of your nearest servicing dealer It ...

Page 5: ...nsion ring 9 Stop switch 10 Throttle trigger lockout 11 Throttle trigger 12 Spark plug cap and spark plug 13 Cylinder cover 14 Starter handle 15 Fuel tank 16 Air filter cover 17 Choke control 18 Air purge 19 Locking nut 20 Support flange 21 Support cup 22 Blade 23 Drive disc 24 Transport guard 25 Spark plug spanner 26 Locking pin 27 Socket spanner 28 Allen key 29 Guard extension 30 Harness 31 Oper...

Page 6: ...metres while working When several operators are working in the same area the safety distance should be at least 15 metres Do an overall inspection of the machine before use see maintenance schedule WARNING This machine produces an electromagnetic field during operation This field may under some circumstances interfere with active or passive medical implants To reduce the risk of serious or fatal i...

Page 7: ...e throttle control is automatically locked at the idle setting Make sure the throttle control is locked at the idle setting when the throttle lockout is released Press the throttle lockout and make sure it returns to its original position when you release it Check that the throttle trigger and throttle lockout move freely and that the return springs work properly See instructions under the heading...

Page 8: ...a blunt or incorrect cutting attachment wrong type or incorrectly filed see instructions under the heading Filing the blade increases the level of vibration The machine s vibration damping system reduces the transfer of vibration between the engine unit cutting equipment and the machine s handle unit Regularly check the vibration damping units for cracks or deformation Check that the vibration dam...

Page 9: ...e machine If the muffler on your machine is fitted with a spark arrestor screen this must be cleaned regularly A blocked screen will cause the engine to overheat and may lead to serious damage WARNING Never use the machine indoors or in spaces lacking proper ventilation Exhaust fumes contain carbon monoxide an odorless poisonous and highly dangerous gas WARNING Mufflers fitted with catalytic conve...

Page 10: ...arse grass A trimmer head is intended for trimming grass General rules Only use cutting attachments with the guards we recommend See the chapter on Technical data Keep the teeth of the blade correctly sharpened Follow our instructions and use the recommended file gauge An incorrectly sharpened or damaged blade increases the risk of accidents IMPORTANT Only use cutting attachments with the guards w...

Page 11: ...mer heads and vice versa This is because when clearing using a cord the engine must throw out the cord radially from the trimmer head and overcome the resistance of the grass being cleared The length of the cord is also important A longer cord requires greater engine power than a shorter cord of the same diameter Make sure that the cutter on the trimmer guard is intact This is used to cut the cord...

Page 12: ... guide in the slot of the combination guard Then click the guard extension into position on the guard with the four quick fasteners WARNING Only grass blades grass cutters or trimmer heads plastic blades may be used when the J handle is fitted Saw blades must never be used with the J handle WARNING When fitting the cutting attachment it is extremely important that the raised section on the drive d...

Page 13: ...close to the blade guard as possible To tighten the nut turn the spanner in the opposite direction to the direction of rotation Caution left hand thread Fitting other guards and cutting attachments Fit the trimmer guard combination guard A intended for use with the trimmer head plastic blades CAUTION Ensure that the guard extension is fitted Hang the trimmer guard combination guard A on the two ho...

Page 14: ...ure that the correct mixture is obtained When mixing small amounts of fuel even small inaccuracies can drastically affect the ratio of the mixture Gasoline CAUTION Always use a quality gasoline oil mixture with an octane rating of at least 87 octane RON MON 2 If your machine is equipped with a catalytic converter see chapter on Technical data always use a good quality unleaded gasoline oil mixture...

Page 15: ... well mixed by shaking the container before filling the tank Gasoline litre Two stroke oil litre 2 50 1 5 0 10 10 0 20 15 0 30 20 0 40 US gallon US fl oz 1 2 1 2 2 1 2 6 1 2 5 12 7 8 WARNING The catalytic converter muffler gets very hot during and after use This also applies during idling Be aware of the fire hazard especially when working near flammable substances and or vapors WARNING Taking the...

Page 16: ...lace the blade guard if it is exposed to impact or is cracked Check that the trimmer head and trimmer guard are not damaged or cracked Replace the trimmer head or trimmer guard if they have been exposed to impact or are cracked Never use the machine without a guard nor with a defective guard All covers must be correctly fitted and undamaged before you start the machine Starting and stopping Starti...

Page 17: ...from the start setting CAUTION Do not pull the starter cord all the way out and do not let go of the starter handle when the cord is fully extended This can damage the machine CAUTION Do not put any part of your body in marked area Contact can result in burns to the skin or electrical shock if the spark plug cap has been damaged Always use gloves Do not use a machine with damaged spark plug cap St...

Page 18: ... right side of your body 7 When using a trimmer it must always be hooked securely to the harness Otherwise you will be unable to control the trimmer safetly and this can result in injury yourself or others never use a harness with a defective quick release 8 Keep the cutting attachment below waist level 9 Switch off the engine before moving to another area Fit the transport guard before carrying o...

Page 19: ...e Never press the cord into the area to be cut The cord can easily remove grass and weeds up against walls fences trees and borders however it can also damage sensitive bark on trees and bushes and damage fence posts Reduce the risk of damaging plants by shortening the cord to 10 12 cm and reducing the engine speed WARNING Watch out for thrown objects Always wear approved eye protection Never lean...

Page 20: ...e cord lasts longer and to reduce the wear on the trimmer head Cutting The trimmer is ideal for cutting grass that is difficult to reach using a normal lawn mower Keep the cord parallel to the ground when cutting Avoid pressing the trimmer head against the ground as this can ruin the lawn and damage the tool Do not allow the trimmer head to constantly come into contact with the ground during norma...

Page 21: ...s are fitted with a catalytic converter See chapter on Technical data to see whether your machine is fitted with a catalytic converter The muffler is designed to reduce the noise level and to direct the exhaust gases away from the operator The exhaust gases are hot and can contain sparks which may cause fire if directed against dry and combustible material Some mufflers are equipped with a special...

Page 22: ...er Unnecessary wear to engine parts Excessive fuel consumption Clean the filter every 25 hours or more regularly if conditions are exceptionally dusty Cleaning the air filter Remove the air filter cover and take out the filter Wash it clean in warm soapy water Ensure that the filter is dry before refitting it An air filter that has been in use for a long time cannot be cleaned completely The filte...

Page 23: ...her action If the spark plug is dirty clean it and check that the electrode gap is 0 020 inch 0 5 mm The spark plug should be replaced after about a month in operation or earlier if necessary CAUTION Always use the recommended spark plug type Use of the wrong spark plug can damage the piston cylinder Check that the spark plug is fitted with a suppressor Note Use only HUSQVARNA replacement parts Us...

Page 24: ...ctly X Check that nuts and screws are tight X Check that there are no fuel leaks from the engine tank or fuel lines X Check the starter and starter cord X Check that the vibration damping elements are not damaged X Clean the outside of the spark plug Remove it and check the electrode gap Adjust the gap to 0 5 mm 020 or replace the spark plug Check that the spark plug is fitted with a suppressor X ...

Page 25: ...20 Max engine output acc to ISO 8893 kW rpm 1 6 8400 Catalytic converter muffler Yes Speed regulated ignition system Yes Ignition system Spark plug Champion RCJ 6Y Electrode gap inch mm 0 02 0 5 Fuel and lubrication system Fuel tank capacity US pint litre 1 27 0 6 Weight Weight without fuel cutting attachment and guard Lbs kg 13 2 6 0 Sound levels see note 1 Equivalent sound pressure level at the ...

Page 26: ...3 Ø 255 3 teeth 537 33 16 03 Grass 255 4 Ø 255 4 teeth 537 33 16 03 Multi 275 4 Ø 275 4 teeth 537 33 16 03 Plastic blades Tricut Ø 300 mm Separate blades have part number 531 01 77 15 537 33 16 03 Trimmer head T35 T35x Ø 2 4 3 0 mm cord 537 33 16 03 537 34 94 03 S35 Ø 2 4 3 0 mm cord 537 33 16 03 537 34 94 03 T45x Ø 2 7 3 3 mm cord 537 33 16 03 537 34 94 03 Support cup 503 89 01 02 ...

Page 27: ...resenting your small off road engine to a Husqvarna Forest Garden distribution center or service center as soon as the problem exists The warranty repairs should be completed in a reasonable amount of time not to exceed 30 days If you have any questions regarding your warranty coverage you should contact Husqvarna Forest Garden in USA at 1 800 487 5951 in CANADA at 1 800 805 5523 or send e mail co...

Page 28: ...disallowing a warranty claim Husqvarna Forest Garden will not be liable to warrant failures of warranted parts caused by the use of a non exempted add on or modified part HOW TO FILE A CLAIM If you have any questions regarding your warranty rights and responsibilities you should contact your nearest authorized servicing dealer or call Husqvarna Forest Gardenin USA at 1 800 487 5951 in CANADA at 1 ...

Page 29: ......

Page 30: ... Clic 1 2 3 5 6 7 10 11 8 5 m 28 4 8 4 2 m 14 2 4 2 7 mm 095 106 10 cm 4 6 15 cm S35 ...

Page 31: ...1 2 4 3 2 4 2 7 mm 095 106 4 25 m 14 4 25 m 14 B 6 15 cm A 6 15 cm S35 5 ...

Page 32: ...T35 T35x Clic 1 2 3 5 6 7 9 8 5 m 28 4 8 4 3 m 14 2 4 2 7 mm 095 106 10 cm 4 6 15 cm ...

Page 33: ... Clic 1 2 3 5 6 7 9 10 m 32 4 8 4 3 m 14 2 7 3 3 mm 106 13 10 cm 4 6 15 cm T45 T45x ...

Page 34: ...Original instructions z X Q 5X z X Q 5X 2015 11 23 1156624 95 ...

Reviews: