background image


4


 – 


English


INTR


ODUCTION


Dear Customer


,


Cong


ratulations on your choice to buy a Husqvarna product! Husqvarna is based on a tradition that dates back to 1689, 

when the Swedish King Karl XI ordered the construction of a factory on the banks of the Husqvarna River, for production 
of muskets. The location was logical, since water power was harnessed from the Huskvarna River to create the water-
powered plant. During the more than 300 years in existence, the Husqvarna factory has produced a lot of different 
products, from wood stoves to modern kitchen appliances, sewing machines, bicycles, motorcycles etc. In 1956, the first 
motor driven lawn mowers appeared, followed by chain saws in 1959, and it is within this area Husqvarna is working 
today.

Today Husqvarna is one of the leading manufacturers in the world of forest and garden products, with quality as our 
highest priority. The business concept is to develop, manufacture and market motor-driven products for forestry and 
gardening, as well as for the building and construction industry. Husqvarna


s aim is also to be at the front edge for 

ergonomics, usability, security and environmental protection. That is the reason why we have developed many different 
features to add to our products within these areas.

We are convinced that you will appreciate with great satisfaction the quality and performance of our product for a very 
long time to come. The purchase of one of our products gives you access to professional help with repairs and service 
whenever this may be necessary. If the retailer who sells your machine is not one of our authorised dealers, ask for the 
address of your nearest service workshop.

It is our wish that you will be satisfied with your product and that it will be your companion for a long time. Think of this 
operator


s manual as a valuable document. By following its content (usage, service, maintenance, etc), the life span and 

the second-hand value of the machine can be extended. If you sell this machine, make sure that the operator


s manual 

is passed on to the buyer.

Thank you for using a Husqvarna product.

Husqvarna AB has a policy of continuous product development and therefore reserves the right to modify the design and 
appearance of products without prior notice.


H1158111-38,543RS,GB.fm  Page 4  Monday, January 11, 2016  1:47 PM

Summary of Contents for 543RS

Page 1: ...6 6 6 4 4 4 49 9 9 9 543RS Operator s manual Please read the operator s manual carefully and make sure you understand the instructions before using the machine 操作手册 ౯ಱᆎᄎ Юҧቛ үƗಙГᄤԐ ٺ য়ࢺ۹རනଃᆴ ޱ ᄣൗႯࠖఝè H1158111 38 543RS GB fm Page 1 Tuesday January 12 2016 10 06 AM ...

Page 2: ... than 15 meters Machines fitted with saw blades or grass blades can be thrown violently to the side when the blade comes into contact with a fixed object This is called blade thrust The blade is capable of amputating an arm or leg Always keep people and animals at least 15 meters from the machine Arrows which show limits for handle positioning Always wear approved protective gloves Wear sturdy non...

Page 3: ...t 7 Cutting equipment 10 ASSEMBLY Assembling the handlebar and throttle 12 Fitting blades and trimmer heads 12 FUEL HANDLING Fuel safety 14 Fuel 14 Fueling 15 STARTING AND STOPPING Check before starting 16 Starting and stopping 16 WORKING TECHNIQUES General working instructions 18 MAINTENANCE Carburettor 22 Air filter 22 Fuel filter 23 Bevel gear 23 Spark plug 23 Maintenance schedule 24 TECHNICAL ...

Page 4: ...s also to be at the front edge for ergonomics usability security and environmental protection That is the reason why we have developed many different features to add to our products within these areas We are convinced that you will appreciate with great satisfaction the quality and performance of our product for a very long time to come The purchase of one of our products gives you access to profe...

Page 5: ...ft 6 Air purge 7 Choke control 8 Handlebar clamp 9 Suspension ring 10 Stop switch 11 Throttle trigger 12 Cylinder cover 13 Starter handle 14 Fuel tank 15 Air filter cover 16 Handlebar 17 Locking nut 18 Support flange 19 Support cup 20 Drive disc 21 Operator s manual 22 Screwdriver 23 Locking pin 24 Approved eye protection 25 Tank 26 Socket spanner 27 Harness H1158111 38 543RS GB fm Page 5 Monday J...

Page 6: ...t the safety checks maintenance and service instructions described in this manual Some maintenance and service measures must be carried out by trained and qualified specialists See instructions under the Maintenance heading All covers guards and handles must be fitted before starting Ensure that the spark plug cap and ignition lead are undamaged to avoid the risk of electric shock The machine oper...

Page 7: ...t professionally If you need further information please contact your nearest service workshop IMPORTANT A grass trimmer can be dangerous if used incorrectly or carelessly and can cause serious or fatal injury to the operator or others It is extremely important that you read and understand the contents of this operator s manual You must use approved personal protective equipment whenever you use th...

Page 8: ...at is designed to minimize vibration and make operation easier Use of incorrectly wound cord or an incorrect cutting attachment increases the level of vibration See instructions under the heading Cutting equipment The machine s vibration damping system reduces the transfer of vibration between the engine unit cutting equipment and the machine s handle unit Regularly check the vibration damping uni...

Page 9: ...with a shaft that is long enough to allow this The arrow in the diagram shows the area where you should operate the socket spanner when loosening or tightening the nut The nylon lining inside the locking nut must not be so worn that you can turn it by hand The lining should offer a resistance of at least 1 5 Nm The nut should be replaced after it has been put on approx 10 times WARNING Mufflers fi...

Page 10: ...tachment for damage or cracks A damaged cutting attachment should always be replaced Sharpening grass knifes and grass blades See the cutting attachment packaging for correct sharpening instructions Sharpen blades and knifes using a single cut flat file IMPORTANT Only use cutting attachments with the guards we recommend See the chapter on Technical data Refer to the instructions for the cutting at...

Page 11: ...This is especially important when a fully automatic trimmer head is used Only use the recommended cutting attachment See the chapter on Technical data Smaller machines generally require small trimmer heads and vice versa This is because when clearing using a cord the engine must throw out the cord radially from the trimmer head and overcome the resistance of the grass being cleared The length of t...

Page 12: ...the shaft Turn the trimmer head counterclockwise when installing To dismantle follow the instructions in the reverse order WARNING When fitting the cutting attachment it is extremely important that the raised section on the drive disc support flange engages correctly in the centre hole of the cutting attachment If the cutting attachment is fitted incorrectly it can result in serious and or fatal p...

Page 13: ... in the gear housing Insert the locking pin C in the hole to lock the shaft Place the blade D support cup E and support flange F on the output shaft Fit the nut G The nut must be tightened to a torque of 35 50 Nm 3 5 5 kpm Use the spanner in the tool kit Hold the shaft of the spanner as close to the blade guard as possible To tighten the nut turn the spanner in the opposite direction to the direct...

Page 14: ...obtained When mixing small amounts of fuel even small inaccuracies can drastically affect the ratio of the mixture Petrol CAUTION Always use a quality petrol oil mixture at least 90 octane RON If your machine is equipped with a catalytic converter see chapter onTechnical data always use a good quality unleaded petrol oil mixture Leaded petrol will destroy the catalytic converter Use low emission p...

Page 15: ...ner with an anti spill valve Clean the area around the fuel cap Contamination in the tank can cause operating problems Ensure that the fuel is well mixed by shaking the container before filling the tank WARNING Taking the following precautions will lessen the risk of fire Do not smoke or place hot objects near fuel Always shut off the engine before refuelling Always stop the engine and let it cool...

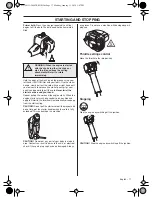
Page 16: ...racked Check that the trimmer head and trimmer guard are not damaged or cracked Replace the trimmer head or trimmer guard if they have been exposed to impact or are cracked Never use the machine without a guard nor with a defective guard All covers must be correctly fitted and undamaged before you start the machine Starting and stopping Starting Ignition Set the stop switch to the start position C...

Page 17: ...matically disengage from the start setting CAUTION Do not pull the starter cord all the way out and do not let go of the starter handle when the cord is fully extended This can damage the machine CAUTION Do not put any part of your body in marked area Contact can result in burns to the skin or electrical shock if the spark plug cap has been damaged Always use gloves Do not use a machine with damag...

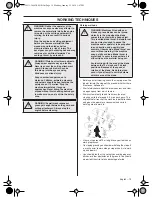
Page 18: ...wrong place the tree may hit you or the machine and cause you to lose control Both situations can cause serious personal injury 6 Keep a good balance and a firm foothold Do not overreach Keep proper footing and balance at all times 7 Always hold the machine with both hands Hold the machine on the right side of your body Keep all parts of your body away from the hot surfaces Keep all parts of your ...

Page 19: ...le afterwards You could get burnt if you touch it WARNING Watch out for thrown objects Always wear approved eye protection Never lean over the cutting attachment guard Stones rubbish etc can be thrown up into the eyes causing blindness or serious injury Keep unauthorised persons at a distance Children animals onlookers and helpers should be kept outside the safety zone of 15 metres Stop the machin...

Page 20: ...rimming with a trimmer head Trimming Hold the trimmer head just above the ground at an angle It is the end of the cord that does the work Let the cord work at its own pace Never press the cord into the area to be cut The cord can easily remove grass and weeds up against walls fences trees and borders However it can also damage sensitive bark on trees and bushes and damage fence posts Reduce the ri...

Page 21: ...n cause damage and wear to the trimmer head Sweeping The fan effect of the rotating cord can be used for quick and easy clearing up Hold the cord parallel to and above the area to be swept and move the tool side to side When cutting and sweeping you should use full throttle to obtain the best results H1158111 38 543RS GB fm Page 21 Monday January 11 2016 1 47 PM ...

Page 22: ...ver and take out the filter Wash it clean in warm soapy water Clean also the inside of the filter cover by using air or a brush Allow the filter to dry and then oil it in according to the instructions Put the filter in a plastic bag and pour the filter oil over it Knead the plastic bag to distribute the oil Squeeze the excess oil out of the filter inside the plastic bag and pour off the excess bef...

Page 23: ... incorrect fuel mixture too much or incorrect type of oil A dirty air filter These factors cause deposits on the spark plug electrodes which may result in operating problems and starting difficulties If the machine is low on power difficult to start or runs poorly at idle speed always check the spark plug first before taking any further action If the spark plug is dirty clean it and check that the...

Page 24: ... centred is sharp and is not cracked An off centre blade will cause vibration that could result in damage to the machine X Check that the trimmer head is undamaged and not cracked Replace the trimmer head if necessary X Check that the locking nut of the cutting equipment is tighten correctly X Check that the transport guard for the blade is intact and that it can be secured correctly X Check that ...

Page 25: ...achment and guard kg 7 2 Noise levels see note 1 Equivalent sound pressure level at the operator s ear measured according to EN ISO 11806 and ISO 22868 dB A 95 Vibration levels see note 2 Equivalent vibration levels ahv eq at handles measured according to EN ISO 11806 and ISO 22867 m s2 Equipped with trimmer head original left right 6 3 4 9 543RS Approved accessories Type Cutting attachment guard ...

Page 26: ...经检验合格的眼部保护设备 输出轴最大速度 rpm 10000 最大 10000rpm 注意抛掷物和弹起物 15 m 50 FT 15 m 50 FT 机器操作员必须确保作业过程中 15 米范围内无任何人员或动物 装有锯片或打草刀片的机器在锯片 或刀片接触固定物体时会猛地甩向 一侧 这称为甩刀 锯片或刀片能 切断手臂或腿部 务必让人员和动 物距离机器至少 15 米远 用于指示手柄位置调节止点的箭头 务必戴上检验合格的保护手套 穿上坚固的防滑靴 阻气门 将风门设在阻风位置 注油泵 有关机器上的其他符号 标识 请参考适用于特定市场的 特殊认证要求 进行任何检查或者维护之前 请将 停止开关扳到 STOP 停止 位置以 关闭引擎 务必戴上检验合格的保护手套 必须经常清洗 视检 务必使用检验合格的眼部保护 设备 符号说明 ...

Page 27: ...以下事项 27 引言 尊敬的客户 28 构造图示说明 割灌机构造图示说明 29 一般安全须知 重要事项 30 个人防护装备 30 机器安全设备 31 切割设备 33 组装 组装手柄杆和油门 36 安装锯片和打草头 36 燃油处理 燃油安全须知 38 燃油 38 加燃油 39 启动与停止 启动前检查 40 启动与停止 40 操作方法 一般工作须知 42 维护 化油器 46 空气滤清器 46 燃油滤清器 47 斜齿轮 47 火花塞 47 维护计划 48 技术参数 技术参数 49 目录 ...

Page 28: ...959 年链锯诞生 这就是 Husqvarna 如今所从事的领域 如今 Husqvarna 已经成为世界上领先的园林产品生产商之一 公司极为重视产品质量 公司的商业理念为 为园林与 建筑行业开发 生产与提供电机驱动产品 此外 Husqvarna 的目标是在人体工程学 使用性 安全性及环保方面居于 领先地位 这就是我们为这些领域中的产品开发许多不同功能的原因所在 我们相信 在相当长一段时间之后 您会对我们产品的质量与性能高度满意 购买我们的任意产品 您都将随时获得专 业的维修和保养帮助 如果出售本机的零售商不是我们的授权经销商 应咨询离您最近的保养厂的地址 希望我们的产品让您称心如意并与您长期相伴 请将本操作手册视为重要文档 遵照其中的内容 使用 维修 维护等 机器的使用寿命及转让时的价值都将大大提高 出售本机时 请确保将操作手册转交买家 非常感谢您使用 Husqvarna 产品 连续开发产...

Page 29: ... 7 阻气门开关 8 手柄杆卡箍 9 吊环 10 停止开关 11 油门扳机 12 气缸罩 13 启动器把手 14 燃油箱 15 空气滤清器外壳 16 手柄杆 17 锁紧螺母 18 支撑凸缘 19 支撑杯 20 驱动盘 21 操作手册 22 螺丝起子 23 锁紧销 24 经检验合格的眼部保护设备 25 水箱 26 套筒扳手 27 背带 构造图示说明 11 1 3 2 4 10 12 13 15 16 17 18 19 20 21 26 1 22 23 9 8 5 6 7 25 24 14 27 割灌机构造图示说明 ...

Page 30: ... 维护 篇中的说 明 启动前必须先安装好所有的护盖 防护罩和手柄 确保 火花塞线帽和点火器导线未受损 以免出现电击风险 在作业过程中 机器操作员必须确保15米范围内无任 何人员或动物 当多名操作员在同一场所工作时 之间 应保持至少15米的安全距离 使用前应对机器进行全面检查 请参阅维护时间表 警告 本机在操作期间会产生电磁场 电磁场在某些情况下会干扰有源或无源医疗 植入体 为了减少严重或致命性伤害风险 我们建议使用医疗植入体的人员在操 作本机之前事先咨询其医生及医疗植入体制 造商 警告 如果引擎在空间狭窄或通风不良的区 域内运转 会导致相关人员窒息死亡或一氧 化碳中毒身亡 警告 切勿允许儿童使用或靠近机器 由于机器设有加载弹簧的停止开关 慢速在 启动器把手上施力即可启动 有时甚至连儿 童也有足够大的力气启动机器 这就有可能 造成严重的人员伤亡 因此 机器在没有严 密监督的情况下要拔掉火花塞...

Page 31: ...绍要如何进行 检查和维护以确保机器的正常运转 请参阅 构造图示说 明 部分 可找到此种安全设备的正确位置 如果机器维护不当或由非专业人士进行保养和 或维修 机器的使用寿命会缩短 发生意外的风险会增加 欲知更 多详情 请与最近的保养厂联络 重要事项 本机的保养和维修必须经过专门培训 对于本机的 安全设备来说尤其如此 如果在检修过程中出现下述的 故障 应与保养厂联络 如果您购买我们的产品 我们 承诺提供专业的修理和保养 如果出售本机的零售商不 是保养商 应向他咨询离您最近的保养厂的 地址 警告 不得使用安全设备存在故障的机器 机器的安全设备必须按照本节说明进行检 查和维护 如果您的机器未通过这些检查中 的任何一项 请联系您的保养厂对其进行 维修 启动 请参阅 启动 一节的说明 启动机器 全开油门 松开油门 检查切割锯片是否停止并保持不动 如果油门 处于怠速位置而切割锯片仍然旋转 则要检查化油器...

Page 32: ...数 章节 安装不恰当规格或破损的安全罩会导 致严重的人身伤害 减振系统 本机配备有减振系统 用于尽量减少振动 并使操作更 简单 使用缠绕不当的拉绳或错误的切割锯片会增加振级 请参 阅 切割设备 一节的说明 本机的减振系统能降低引擎装置 切割设备以及机器把手 之间的振动传递 定期检查减振装置是否出现裂纹或变形 检查确保减震垫 无损坏且安装牢固 警告 血液循环不佳的人受到过度振动时 可能会导致循环系统或神经伤害 如果您因 过度振动而引起以下症状 请自行就医 这些症状包括 麻木 失去知觉 麻刺 刺痛 疼痛 虚弱 肤色或皮肤状况发生 变化 这些症状通常出现在手指 双手或手 腕上 消音器 消音器设计用于最大程度地降低噪音并将引擎的废气导离 操作人员 装有催化转换器的消音器还具有减少有害废气 的作用 切勿使用消音器出现故障的机器 一般安全须知 ...

Page 33: ...拧紧锯片螺母时 锯片齿可能会导致伤害 因此在 进行此操作时 应始终确保通过锯片防护罩保护手部 务 必使用柄部长度足以进行此操作的套筒扳手 图中箭头显 示了在松开或拧紧螺母时套筒扳手的操作区域 锁紧螺母内的尼龙衬垫不得磨损到您可以用手转动螺母的 程度 衬垫应提供至少 1 5Nm 的阻力 当螺母的安装次 数达到 10 次左右后 应更换该螺母 切割设备 本节介绍选择与维修您切割设备的方法 从而 降低甩刀风险 获得最大锯切性能 延长切割设备的使用寿命 重要事项 仅使用我们推荐的带防护罩的切割锯片 请参阅 技术 参数 章节 请参阅切割锯片的说明 以了解有关正确装载拉绳以及 适当拉绳直径的信息 确保正确打磨锯片齿 请按照我们的建议操作 另请参 阅锯片包装上的说明 请保持正确的锯片设置 请按照我们的说明使用推荐的 扁锉规 警告 在对切割锯片执行任何操作之前 务必先停止运行发动机 即使释放了油门的 情况后...

Page 34: ...确打磨锯片齿 请按照我们的说明使用推荐的扁锉 规 打磨不当或受损的锯片会增加发生意外的风险 请保持锯片的设置正确 请按照我们的说明并使用推荐的 设置工具 设置错误的切割锯片会增加卡住和甩刀风险 并会对锯片造成损坏 检查切割锯片是否损坏或有裂痕 务必更换损坏的切割 锯片 打磨割草刀和打草刀片 请参阅切割锯片包装以了解正确的打磨说明 使用单 纹扁锉打磨锯片和刀片 均匀地打磨所有刀刃以保持锯片的均衡 警告 务必弃置弯曲 扭曲 开裂 断裂或 受到其他任何损坏的锯片 切勿为了重复使 用而试图拉直扭曲的锯片 仅使用指定类型 的原厂锯片 打磨锯片 请参阅切割锯片包装以了解正确的打磨说明 一般安全须知 ...

Page 35: ...作 然后再使 用圆锉锉削 必须对所有锯齿的顶部边缘进行等量 锉削 调整锯片设置 应为 1 mm 打草头 重要事项 务必确保打草机拉绳均匀地紧紧缠绕在卷筒上 否则机 器将会产生不良振动 仅使用推荐的打草头和打草机拉绳 这些部件均经过 制造商测试 适合在特定引擎尺寸条件下操作 这一 点在使用全自动打草头时尤为重要 仅使用推荐的切 割锯片 请参阅 技术参数 章节 小型机器通常需要小型打草头 反之亦然 这是因为 在使用拉绳进行清理时 引擎必须从打草头中径向抛 出拉绳并克服所清理的草的阻力 拉绳的长度也很重要 如果拉绳的直径相同 长拉绳 比短拉绳所需的引擎动力更大 请确保打草机防护罩上的切割齿完好无损 切割齿用 于将拉绳切成正确的长度 为了延长拉绳的使用寿命 可在使用前将拉绳浸泡在 水中数天 这将使拉绳更坚韧 从而使用寿命更长 一般安全须知 ...

Page 36: ...果切割锯片安装 不当 会导致严重的和 或致命的人身伤 害 警告 严禁在未安装经检验合格的安全罩 的情况下操作切割锯片 请参阅 技术参 数 章节 安装不恰当规格或破损的安全罩 会导致严重的人身伤害 重要事项 使用锯片或打草刀片时 机器必须配备适 当的把手 锯片防护罩和背带 安装打草机防护罩和打草头 安装适用于打草头的正确打草机防护罩 A 如图所示安装防护罩 拧紧 将打草机防护罩定位在箭头标志旁 将驱动盘 B 和支撑凸缘 C 安装在输出轴上 转动输出轴 直至驱动盘的一个孔与齿轮箱中的相 应孔对准 将锁紧销插入孔中以将轴锁定 安装时逆时针转动打草头 拆卸时 请按照与说明相反的顺序进行操作 B C D 组装 ...

Page 37: ...护罩 牢固拧紧 将切割锯片防护罩放在箭头标记旁 在输出轴上安装驱动盘 B 转动输出轴 直到驱动盘中的一个孔与齿轮箱中的相 应孔对齐 将锁定销 C 插入孔中以锁定刀轴 将锯片 D 支撑杯 E 和支撑凸缘 F 安装到输出轴 上 安装螺母 G 必须将螺母紧固至 35 50 Nm 3 5 5 kpm 的扭矩 使用工具箱中的套筒扳手 握住套筒扳手的轴 尽可能靠近锯片防护罩 要紧固 螺母 请按照与旋转方向相反的方向转动套筒扳手 小心 是左旋螺纹 G E D F B C 组装 ...

Page 38: ...个二冲程引擎 必须始终使用汽油与二 冲程机油混合的燃油运行 注意准确测定要混合的油量 以确保正确混合 混合少量燃油时 即使小误差也会严重 影响混合比 警告 燃油和油气都是高度易燃物 一旦吸 入或与皮肤接触 会造成严重的人身伤害 为此需要小心处理燃油 并确保空气流通 汽油 小心 务必使用优质汽油 机油混合物 辛烷值 RON 至 少为 90 如果您的机器装有催化转换器 请参阅 技 术参数 章节 请务必使用优质的无铅汽油 机油混合 物 含铅汽油会损坏催化转换器 如果可以的话 请使用低排放汽油 也叫烷基化汽油 最低建议辛烷值是 90 RON 如果您使用的辛烷标号 低于 90 会导致出现爆震现象 这会导致引擎过热 令引擎严重受损 连续高转速作业时 建议提高辛烷值 二冲程机油 为获得最佳的效果和性能 最好使用HUSQVARNA为 风冷式二冲程引擎专门开发的二冲程机油 千万不可使用水冷式引擎专用的二冲程...

Page 39: ...的燃油箱之前 务必充分混合 摇匀 燃油 混合液 一次混合的油量不要超过一个月的用量 如果机器一段时间不使用 应倒光油箱内的油 并清 理干净 加燃油 警告 采取下列注意事项可以减少火患 的发生 不要吸烟或者把热烫的物体放在燃油 旁边 加油前先关掉引擎 加油前务必关闭引擎 并让它冷却几 分钟 加油时 请慢慢打开油箱盖 以便缓慢释 放过高的压力 加油之后小心拧紧燃油箱盖 务必将机器移离加油区和加油站之后才可 启动 必须使用带防溢漏阀的油罐 将油箱盖四周清理干净 油箱上的污物会导致运行 故障 先将油罐摇匀 充分混合燃油后 再加入油箱 最小3 m 10 ft 燃油处理 ...

Page 40: ...力 螺母锁紧应至少有 1 5Nm 的锁紧力 锁紧螺母的紧固扭矩应为 35 50Nm 检查锯片防护罩是否损坏或有裂痕 如果锯片防护罩 受到碰撞或有裂痕 请予以更换 检查并确保打草头和打草机防护罩没有损坏或裂痕 如果打草头或打草机防护罩受到碰撞或有裂痕 请予 以更换 切勿使用没有防护罩或防护罩有缺陷的机器 启动机器前 必须正确安装好所有的盖 并且不得有 损坏 启动与停止 警告 机器启动之前一定要安装好离合器罩 和轴 否则离合器会松动 会造成人身 伤害 务必将机器移离加油区和加油站之后才可启 动 将机器停放在平整表面上 确保切割锯 片不会与任何物体接触 确定没有非工作人员在现场 否则会造成严 重的人身伤害 安全距离为15米 启动 点火装置 将停止开关设置到开始位置 阻气门 将风门设在阻风位置 启动与停止 ...

Page 41: ...器按在地上 小心 不要用脚 用右手抓 住启动器把手 慢慢地向外拉启动绳 直到感觉到有阻力 止轮具抓紧 然后快速用力地拉 千万不可将启动器 拉绳绕在手上 拉动启动器把手 直到引擎启动 引擎启动后 使阻 气门返回运行位置 全开油门 油门将会自动脱离启动 设置 小心 不要将启动器的拉绳拉到底 也不要在完全拉出的 位置放开启动器把手 这样做会损坏机器 小心 不要让身体的任何部分进入标记区 如果火花塞帽 已经损坏 接触会烧伤皮肤或发生电击 请务必戴上手 套 不要使用火花塞帽破损的机器 油门设置控制 将油门移至怠速位置 停止 关闭点火开关 停止引擎 小心 关闭点火开关 停止引擎 启动与停止 ...

Page 42: ... 强风或是严寒等 在天气不佳的情况下工作 容易令人感到疲倦 更可能造成危险的状况 例如湿 滑的地面和不可预测伐木方向等 4 确保您可以安全地移动与站立 检查您的周围区域 是否存在障碍物 树根 岩石 树枝 沟渠等 以免您突然移动 在倾斜地面上工作时 要特别 小心 5 切割张紧的树木时应格外当心 在切割前后 张紧树 木有可能重新弹回其正常位置 如果您处于不正确位 置或在错误位置切割 那么树木很有可能会将您或机 器击中 使您失去控制 这两种情况均会造成严重的 人身伤害 6 请保持平衡并找到牢固的立足处 请勿距离过远 请始终维持适当的位置和平衡 7 务必用双手握住机器 将机器靠在身体右侧 使您的 身体各部位远离高温表面 使您的身体各部位远离旋 转的切割锯片 8 使用割灌机时 务必将其牢固地挂在背带上 否则将 无法安全控制割灌机并会导致您或他人受伤 切勿使 用快速脱解功能发生故障的背带 9 将切割锯...

Page 43: ...身后 确保安全区内无人 警告 有时树枝或草会被绞入防护罩和 切割锯片中 在清洁之前务必停止引擎 运行 作业方法 警告 装有锯片或打草刀片的机器在锯片或 刀片接触固定物体时会猛地甩向一侧 这称 为甩刀 甩刀的反冲力很大 能将机器和 或操作员推向任何方向 并有可能失去对机 器的控制 如果机器被绊住 停止或受阻 则会在没有任何警告的情况下发生甩刀 甩刀更有可能发生在难以看到被切割材料的 区域 避免将锯片置于12点钟和3点钟位置之间的 区域进行切割 由于锯片快速旋转 如果您 试图将锯片置于该区域切割厚茎 可能会发 生甩刀 开始清理前 请先检查清理区 地形 地面坡度 是 否有石块 洼地等 从区域的一端开始最为简单 然后从作业区域中清理 出一个开阔空间 在区域中按照规划来回地作业 每趟清理4 5 m左 右的宽度 这充分利用了机器在两个方向上的全部 伸展距离 并为操作员提供了一个便利灵活的作业 区域 清...

Page 44: ...照以下说明操作可减少材料缠绕锯片的风险 1 务必在全开油门状态下执行切割 2 避免在回程中切割之前切割的材料 停止引擎 解开背带 将机器放在地上 然后开始收 集切割材料 用打草头修剪草 修剪 握住打草头 使其与地面呈一定角度且恰好离地 这 时用拉绳末端进行工作 让拉绳按照自己的节奏工 作 切勿将拉绳压入待切割区域 拉绳可以轻松地移除墙壁 栅栏 树木和狭长绿化带 上的草和杂草 但也会损坏树木及灌木的敏感树皮和 损坏栅栏柱 将拉绳缩短至 10 12 cm 并降低引擎转速可降低植物 受损的风险 清理 清理方法可清除所有不需要的植被 使打草头恰好离 地并将其倾斜 使用拉绳的末端扫过树木 柱子 雕 像和类似物体周围的地面 小心 此方法会加大拉绳 的磨损 在石块 砖头 混凝土 金属栅栏等物体上作业时 拉绳会比在接触树木和木栅栏时更快地磨损 因此必 须更频繁地向前送绳 应使用小于全开油门的状态 80 进...

Page 45: ...Chinese 45 在正常切割过程中 不要让打草头持续接触地面 否则会导致打草头损坏和磨损 清扫 旋转拉绳的风扇效应可用于快速轻松地进行清理 使拉绳位于待清扫区域的上方并保持平行 然后将工 具从一侧移到另一侧 切割和清扫时 应使用全开油门状态以获得最佳 结果 操作方法 ...

Page 46: ...使用机器 空气滤清器 必须定期清洁空气滤清器 以清除泥土和灰尘 避免发生 下列情况 化油器故障 启动问题 引擎功率损耗 引擎零件发生不必要磨损 过度耗油 每25小时清洁一次滤清器 或者如果在灰尘异常多的环境 下 则要增加清洁次数 清洁空气滤清器 打开空气滤清器外壳 取出滤清器 在温暖的肥皂水中 将滤清器清洗干净 还应使用压缩空气或刷子清洁滤清 器罩的内侧 按照说明将滤清器晾干 然后涂上油 将滤清器放在塑胶袋中并倒上滤清器油 揉捏塑胶袋使 油散开 挤出塑胶袋内滤清器多余的油 倒出多余的 油 然后将滤清器安装到机器上 千万不可使用四冲程引擎专用的机油 千万不可使用汽 油 机油或者任何汽油混合物 打开空气滤清器外壳 取出滤清器 用压缩空气吹净 滤清器经过长期使用之后 无法彻底清洁 因此 所有的 空气滤清器都应定期更换新的 损坏的空气滤清器一定要 换新 清洁后 需对泡棉塑胶滤清器上油 请参阅 对泡...

Page 47: ...满的 位置 使用 Husqvarna 专用润滑脂 斜齿轮中的润滑脂通常不需要更换 但维修情况除外 火花塞 火花塞的状况会受下列的因素影响 化油器调节不正确 燃油混合不正确 机油太多或种类不对 空气滤清器变脏 这些因素会导致异物堆积在火花塞电极上 从而造成操作 问题及启动困难 如果机器动力不足 不易启动或是怠速运转情况差 首先检查火花塞 然后再采取其他措施 如果火花塞很 脏 清洁并检查跳火间距是否有 0 9 1 0 mm 每使用大 约一个月需要更换火花塞一次 或在必要时提前更换火 花塞 0 9 1 0 mm 小心 务必使用推荐的火花塞类型 不适合的火花塞会损 坏活塞 气缸 检查并确定火花塞安装有抑制器 1 维护 ...

Page 48: ... 清洁空气滤清器 必要时换新 X 检查并确保防护罩没有损坏或裂痕 如果防护罩受到碰撞或有裂 痕 请予以更换 X 检查并确保锯片锋利 已正确居中且没有裂痕 锯片未居中将会 引起振动 可能导致机器损坏 X 检查并确保打草头没有损坏或裂痕 必要时更换打草头 X 检查并确保切割设备的锁紧螺母已正确拧紧 X 检查并确保锯片的运输防护罩完好无损并且可以正确固定 X 检查螺母和螺丝是否上紧 X 检查引擎 油箱与燃油管是否漏油 X 检查启动器及启动器绳索 X 清洁火花塞外部 拔下火花塞 然后检查跳火间距 将跳火 间距调至 0 6 0 7 mm 或更换火花塞 检查并确定火花塞安装有 抑制器 X 清洁化油器外部以及其周围区域 X 检查斜齿轮中的润滑剂是否已加注到四分之三满的位置 必要时 使用专用润滑脂进行加注 X 检查燃油滤清器上是否有污物 油管是否有裂痕或其它破损 现象 必要时换新 X 检查所有的电缆及接头...

Page 49: ...释 1 手柄的等效振级 ahv eq 根据 ENISO11806 和 ISO22867 测量得出 单位为 m s2 6 3 4 9 注释 1 本机的等效声压级的报告数据中具有一个 1dB A 的典型统计离差 标准偏差 注释 2 等效振级的报告数据中具有一个 1 m s2 的典型统计离差 标准偏差 543RS 经批准使用的附件 类型 切割锯片防护罩 零件号 打草刀片 割草机 Grass 255 41 Ø 2554齿 584 40 43 01 Multi 255 3 Ø 2553齿 584 40 43 01 Grass 275 4 Ø 2754齿 584 40 43 01 塑料锯片 Tricut Ø 300 mm 单独锯片的零件 号5310177 15 584 40 43 01 打草头 Superauto II 584 40 43 01 T35 T35x Ø 2 4 3 0 mm 拉绳 584...

Page 50: ...H1158111 38 543RS GB fm Page 26 Monday January 11 2016 1 47 PM ...

Page 51: ...1 Super Auto II Super Auto II 1 2 3 4 5 6 7 8 9 10 4 0 m 13 2 4 mm 095 2 0 m 6 5 6 6 15 cm 15 cm H1158111 38 543RS GB fm Page 27 Monday January 11 2016 1 47 PM ...

Page 52: ... Clic 1 2 3 5 6 7 9 6 0 m 18 4 8 3 05 m 9 2 0 2 4 mm 079 095 10 cm 4 6 15 cm T25 H1158111 38 543RS GB fm Page 28 Monday January 11 2016 1 47 PM ...

Page 53: ...T35 T35x Clic 1 2 3 5 6 7 9 8 5 m 28 4 8 4 3 m 14 2 4 2 7 mm 095 106 10 cm 4 6 15 cm H1158111 38 543RS GB fm Page 29 Monday January 11 2016 1 47 PM ...

Page 54: ... Clic 1 2 3 5 6 7 9 10 m 32 4 8 4 3 m 14 2 7 3 3 mm 106 13 10 cm 4 6 15 cm T45 T45x H1158111 38 543RS GB fm Page 30 Monday January 11 2016 1 47 PM ...

Page 55: ...A 2 7 4 0 mm 105 160 B 8 m 26 C 15 cm 5 9 1 2 3 5 6 7 9 4 8 6 15 cm B C A T55x Clic PT104 H1158111 38 543RS GB fm Page 31 Monday January 11 2016 1 47 PM ...

Page 56: ...H1158111 38 543RS GB fm Page 32 Monday January 11 2016 1 47 PM ...

Page 57: ...H1158111 38 543RS GB fm Page 33 Monday January 11 2016 1 47 PM ...

Page 58: ...1158111 38 z Z 8 z Z 8 2016 01 11 Original instructions ჷ නଃඇ H1158111 38 543RS GB fm Page 34 Monday January 11 2016 1 47 PM ...

Reviews: