15.3 Assembling
WARNING: Always use protective gloves
when handling hot objects.
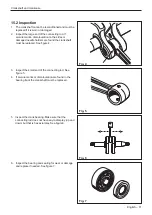
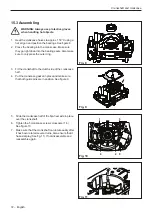
1. Heat the crankcase halves to approx. 150°C using a
hot air gun and position the bearings. See figure 8.
2. Press the bearing into the crank case. Make sure
they go right down into the bearing seats. Also make
sure to only press the outer ring.
3. Fit the crankshaft to the clutch side of the crankcase
half.
4. Put the crankcase gasket in place and make sure
that both guide pins are in position. See figure 9.
5.
Slide the crankcase half of the flywheel side in place
over the crankshaft.
6.
Tighten the 5 crankcase screws crosswise (1-5).
See figure 10.
7. Make sure that the crank shaft can rotate easily after
it has been rotated several turns. Also ensure that it
has axial play (See fig. 11). If not disassemble and
reassemble again.
Crankshaft and crankcase
1
3
4
2 5
Fig. 8
Fig. 9
Fig. 10
Fig. 11
72 – English
Summary of Contents for 545FX AT
Page 1: ...Workshop manual English 545RXT AT 545FX AT 545FXT AT 545FX 545FXT 545RX 545RXT ...
Page 2: ......
Page 79: ...English 79 ...
Page 80: ...2018 10 04 115 88 11 26 ...

