background image

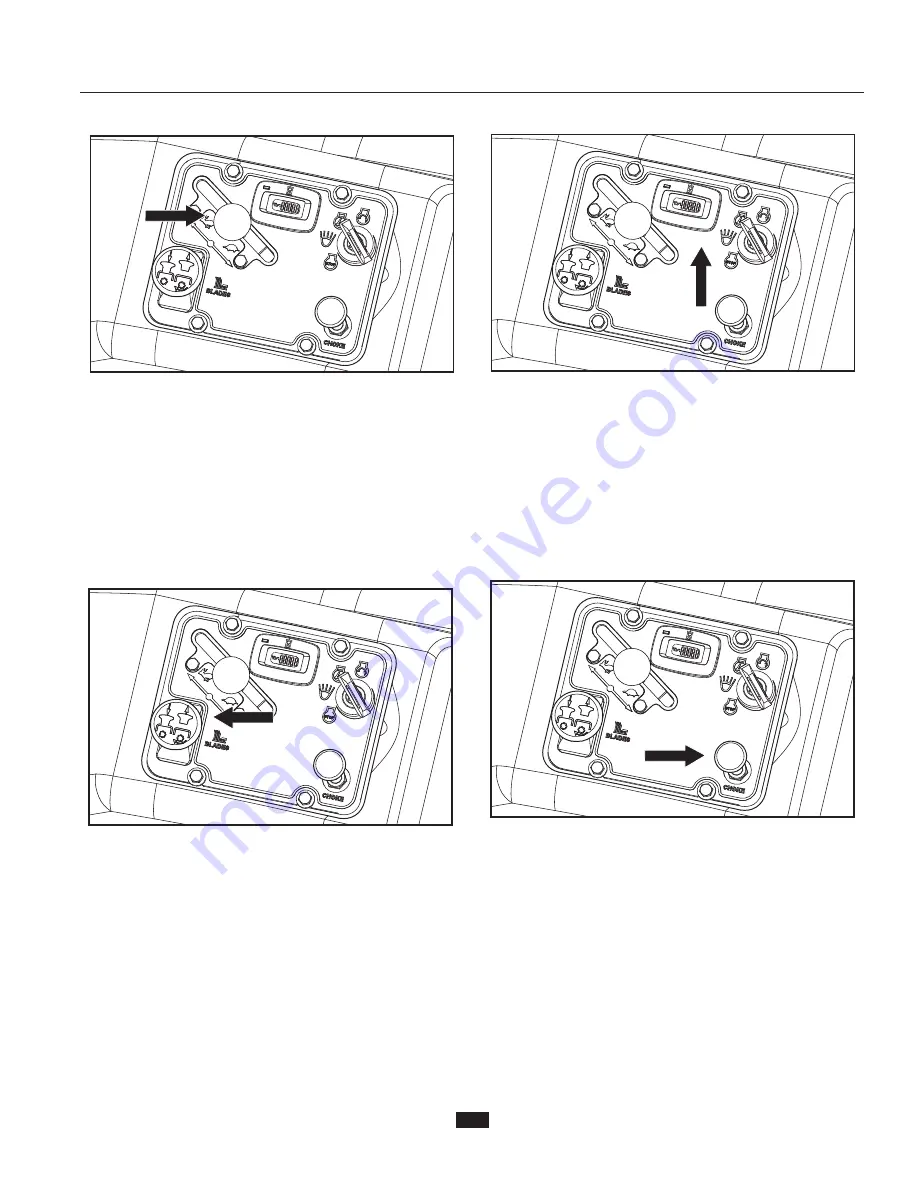
Blade Switch

Throttle Control

The throttle control regulates the engine speed and thereby 
the rate of rotation of the blades, assuming the blade switch is 
pulled out, see Engaging the Mower Deck.
To increase or decrease the engine speed, the control is 
moved forward or back respectively.
Avoid idling the engine for long periods, as there is a risk 
of fouling the spark plugs. USE FULL THROTTLE WHEN 
MOWING, for best mower performance and battery charging.

To engage the mower deck, pull the knob out; mower blades 
are disengaged when the knob is pressed down.

Service Minder

The service minder displays the total number of hours the 
engine has run and indicates when the engine and mower 
need servicing.
After every 50 hours of operation, an oil can icon will appear 
and stay on for two hours, before an automatic reset occurs. To 
service the engine and mower, see the Service Journal of this 
manual.

NOTE: The service minder operates (clocks hours) only when 
the engine is running.

Choke Control

The choke control is used for cold starts in order to provide the 
engine with a richer fuel mixture.
For cold starts the control should be pulled out to its extent.

13

CONTROLS

Summary of Contents for 967277502

Page 1: ...refully and make sure you understand the instructions before using the machine Gasoline containing up to 10 ethanol E10 is acceptable for use in this machine The use of any gasoline exceeding 10 ethanol E10 will void the product warranty MZ61 967277502 ...

Page 2: ...d these instructions to operate the mower Each person operating the mower must be of sound mind and body and must not be under the influence of any mind altering substance WARNING Engine exhaust some of its constituents and certain vehicle components contain or emit chemicals known to the State of California to cause cancer and birth defects or other reproductive harm WARNING Battery posts termina...

Page 3: ... Training 16 Steering 16 Before Starting 16 Starting the Engine 17 Running 18 Stopping the Engine 18 Operating on Hills 19 Mowing Tips 19 Weak Battery 20 Jumper Cable Use 20 Moving Machine By Hand 20 MAINTENANCE 21 Maintenance Schedule 21 Battery 23 Safety System 24 Hardware 24 Park Brake 24 Tire Pressures 24 Caster Wheels 25 Anti scalp Rollers 25 V belts 25 Deck Belt Removal 25 Pump Belt 26 Cutti...

Page 4: ...sure that the machine is well anchored DO NOT operate this machine on public roadways Towing If machine is equipped with a tow hitch use extreme caution when towing Never allow children or others in or on the towed equipment Make wide turns to avoid jack knifing Travel slowly and allow extra distance to stop Do not tow on sloped ground The weight of the towed equipment may cause loss of traction a...

Page 5: ... to the machine with the manufacturing number Engine Manufacturing Number The machine s manufacturing number can be found on the printed plate affixed to the engine compartment Stated on the plate from the top are The machine s type designation I D The manufacturer s type number Model The machine s serial number Serial no Please have the type designation and serial number available when ordering s...

Page 6: ...t to follow instructions given in the manual Used also when there is a potential for misuse or misassembly Reverse Neutral Fast Slow Choke Fuel Warning Park Brake Do not stand here Use protective glasses Use protective gloves Danger Keep hands and feet away Do not touch parts Warning Rotating blades keep away from the discharge deck Battery acid is corrosive explosive and flammable Read Operator M...

Page 7: ...ERVE THE FOLLOWING SAFETY INSTRUCTIONS COULD RESULT IN SERIOUS INJURY OR DEATH Watch for traffic when operating near or crossing roadways Use extra care when loading or unloading the machine into a trailer or truck Always wear eye protection when operating machine Wear proper Personal Protective Equipment PPE while operating this machine including at a minimum sturdy footwear eye protection and he...

Page 8: ...ften attracted to the machine and the mowing activity Never assume that children will remain where you last saw them Keep children out of the mowing area and in the watchful care of a responsible adult other than the operator Be alert and turn machine off if a child enters the area Before and while backing look behind and down for small children Never carry children even with the blades shut off T...

Page 9: ...the machine Repair if necessary before restarting Never make any adjustments or repairs with the engine running Check grass catcher components and the discharge guard frequently and replace with manufacturer s recommended parts when necessary Mower blades are sharp Wrap the blade or wear gloves and use extra caution when servicing them Check brake operation frequently Adjust and service as require...

Page 10: ...ffective working order by the operator A spark arrestor for the muffler is available through your authorized Husqvarna dealer IMPORTANT INFORMATION The park brake is not sufficient to lock the machine in place during transport Ensure that the machine is well fastened to the transport vehicle Always reverse the machine onto the transport vehicle to avoid tipping it over WARNING Use extreme caution ...

Page 11: ... left and right steering controls the flow is regulated and thereby the direction and speed Control Locations 1 Motion control levers 2 Park brake 3 Tracking knob 4 Fuel tank 5 Hydro release levers 6 Choke control 7 Ignition switch 8 Service meter 9 Throttle control 10 Blade switch 11 Seat adjustment lever 12 Right tracking bolt 13 Cutting height lever 14 Deck lift pedal 1 2 3 4 5 8 9 10 12 6 11 1...

Page 12: ...he neutral position and carefully moving the other steering control forward from its neutral position The rotation direction when zero turning is determined by which steering control is moved backward behind the neutral position If the left steering control is pulled backward the machine turns to the left Use extra care when using this maneuver If the steering controls are in uneven positions when...

Page 13: ...ull the knob out mower blades are disengaged when the knob is pressed down Service Minder The service minder displays the total number of hours the engine has run and indicates when the engine and mower need servicing After every 50 hours of operation an oil can icon will appear and stay on for two hours before an automatic reset occurs To service the engine and mower see the Service Journal of th...

Page 14: ...n cutting height it is important that the air pressure in all tires is 15 psi 103 kPa 1 bar IMPORTANT INFORMATION Always raise the deck to the highest position for transport The desired cutting height is set with the height pin The cutting height pedal releases the deck lift to place the deck at the selected height For transport push the lift pedal fully forward until the deck lift latches in the ...

Page 15: ...ot store spill or use gasoline near an open flame Read the safety instructions before refueling The capacity for the tank is 5 gallons 19 liters Regularly check the gas cap gasket for damage and keep the cap properly tightened The engine will run on a minimum of 87 octane unleaded gasoline no oil mix Environmentally adapted alkylate gasoline can be used See Technical Data concerning ethanol fuel M...

Page 16: ... and the mower should stop moving Pull back slightly on control levers allowing the mower to move backwards Push the control levers forward to the neutral position and mower should stop moving To turn to the right While moving in a forward direction pull the right lever back towards the neutral position while maintaining the position of the left lever this will slow the rotation of the right wheel...

Page 17: ...the fuel tank valve 8 Press in and turn the ignition key to the start position 9 When the engine starts immediately release the ignition key back to the run position Slowly push in the choke control knob if it was used to start a cold engine IMPORTANT INFORMATION Do not run the starter for more than 5 seconds each time If the engine does not start wait approximately 10 seconds before retrying 10 S...

Page 18: ...uld be thrown by the rotating blades WARNING Do not drive up or down hills with slopes greater than 10 degrees Do not drive across slopes 4 Move throttle control to full throttle 5 Engage the mower deck by pulling up the blade switch Stopping the Engine 1 Move the throttle to the minimum position tortoise symbol 2 Move the steering controls outward 3 Disengage the mower deck by pressing the blade ...

Page 19: ...ss forward to regain forward motion 6 Make all turns slowly Mowing Tips Observe and flag rocks and other fixed objects to avoid collisions Begin with a high cutting height and reduce it until the desired mowing result is attained The average lawn should be cut to 2 64 mm during the cool season and over 3 76 mm during the hot months For healthier and better looking lawns mow often after moderate gr...

Page 20: ...able first from chassis and then from the fully charged battery 2 Remove RED cable last from both batteries Moving Machine By Hand When pushing or pulling the mower engage the IZT Integrated Zeroturn Transaxle bypass linkages The release levers are located on each side of the rear of the unit below the rear engine plate 1 Raise the deck to the highest transport position 2 Pull the release levers u...

Page 21: ...ition and to ensure safe operation Read General Maintenance in the Safety section MAINTENANCE Daily At least once each year Maintenance interval in hours Before After 25 100 300 Check the park brake Check the engine s oil level every refueling Check the safety system Check for fuel and oil leakages Check clean the engine s cooling air intake Check the mower deck Check for loose hardware screws nut...

Page 22: ...enetrate the skin causing serious injury If injured by escaping fluid see a doctor at once Serious infection or reaction can develop if proper medical treatment is not administered immediately MAINTENANCE Daily At least once each year Maintenance interval in hours Before After 25 100 300 Check adjust throttle cable Check the condition of belts belt pulleys Change the engine oil 1 Replace the engin...

Page 23: ...age temperature and efficiency of charger Cleaning battery and terminals Corrosion and dirt on the battery and terminals can cause the battery to lose power 1 Open the terminal access doors 2 Disconnect BLACK battery cable first then the RED battery cable and remove the battery from the machine 3 Rinse the battery with plain water and dry 4 Clean terminals and battery cable ends with wire brush un...

Page 24: ...g the park brake WARNING Faulty adjustment will result in reduced braking ability and can cause an accident Make daily inspections to ensure that the safety system works by attempting to start the engine when one of the conditions is not met Change the conditions and try again If the machine starts when one of these conditions is not met turn the machine off and repair the safety system before usi...

Page 25: ...ve the tension on the belt 5 Remove any dirt or grass that may have accumulated around the cutter housings and entire deck surface 6 Carefully lift the belt over the top of the cutter housing pulleys Caster Wheels Check every 200 hours Check that wheels rotate freely If wheels do not rotate freely take the unit to your dealer for service Foam filled tires or solid tires will void the warranty Remo...

Page 26: ...the engine pulley 5 Use the breaker bar to hold the tension off the belt while removing the implement used as a brace in the plate 6 Replace and secure clutch stop 7 Reinstall the fan shields 8 Reinstall the deck belt See Deck Belt Installation in this section of the manual IMPORTANT INFORMATION Special blade bolt is heat treated Replace with a Husqvarna bolt if required Do not use lower grade har...

Page 27: ...e belt must be installed prior to leveling deck 1 Wear heavy gloves Turn each outer blade tip to align with the deck side to side 2 Measure from the floor surface up to the bottom of the blade tip on the discharge side of the mower deck Retain this measurement Move to the opposite side check that measurement is the same If adjustment is required loosen the locknut and move mounting bolt up or down...

Page 28: ... clean belts 12 12 Every year Lubricate with grease gun 1 52 Every Week Filter change 1 365 Every day Oil change Level check IMPORTANT INFORMATION Use minimal lubrication and remove excess lubricant so that is does not come into contact with belts or belt pulley drive surfaces Deck Spindles Lower the cutting deck completely If a grease gun without rubber hose is used the foot plate must be removed...

Page 29: ... plug and tighten securely 7 Fill the engine with new oil to the bottom of the fill tube threads Check the level with the dipstick 8 Replace the oil fill cap securely when the oil level is FULL 9 Refer to the Service Journal for oil checking and changing intervals 3 After the oil has drained wipe the filter base surface and apply a film of new oil to the gasket of the replacement filter 4 Install ...

Page 30: ...ee Moving Machine By Hand in the Operation section for bypass linkage adjustments 1 Disengage the brake if activated 2 With the bypass linkage disengaged and the engine running at fast idle slowly move the directional control in both forward and reverse directions five or six times As air is purged from the unit the oil level will drop 3 With the bypass linkage engaged and the engine running slowl...

Page 31: ...tes Blades are loose Blades are incorrectly balanced Engine is loose Engine overheats Clogged air intake or cooling fins Engine overloaded Poor ventilation around engine Defective engine speed regulator Too little or no oil in the engine Contamination in the fuel line Fouled spark plugs Battery not charging Poor contact of the battery terminal cable connections Charging lead is disconnected Fault ...

Page 32: ...zer Start the engine and allow it to run until the carburetor is drained of fuel or the stabilizer has reached the carburetor 5 Remove the spark plug and pour about a tablespoon of engine oil into the cylinder Turn over the engine so that the oil is evenly distributed and then refit the spark plug 6 Lubricate all grease zerks joints and axles 7 Remove the battery Clean charge and store the battery...

Page 33: ...33 SCHEMATIC ...

Page 34: ...100 Hydro Gear Productivity 4 2 acres h 16 997 m2 h Steering control Dual levers foam gripped Dimensions Speed forward 0 8 5 mph 0 13 7Km h Weight 770 lbs 349 kg Speed reverse 0 4 mph 0 6 4 Km h Base Machine Length 75 192 cm Brakes Mechanical park brake Base Machine Height 42 107 cm Front caster tires 13 x 5 5 Base Machine Width 49 125 cm Rear tires turf pneumatic 22 x 10 10 Overall Width Chute Up...

Page 35: ...ter in inches fine or coarse thread 9 12 13 18 5 16 18 24 28 38 24 33 3 8 31 42 46 62 40 54 7 16 50 68 75 102 75 102 115 156 9 16 110 149 165 224 5 8 150 203 225 305 250 339 370 502 7 8 378 512 591 801 11 8 782 1060 1410 1912 Grade 5 Minimum commercial quality lower quality not recommended Metric Standard Hardware Grade Grade 8 8 Grade 10 9 Grade 12 9 Size ft lbs Nm ft lbs Nm ft lbs Nm Shank Size ...

Page 36: ... the mower deck adjustment r Check Safety switch for the parking brake r Safety switch for the mower deck r Safety switch in the seat r Safety switch in the steering controls r Parking brake functionality r Driving forward r Driving backward r Engaging the blades r Check engine high idle speed r Inform the customer about Need and advantages of following the service schedule r Need and advantages o...

Page 37: ...y guards and shields r Check brake adjustment r Daily Service Clean debris from mower r Check engine oil level r Check the tire pressures r Check underside of deck r Inspect deck pulleys r Check clean the engine s cooling air intake r Check safety system r Check seat belt r Check fuel system for leaks r Inspect safety guards and shields r Check brake adjustment r 37 SERVICE JOURNAL Action Date mtr...

Page 38: ... mower blades if required r Check the tire pressures r Check battery with cables r Lubricate according to lubrication chart r Check clean the engine s cooling air intake r Clean the air cleaner s foam pre filter r 38 SERVICE JOURNAL Action Date mtr reading stamp sign ...

Page 39: ...k r Check blade pitch r Grease blade spindles r Inspect spindle bearings r Inspect deck belt and blades r Inspect idler arm bearings r Inspect deck idler pulleys r Check hydraulic oil level r Inspect hydraulic filter r Inspect hydraulic drive belt r Inspect hydraulic hoses r Check neutral position r Inspect battery connections r Check safety system r Check seat belt r Check fuel system for leaks r...

Page 40: ...ade spindles r Inspect spindle bearings r Inspect deck belt and blades r Inspect idler arm bearings r Inspect deck idler pulleys r Change hydraulic oil r Change hydraulic filter r Replace hydraulic drive belt r Inspect hydraulic hoses r Check neutral position r Inspect battery connections r Load test battery r Clean electrical connections r Inspect the clutch r Check safety system r Check seat bel...

Page 41: ...ir filter s paper cartridge q Change the engine oil 50 hours q Replace the engine oil filter 100 hours q Check adjust the cutting height q Check adjust the park brake 50 hours q Clean Change the spark plugs 100 hours q Change the fuel filter 100 hours q Check the engine valve clearance q 41 SERVICE JOURNAL Action Date mtr reading stamp sign ...

Page 42: ...42 SERVICE JOURNAL Action Date mtr reading stamp sign ...

Page 43: ......

Page 44: ...www husqvarna com 115 666627 Rev A 2013 11 15 ...

Reviews: