background image

9

PROBLEM

ANSWER/COMMENT

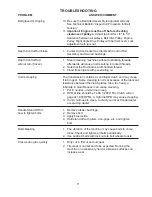
Chain (Drive) is coming off,

The Transmission Output Sprocket  is a fixed (non adjustable)

drive sprocket wearing

sprocket which is splined and snap-ringed in place.
1. Align the Axle Sprockets (double set screws) to the

Transmission Output Sprocket. Position the Axle

 Sprockets

the same distance from the chassis wall.

2. Replace the Tensioner Sprocket if it has a bent or twisted

bracket or bent teeth.

3. Check chain tension between Axle Sprockets (1/4” - 3/8”

deflection at mid-span).

Pulleys not staying tight or coming

1. Inspect shaft, pulleys and keys for damage. Note:Gear box

off.

pulley has double set screws.

2. Replace any damaged parts.
3. Use blue loctite on the set screws.

Blade Replacement

1. Replace when worn to 1 1/2” from the cutting edge to the

back edge.

2. Sharpen blade from top only. Maintain a flat lower surface.
3. Sharpen sides of blades from outside only.

Blade doesn’t move or stops cutting 1. If the operator tries to cut deeper than 2 1/2”, pivoting the

machine back on its rear wheels while cutting can cause
machine to cut too deeply.

2. Make sure the blade is sharp.
3. Moisture, oil or grease on the belt will cause it to slip.

Replace with a Husqvarna belt.

4. Tension can be increased by tightening the Cable Tension

Nut. If additional adjustment is not available, add a 1/2”
stack of washers between Tension Nut and Cable Bracket.

5.

IMPORTANT: Engine must be off before checking
clearance of pulleys. 

Adjust tap bolt for 1/8” to 1/4”

clearance between all pulleys, Belt Idler Pulley, Engine
Pulley, Right Angle Drive Pulley, with the belt removed.

Lock

adjustment with jam nut.

Blade not cutting full depth

1. Replace the Depth Control Bushings when worn.

or inconsistent depth

2. Be sure the Depth Control Rod is installed properly. See

Technical Bulletin “Installation of Depth Adjuster Assembly
Control.

3. If blade is dull or improperly sharpened, sharpen it from top

only (see page 7) or replace.

4. Check to see if the cutting surface is uneven
5. Replace the Blade Lift Springs when worn or broken.

TROUBLESHOOTING

Summary of Contents for 968981201

Page 1: ...Operators manual SC18 968981201 SC18 968999352 Models Please read these instructions carefully and make sure you understand them before using the machine MANUAL NO 540200156 REV 01 12 01 05 ...

Page 2: ...s Page Operator s Tips 4 Operating on Hills 5 Before You Start 5 Transporting 5 Sod Cutting 5 Maintenance and Service Instructions Page Safety and Maintenance 6 Safety 6 Engine Service and Warranty 6 Lubrication Schedule 6 Inspection Schedule 6 Blade Wear 7 Cleaning 7 Service 7 Adjusting Chain Tension 7 Storage 7 Trouble Shooting Guide 8 Sound Test 12 Vibration Test 12 WARNING Engine exhaust some ...

Page 3: ...ur engine manual for oil type viscosity weight and capacity Reducer yellow cap Transmission grease used 1 You should not need to service the transmission Call Tecumseh or your servicing dealer if needed 2 Transmission is located directly behind the front axle underneath the engine 3 There is no dipstick for transmission 4 Tecumseh Bentonite Grease part 788067B or equivalent ...

Page 4: ...in neutral Read all maintenance and service instructions before attempting work Follow engine manufacturer operating and maintenance instructions Inspect area to be cut and remove rocks wire string and other objects that might present hazard before starting Identify and mark all in ground objects to be avoided such as sprinkler heads stakes water valves clothes line anchors etc This machine was de...

Page 5: ...d hill side turns Back up hills in reverse gear then cut going down BEFORE YOU START Read and understand this manual Be sure engine oil is at engine manufacturer s recommended level Refer to engine manufacturer s manual Put the sod cutter into neutral before starting Place blade in transport position before starting TRANSPORTING Push the blade engagement lever forward to raise the blade Select the...

Page 6: ...tions ENGINE SERVICE AND WARRANTY Contact your nearest engine manufacturers authorized servicing dealer for engine service and warranty questions Follow the engine manufacturers maintenance instructions Should any mal function occur with the engine during the warranty period take it to an Authorized Service Dealer DO NOT tear down the engine as this may void the Engine Manufacturer s Warranty PREV...

Page 7: ...EED 1000 PSI WATER PRESSURE FOR CLEANING ADJUSTING CHAIN TENSION Upper Chain No adjustment is required Lower Chain Remove chain guard Tilt the sod cutter forward onto the front weight Tighten the 1 2 lock nut on the chain idler until the 40 chain flexes approximately 1 4 6mm at mid span Install chain guard Set sod cutter back to level STORAGE 1 Refer to engine manufacturer s instructions for engin...

Page 8: ...ly1 The bushings are wearable items are wearing quickly 2 Grease polyurethane compatible ID and OD of bushings before installing 3 Ensure that proper Blade Lift Springs are installed Springs have 1 5 inch OD 4 Be sure the maximum RPM is set correctly at 3000 See Technical Bulletin Throttle Cable Adjustment 5 Be sure red bushings are installed Bushings ooze out when installed 1 This is normal Trim ...

Page 9: ...tting 1 If the operator tries to cut deeper than 2 1 2 pivoting the machine back on its rear wheels while cutting can cause machine to cut too deeply 2 Make sure the blade is sharp 3 Moisture oil or grease on the belt will cause it to slip Replace with a Husqvarna belt 4 Tension can be increased by tightening the Cable Tension Nut If additional adjustment is not available add a 1 2 stack of washer...

Page 10: ...spection Procedure for Belt Tension 3 Replace the Belt Idler Pulley Arm if it is bent Belt glazed or slipping 1 Limit maximum depth of cut to 2 1 2 2 Be sure the updated Blade Lift Springs are installed Springs have 1 5 inch OD 3 If the Blade Lift Springs are worn they will allow the blade to cut too deeply which causes the belt to slip Replace if necessary 4 Be sure the maximum RPM is set at 3000...

Page 11: ...ission contains a centrifugal clutch and may creep if left in gear Some creeping is normal because of the lubricant resistance between the clutch plates Also too heavy a lubricate in Gear Reducer can cause creeping 1 Put in neutral unit will not creep 2 RPM at idle should be 1 400 200 150 Clutch will en gage at 1 800 RPMs A high idle RPM may cause creeping 3 If unit continues to creep contact your...

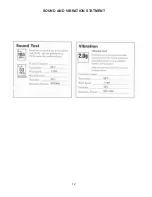
Page 12: ...12 SOUND AND VIBRATION STATMENT ...

Page 13: ...13 This page left black intentionally ...

Page 14: ...Technical assistance For technical assistance please contact your Local Dealer ...

Reviews: