background image

5

INTRODUCTION

Good Service

Husqvarna’s products are sold all over the world and only in specialized retail stores with complete
service. This ensures that you as a customer receive only the best support and service. Before the
product is delivered, the machine has, for example, been inspected and adjusted by your retailer,
see the certificate in the Service Journal in this operator’s manual.

When you need spare parts or support in service questions, warranty issues, etc., please consult
the following professional:

This Operator’s Manual belongs to the
machine with manufacturing number:

Engine

Transmission

Manufacturing Number

The machine’s manufacturing number can be found on the printed decal affixed to the left side of the
frame under the seat.

The machine’s type designation (I.D.).

The manufacturer’s type number (Model).

The machine’s serial number (Serial no.)

Please state the type designation and serial number when ordering spare parts.

The engine’s manufacturing number is stated on a decal. This is placed on the right side on the top
of the engine.

The engine’s serial number (E/NO).

The engine’s type designation (Code).

Please state these when ordering spare parts.

The hydraulic pump’s manufacturing number is stated on a barcode decal affixed to the left side of
the pump housing. The plate states:

The pump’s type designation.

The pump’s serial number.

The hydraulic motor’s manufacturing number is stated on a round metal plate. This is placed on the
gable inside the motor. The plate states:

The hydraulic motor’s type designation and design version.

The hydraulic motor’s serial number.

Summary of Contents for 968999185

Page 1: ... ZTH6125KAA 968999189 ZTH6123KOLA 968999224 ZTH6127KOB 968999225 ZTH7227KOB Models Please read these instructions carefully and make sure you understand them before using the machine MANUAL NO 539109202 REV IR 09 01 03 For Serial No 033600000 Higher ...

Page 2: ...2 2003 Husqvarna All rights reserved Beatrice NE Printed in U S A ...

Page 3: ...ension 15 Reverse spring detent adj 15 Park brake adj 16 Motion control lever adj 16 OPERATING INSTRUCTIONS 17 Starting and operation 17 Controls 17 18 MAINTENANCE 19 Engine oil 19 Mower blades 19 Safety interlock system 19 Cutter housings 19 Hardware 20 Air filter 20 Hydraulic system 20 Deck belt 20 Pump belt 21 Lubrication 21 Tire pressure 21 Caster wheels 21 Fuel filter 21 Winter storage 21 TOR...

Page 4: ...direction Driving and Transport on Public Roads Check applicable road traffic regulations before driving and transporting on public roads If the machine is transported you should always use approved fastening equipment and ensure that the machine is well anchored Operating This machine is constructed only for mowing grass on lawns and other free and even ground with out obstacles such as stones tr...

Page 5: ...ecal affixed to the left side of the frame under the seat The machine s type designation I D The manufacturer s type number Model The machine s serial number Serial no Please state the type designation and serial number when ordering spare parts The engine s manufacturing number is stated on a decal This is placed on the right side on the top of the engine The engine s serial number E NO The engin...

Page 6: ...hould neglect to follow instructions given in the manual Used also when there is a potential for misuse or misassembly R N Reverse Neutral Fast Slow Fuel Ignition Stop Run Start Warning Danger Caution Parking brake Do not stand here Warning Rotating blades keep away from the discharge deck Do not touch rotating parts Battery acid is corrosive explosive and flammable Use on a slope no greater than ...

Page 7: ...e animals and people maintain a safe distance from the machine Stop the machine if someone enters the work area Clear the area of objects such as stones toys steel wire etc that may become caught in the blades and thrown out Beware of the discharge deck and do not point it at any one Do not use the machine without the discharge deck in place Stop the engine and prevent it from starting before you ...

Page 8: ...ce it Local laws may regulate the age of the user Engine exhaust and certain vehicle components contain or emit chemi cals considered to cause cancer birth defects or other reproductive system damage The engine ex haust contains carbon monoxide which is colorless poisonous gas Do not use the machine in en closed spaces WARNING WARNING When using the machine approved personal protective equipment s...

Page 9: ...ke no sudden changes in speed or direc tion Avoid unnecessary turns on slopes and if it proves necessary turn slowly and gradually downward if possible Watch out for and avoid driving over furrows holes and bumps On uneven terrain the machine can tip more easily Long grass can hide obstacles Drive slowly Use small movements of the steering controls Be extra cautious with any additional equip ment ...

Page 10: ...er allow children to operate the machine Be particularly cautious near corners bushes trees or other objects that block your view WARNING The engine must not be started when the driver s floor plate or any protective plate for the mower deck s drive belt is removed Stop the engine Prevent the engine from start ing by removing the ignition key before mak ing any adjustments or performing mainte nan...

Page 11: ... servicing the battery Explo sive gases form in the battery Never perform maintenance on the battery when smoking or near open flames or sparks The battery can explode and cause serious injury damage Ensure that nuts and bolts especially the fas tening bolts for the blade attachments are properly tightened and that the equipment is in good condition Do not modify safety equipment Check regu larly ...

Page 12: ...ving grass leaves and other debris that may have accu mulated on the machine Allow the machine to cool before putting it in storage SAFETY INSTRUCTIONS Transport The machine is heavy and can cause serious crushing injuries Be extra cautious when it is loaded on or unloaded from a vehicle or trailer Use an approved trailer to transport the ma chine Activate the parking brake turn off the fuel suppl...

Page 13: ... Thank you for buying a HUSQVARNA Before operating your new mower read understand and follow the safety instructions and other directions in this manual Lawnmowers and all power equipment can be potentially dangerous if used improperly Safety requires good judgement careful use in accordance with these instructions and com mon sense HOUR METER ...

Page 14: ...h dip stick Add if needed per the engine manufactures specifications See engine manual for oil type and filling specifications FIG 4 Loosen the discharge chute slightly and lower into position Chute should be snug but still pivot freely Install armrests to seat Hardware and armrests are in the plastic bag Assemble the air cleaner hood to the inlet of the air filter EFI models only Adjustments Cutt...

Page 15: ...justment Stop engine and remove key Pull the motion control lever back to the re verse position and release the lever When the lever stops it should be in line with the neutral slot so you can move the lever into neutral slot with out hitting the side of the console frame If adjustment is required put the seat in the rear most position on the slide tilt the seat forward remove the seat rod from se...

Page 16: ...e trunion and the bolt head loosen the nut against the yoke then turn the bolt head the proper direction to achieve the proper gap To adjust the length of the spring turn the nut against the spring the proper direc tion to lengthen or shorten the spring This adjustment is the same for both sides FIG 8 If brake lever trys to catch as you engage the brake the spring needs to be tightened When you ch...

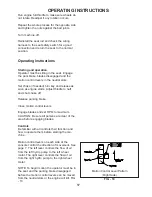
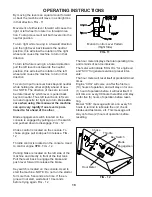
Page 17: ... shut choke off Release parking brake Close motion control levers Engage blades and set RPM to maximum CAUTION Be sure all persons are clear of the area before engaging blades Controls Be familiar with all controls their function and how to operate them before starting the ma chine Motion control levers on each side of the console control the direction of movement See page 7 The left lever control...

Page 18: ...pushed down to disengage FIG 12 Choke control is located on the console To choke engine pull knob push to release FIG 12 Throttle control is located on the console Used to control engine RPM FIG 12 Parking brake is located on the left side of the machine and directly in front of the fuel tank Pull the lever back to engage the brake and push lever forward to release the brake Key switch is located ...

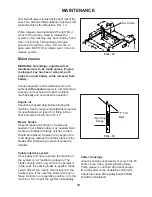
Page 19: ...fications on type of oil filling instruc tions and service intervals FIG 14 Mower blades Inspect blades and sharpen or replace as needed Check blades daily or as needed Bent cracked or blades with large notches in them should be replaced Sharpen to an angle of 22 to 28 degrees Always check the balance of the blades after sharpening to prevent excessive vibration MAINTENANCE Safety interlock system...

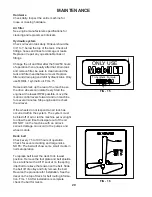
Page 20: ...ontrol levers forward and run machine for several minutes Stop engine and recheck the oil level If the wheels do not respond an air lock has occurred within the system The system must be bled off of air or let the machine set overnight to allow the air time to dissipate out of the oil DO NOT run the machine with an air lock serious damage can occur to the pumps and wheel motors Deck belt Check eve...

Page 21: ... 17 Tire pressure Check every 25 hours All four tires require 15 psi SERVICE DECAL FIG 17 Winter storage To prepare the machine for storage Clean the machine especially under the deck Touch up the paint or spray the underside of deck with a light coat of oil Inspect the machine for damage and loose hardware Change the oil Drain the fuel system or add stabilizer to fuel Make sure to run the machine...

Page 22: ...tube nuts 41 Nm 30 ft lb Wheel motor hub nut 122 Nm 90 ft lb Lug nuts 100 Nm 75 ft lb Blade bolt 122 Nm 90 ft lb Standard fasteners 12 Nm 9 ft lb Standard 5 16 fasteners 25 Nm 18 ft lb Standard 3 8 fasteners 44 Nm 33 ft lb Standard 7 16 fasteners 70 Nm 52 ft lb Standard fasteners 110 Nm 80 ft lb MAINTENANCE ...

Page 23: ...cate Left and right brakes X Left and right motion control shafts X Left and right deck struts X Deck idler arm X Pump idler arm X Caster swivels X Caster tires X Deck lift lever X Throttle cable X Choke cable X Cutter housings X General Check bolts and nuts X Check cutting deck X Clean cutting deck 3 X Clean pump compartment 3 X Check tire pressure 15 psi X Check belts X Check and adjust throttle...

Page 24: ...e on Pump bypass valves open Pump drive belt loose or off Hydraulic system failure Air in the hydraulic system BLADES WILL NOT ENGAGE Blade belt off Clutch unhooked form wiring harness Blade switch failure or unhooked from harness Fuse burnt out UNEVEN CUT Tire pressure uneven Blades bent Deck chains uneven Deck lift blocks loose Anti scalp rollers set uneven CUT IS RAGGED Blades dull Ground speed...

Page 25: ...25 WIRING DIAGRAMS CONSOLE HARNESS Frame Harness Engine Clutch Left Motion Control Hour Meter Blade Switch Seat Starter Switch Right Motion Control P N 104414 ...

Page 26: ...26 WIRING DIAGRAMS CONSOLE HARNESS SCHEMATIC ...

Page 27: ...27 FRAME HARNESS WIRING DIAGRAMS Clutch Engine Pigtail Ground to Engine Starter Solenoid Park Brake Console Harness Brake Relay Start Relay Run Relay P N 104964 ...

Page 28: ...28 WIRING DIAGRAMS FRAME HARNESS ...

Page 29: ...29 ...

Page 30: ......

Reviews: