background image

Operator´s manual

AR19
AR25

Please read these instructions carefully and make sure

you understand them before using the machine.

English

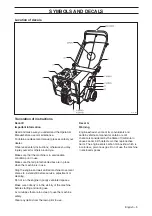
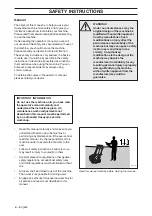
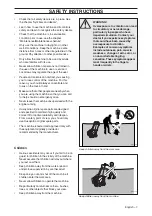
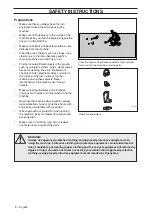
Summary of Contents for AR19

Page 1: ...Operator s manual AR19 AR25 Please read these instructions carefully and make sure you understand them before using the machine English ...

Page 2: ......

Page 3: ...on 22 Turning and maneuvering the lawn aerator 23 Operating on hills 23 Maintenance 24 Maintenance schedule 24 Replacing the air filter 25 Cleaning the sludge reservoir 26 Idle adjustment 26 Adjusting the throttle cable 27 Replacing the throttle cable 27 Ignition system 28 Replacing the engine 29 Replacing the clutch cable 29 Replacing and adjusting the drive belt 30 Cam lock for the handle 31 Whe...

Page 4: ... ensures that you as a customer receive only the best support and service Before the machine was delivered it underwent inspection and was adjusted by your dealer When you need spare parts or support in service questions guarantee issues etc please consult the following professional Serial number The machine s serial number can be found on the printed plate attached to the rear side panel of the m...

Page 5: ...ould I use the removable weights The soil conditions dictate whether extra machine weight will be required for effective aeration The weights are provided to give you added control and greater tine penetration Should I water the lawn before aeration Normally it is not necessary to water the lawn before aerating In extreme conditions such as highly compacted clay soil a simple test can be used to d...

Page 6: ...or misuse or misassembly WARNING Xxxx xxx xxxx xx xxxx x xxxx Used in this publication to notify the reader of a risk of personal injury particularly if the reader should neglect to follow instructions given in the manual A Model designation AR19 B Weights C Wheel removal AR25 D1 Operating instructions AR19 D2 Operating instructions AR25 E Caution list F Chain tension G WARNING carbon monoxide H H...

Page 7: ... until all machine movement comes to a standstill before service adjustment or cleaning Do not run the engine in poorly ventilated spaces Make sure nobody is in the vicinity of the machine before starting and during use Avoid slopes that are too steep to use the machine safely Clear any debris from the lawn prior to use Decal G Warning Engine exhaust some of its constituents and certain vehicle co...

Page 8: ... Failure to do so may result in injury to yourself or others Accident prevention regulations other general safety regulations occupational safety rules and traffic regulations must be followed without fail All users shall be trained in use of the machine The owner is responsible for training users Engage an authorized Husqvarna workshop for all service and repairs not described in this manual IMPO...

Page 9: ...nd specified to maintain high quality and correct fit for optimal durability and lifespan From a safety point of view you should only use Husqvarna original spare parts The machine is tested and approved only with the equipment originally provided or recommended by the manufacturer Children Serious accidents may occur if you fail to be on guard for children in the vicinity of the machine Never ass...

Page 10: ...Make sure all guard plates and protective cowlings are in place and intact when using the machine Never use the machine when barefoot Always wear protective shoes or protective boots with anti slip and preferably with steel toes Wear approved ear protection when running the machine Ask your dealer about approved ear protection Makes sure no clothing long hair or jewelry can fasten in moving machin...

Page 11: ...t intended for any other use Make sure you have a proper foothold when using the machine particularly when backing Walk don t run Never work on wet grass Poor footholds may cause you to slip Keep your hands and feet away from the work tools Mind you keep your hands and feet away from moving parts Mind you keep your hands and feet away from moving parts Running 8011 093 8011 091 8011 152 The engine...

Page 12: ... minutes before transport Collapse the handle if the machine is equipped with a collapsible handle Do not lift the lawn aerator by hand Use a lifting crane or other suitable equipment to load the machine Be careful and use safe lifting and moving techniques when loading unloading the machine Fasten the machine properly in place with approved fasteners such as tension belts chains or rope Always ch...

Page 13: ...el supply for storage or transport If leaks arise in the fuel system the engine must not be started until the problem has been resolved WARNING Gasoline and gasoline fumes are poisonous and extremely flammable Be especially careful when handling gasoline as carelessness can result in personal injury or fire Check the fuel level before each use and leave space for the fuel to expand because the hea...

Page 14: ...ne This may invalidate your guarantee Please contact your dealer if you have any questions regarding service or guarantee matters Follow all maintenance instructions Do not change the setting of governors and avoid running the engine with overly high RPMs If you run the engine too fast you risk damaging the machine components Do not modify safety equipment Check regularly to be sure it works prope...

Page 15: ...9 and AR25 Both machines are equipped with a 4 hp Honda four cycle engine AR19 is the smaller of the two machines see illustration It is recognizable for its collapsible handle AR25 is broader and has a fixed handle Maincomponentsandoperatinginstruments 1 Weight 2 Engine with reduction gear 3 Adjustment knob for rear wheel depth stability 4 Rear wheel control 5 Clutch handle 6 Handle 7 Weight 8011...

Page 16: ...engine stalls in idle the idle speed can be adjusted see the chapter Maintenance Idle adjustment Engine Exterior engine components and operating instruments 1 Throttle 2 Starter 3 Starter handle 4 Fuel valve 5 Choke control 6 Air filter 7 Spark plug 8 Muffler 11 Oil dipstick engine 12 Oil drainage engine 13 Oil level guard 14 Engine switch 15 Fuel tank 16 Fuel filler cap 21 Reduction gear 22 Oil r...

Page 17: ...cleaning instructions see the chapter Maintenance Cleaning the sludge reservoir Air filter The engine air filter is located under the cowling It consists of a foam rubber pre filter and a paper filter cartridge See the chapter Maintenance Replacing the air filter for cleaning instructions Running the machine with a dirty air filter will cause the engine to run on partial choke and show the same sy...

Page 18: ...rt the engine the switch must be first set to the ON position IMPORTANT INFORMATION Used engine oil is a health hazard and legislation prohibits disposal on the ground or in nature it should always be disposed of at a workshop or appropriate disposal location Avoid skin contact wash with soap and water in case of spills Oil dipstick The dipstick for the crankcase oil reservoir is located on the fr...

Page 19: ... not fill the tank completely leave space for the fuel to expand as it warms up Reduction gear 1 6 The gear is directly coupled to the engine A V belt pulley is located on the output axle with a key The gear reduces the speed of the engine so that the output axle turns at 1 6 of the engine speed Oil refill reduction gear The oil is filled through the plug 1 at the top of the gearbox until it flows...

Page 20: ...es the machine to begin moving Raising the handle First lift the rear wheel control then the handle can be lifted into working position and locked in place with the cam lock Cam lock for the handle If the lever for the handle locking mechanism is opened outwards the handle can be moved forwards to a locked position For instructions on raising the handle please see Raising the handle 8011 086 8011 ...

Page 21: ...The rear wheels can be adjusted to the level of your choice so that you can control the penetration of the tines to a margin of a few millimeters Aeration depth can be controlled accordingly B With the rear wheels adjusted to the top position you obtain maximum tine penetration Pushing down on the machine s handle puts most of the weight of the machine on the tines In this configuration aeration d...

Page 22: ...ompletely or partly to the left Move the lever back to the right once the engine starts When the engine is cold it may be best to move the lever back in several stages Find the position where the engine runs smoothly Engine switch Turn the engine switch clockwise to ON Starter handle Misuse of the starter handle can damage the starter Never twist the starter cord around your hand Pull out the hand...

Page 23: ...terclockwise to OFF Fuel valve Close the fuel valve Turn the lever all the way to the left see illustration Throttle Adjust the engine speed with the throttle Moving the lever to the left increases throttle and to the right decreases throttle For machines with a throttle on the handle the throttle on the engine should be set at idle position OFF OFF ON ON 8011 034 8011 026 8011 036 ...

Page 24: ...at the throttle clutch releases properly and that the throttle and clutch cables slide easily applies to model AR25 IMPORTANT INFORMATION Clear the lawn of any extraneous objects Clearly mark rocks and other fixed objects Be especially sure to check for hidden electrical cables or similar in the surface of the lawn Aeration 1 Start the engine and adjust the throttle so that you can move at a comfo...

Page 25: ...ing It is more difficult to steer the machine and maintain its balance The tine penetration will become uneven when you run the machine across the slope of the hill Because the center of gravity changes the tines on the downhill side of the machine will penetrate deeper than the uphill tines When using the machine on hills you should remember the following It is better to run the machine up and do...

Page 26: ...eck the throttle cable model AR25 27 Lubricate the rear wheels 41 Lubricate the chain 2 3 41 Lubricate the links 2 3 41 Lubricate cam lock for the handle 42 Other lubrication see the Lubrication schedule Described in this manual Not described in this manual 1 First change after 20 hours 2 In dusty conditions maintenance is required at shorter intervals 3 With daily use the machine shall be lubrica...

Page 27: ...bsorbent cloth and squeeze out excess oil MAINTENANCE 4 Refit the air filter as follows Mount the paper filter in the air filter housing and tighten using the wing nut Refit the pre filter on the paper filter Return the cowling to the air filter housing and tighten using the wing nut 3 Remove the wing nut in the air filter and remove the paper filter Tap the paper filter against a fixed surface to...

Page 28: ...ew 1 so that the engine idles at 1250 1400 RPM 4 Increase the idle speed with the throttle and move it right back to idle position Check engine speed again 2 Unscrew the sludge reservoir 2 Make sure not to misplace the o ring 1 3 Clean the reservoir and the o ring in e g white spirit and dry carefully 4 Put the o ring in place in its track and replace the sludge reservoir Tighten it moderately to ...

Page 29: ...t nut the engine speed decreases If engine speed is too low the engine will stall when the clutch is released As the cable length decreases between the cable screw and the adjustment nut the engine speed increases If engine speed is too high you lose your ability to start moving under control Adjusting the throttle cable Only applies to model AR25 1 Start the engine and allow it to reach operating...

Page 30: ...l brush if it is to be reused 4 Measure the electrode gap with a gapping tool The gap should be 0 7 0 8 mm 0 028 0 031 Adjust as necessary by bending the side electrode 5 Reinsert the spark plug turning by hand to avoid damaging the threads 6 After the spark plug is seated tighten it using a spark plug wrench so that the washer is compressed A used spark plug should be turned 1 8 1 4 of a turn fro...

Page 31: ...s 2 Two on each side 5 Remove the engine from the unit IMPORTANT INFORMATION Lawn aerators of model AR25 have two pairs of shim plates under the engine MAINTENANCE Replacing the clutch cable 1 Turn off the engine and remove the old clutch cable 2 Insert the new cable through the hole in the rear of the cowling 3 Attach the lower end of the clutch cable to the mounting on the tensioning pulley spri...

Page 32: ...rive belt 1 Turn off the engine and remove the drive guard cover 2 Remove the drive belt 1 3 Check for wear on the pulleys and replace as necessary 4 Check the alignment of the pulleys by making sure that they are in line with one another and with the tensioning pulley 2 If not correct the alignment IMPORTANT INFORMATION Many components including the drive belt on your Husqvarna lawn aerator are s...

Page 33: ...9 1 The cam lock 3 on the handle should lock if you press it with moderate force using your hand The frame of handle 2 should be properly affixed to the machine 2 Check the locking nut on the cam rod 1 If the nut is easy to turn by hand when the cam is released it will no longer properly affix the handle and must be replaced for the lock to continue functioning safely Adjustment Put the handle in ...

Page 34: ...it with a hammer so that the locking collar turns opposite the wheel s normal rotation direction If the bearings have rusted in place they must be replaced together with the wheels and axle 8 Fit the bearings and sprocket loosely on the axle For model AR19 the hub side of the bearing should be turned away from the wheel Model AR25 has three bearings On both of the bearings closest to the wheel the...

Page 35: ... grease nipple turned outwards and the seals carefully in place on the wheel bushing Insert the axle bolt through the wheel and the wheel carriage Fit the washer and nut and tighten firmly 6 Grease the wheel bearings Applies to model AR25 1 Make sure the machine is parked on level ground and that the engine is off 2 Lower the rear wheel control so that the lawn aerator is resting on the tines 3 Tu...

Page 36: ...the rear wheels and insert blocks 5 Turn the drive chain manually for access to the master link 6 Slack the chain by turning the idler adjustment screw counterclockwise 7 Remove the master link and free the chain from the rotor sprocket 8 Remove the nuts 1 and screws 2 per bearing that hold the outer bearings of the tine rotor shaft in the side panels of the machine see illustration 9 Remove the t...

Page 37: ...alled on the rotor you should mount the new freewheeling tine assembly and the outer bearing The bearing hub should face the fixed tines The bearing with the locking collar faces the fixed tines and butts up against the shoulder of the shaft Tighten the bearing nuts by hand 7 Tighten the four bearing nuts properly 8 Lock the bearing collar with a hammer and punch Make sure that the collar locks in...

Page 38: ...ends replacing the sprockets at the same time as the drive chain Chain Replacing the chain 1 Turn off the engine 2 Remove the drive belt cover see illustration 3 Undo the chain s idler adjustment screw 1 and lock nut 2 4 Remove the master link and the chain 5 Check and align the sprockets as necessary The sprocket at the front wheel 4 see lower illustration and the sprocket on the tine shaft each ...

Page 39: ...aged Do not exceed 70 bar 1000 PSI water pressure when cleaning Lubricate the machine after cleaning This is particularly important if the machine is to be stored Two minute rule The machine may be tipped forward to facilitate access for cleaning or service but no longer than 2 minutes If the machine is held in this position for too long the engine can be damaged by gasoline draining into the cran...

Page 40: ...38 English Lubrication schedule LUBRICATION 8011 280 ...

Page 41: ...riate viscosity according to the diagram API Service SF SG to the upper level mark on the dipstick threads on the oil dipstick The engine takes 0 6 liters 0 63 US qt of oil When checking the oil level the dipstick should not be screwed in 4 Check that the rubber gasket is in position and screw the dipstick back into place Do not tighten it askew or too hard or you may damage the threads 5 Wipe up ...

Page 42: ...nning Carefully remove the level plug 2 and check that oil drains out If there is no oil leakage the machine can be carefully tipped forward to estimate the oil level If necessary fill the oil in the filler plug hole 1 until it runs over from the level plug Replace the level and filler plugs Tighten moderately IMPORTANT INFORMATION Used engine oil is a health hazard and legislation prohibits dispo...

Page 43: ...e both rear wheels with a grease gun in the single nipple on the outside of the rear wheels until the grease begins to squeeze out 5 Tines Cover the tines with a thin coat of oil to avoid rust This is particularly important prior to winter storage or if the machine will not be used for a period of longer than 30 days 6 Links and joints It is important to lubricate all links and joints so that they...

Page 44: ...ows AR25 8 Cam lock for the handle Lubricate the edge of the cam with a little grease 7 Adjustment for rear wheel depth stability Lubricate the threads regularly with grease to avoid binding or locking It is particularly important to lubricate the threads after cleaning 8011 163 8011 088 8011 271 ...

Page 45: ...ll the engine 1 with the manufacturer recommended oil See the chapter Lubrication Engine oil Fill the reduction gear 2 with the manufacturer recommended oil See the chapter Lubrication Oil change in reduction gear The machine must be parked on level ground when inspecting and filling oil 5 Place the weights 7 in their holders on each side of the machine 6 Make sure that the clutch handle releases ...

Page 46: ...of the control rod to the outer side of the torque arm mounting 1 on the bottom illustration using fittings C see the bottom illustration 7 Connect the clutch cable by threading it through the guide hole 6 on the top illustration at the back of the machine 8 The lower end of the throttle cable 2 is factory installed Insert it through the guide hole 8 in the top illustration and affix the spring fo...

Page 47: ...o not empty the fuel tank and the carburetor if you have added stabilizer WARNING Never store an engine with fuel in the tank indoors or in poorly ventilated spaces where fuel vapor can come in contact with open flame sparks or a pilot light such as in a boiler hot water tank clothing drier etc Handle the fuel with caution It is very flammable and careless use can cause serious damage to person an...

Page 48: ...46 English WIRING DIAGRAM 1 Engine switch 2 Transistor ignition unit 3 Spark plug 4 Oil level guard Legend for color abbreviations in wiring diagram RD Red SV Black GL Yellow 8011 099 8011 050 ...

Page 49: ...ed service checking spark plug or ignition workshop Low compression Serious interior engine Contact an authorized service damage or faulty valves workshop Engine is gutless or runs unevenly Air filter Clogged air filter Clean or replace the air filter Fuel system Machine stored without observ Clean tank sludge reservoir and ing proper procedure from empty carburetor chapter Storage Winter storage ...

Page 50: ...m roller bearing Rear tire 8 x 2 solid rubber 8 x 2 solid rubber Front tire 10 x 6 half solid tire 10 x 6 half solid tire Aeration Tines 1 95 cm coring 1 95 cm coring 30 per unit 42 per unit Aeration breadth 48 3 cm 64 8 cm Coring pattern 9 7 x 16 5 cm 9 7 x 16 5 cm Coring aeration depth Up to 7 6 cm Up to 7 6 cm Holes per m2 82 9 87 2 Working speed 76 2 m min 4 57 km h 88 39 m min 5 3 km h Capaci...

Page 51: ...edule 10 Fill the fuel tank and start the engine 11 Check that the machine and working equipment do not move in neutral 12 Check all operating instruments 13 Check decals and information attached to the unit 14 Check the engine speed RPM see the chapter Technical Data 15 Check for leakage 16 Inform the customer about The need and advantages of following the service schedule The need and advantages...

Page 52: ...50 English SERVICE JOURNAL Action Date stamp signature ...

Page 53: ...English 51 SERVICE JOURNAL Action Date stamp signature ...

Page 54: ... SERVICE JOURNAL Action Date stamp signature H r 6 ...

Page 55: ...8011 156 8011 157 8011 158 8011 159 ...

Page 56: ...2001W35 114 00 28 26 H r 6 ...

Reviews: