background image

4 Operation

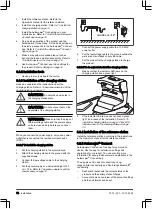
4.1 Main switch

WARNING: 

Read and understand the

safety chapter before you use the product.

Set the Main switch to the 

1

 position to start the

product.

Set the Main switch to the 

0

 position to set the

product to OFF.

4.2 To start the product

1.

Push the STOP button on the product.

2.

Set the Main switch to the 

1

 position.

3.

Open the Automower

®

 Connect app.

4.

Enter the PIN code.

5.

Select an operating mode in the app. Refer to 

To

select operation mode Start on page 22

.

6.

Push the START button on the product.

7.

Select an operating mode in the app.

4.3 To select operation mode Start

1.

Open the app on your mobile device.

2.

Select 

Start

 and select an operation mode:

Resume Schedule

appDrive

 or 

Select work area

.

4.3.1 Resume Schedule

The product will continue to operate on the scheduled

work area where it cuts the grass and charges

automatically.

4.3.2 appDrive

Use the appDrive to operate the product manually.

4.3.2.1 To operate the product with appDrive
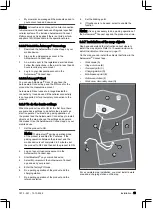
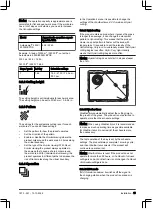
Use the buttons to operate the product:

Use the up button (A) to move the product forward.

Use the down button (B) to move the product

rearward.

Use the left arrow button (C) to rotate the product

to the left.

Use the right arrow button (D) to rotate the product

to the right.

Use the center button (E) as a joystick to move and

rotate the product in any direction.

A

D

B

C

E

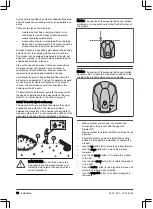
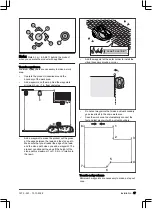
Note: 

Walk 2-3 m / 6.5-9.8 ft. behind the product

when you operate the product with appDrive.

4.3.3 Select work area

This function lets the product temporarily operate in a

selected work area. You can select a time limit for this

function. After that time period, the product continues to

operate as set in the schedule.

4.3.3.1 Secondary area
For the product to operate in a secondary area, you

must move the product manually to and from the

secondary area. The product cuts for a selected period

of time or until the battery is empty.

4.4 Operating mode - Park

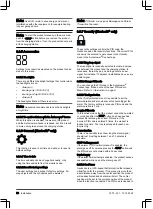
When you select 

Park

 in the app you can select the

operation selections that follow:

Park until further notice

Select duration

4.4.1 Park until further notice

The operation mode 

Park

 means that the product goes

back to the charging station where it stays until a new

operation mode is selected and the START button is

pushed.

4.4.2 Select duration

The product goes back to the charging station and

stays for the selected park duration. Use the operation

selection to temporary stop an ongoing mowing cycle

and let the product to stay in the charging station.

4.4.3 Operating mode - Pause

When selecting 

Pause

 in the Automower

®

 Connect app,

the product stop the current activity and pause. The

22 - Operation

1970 - 001 - 10.10.2022

Summary of Contents for AUTOMOWER 450X

Page 1: ...EN English Operator s manual HUSQVARNA AUTOMOWER 450X 450XH EPOS Read the operator s manual carefully and make sure that you understand the instructions before you use the product ...

Page 2: ... 7 To examine where to install the objects on the map 13 3 8 Installation of the product 13 3 9 Settings 18 4 Operation 4 1 Main switch 22 4 2 To start the product 22 4 3 To select operation mode Start 22 4 4 Operating mode Park 22 4 5 To stop the product 23 4 6 To set the product to OFF 23 4 7 To charge the battery 23 5 Maintenance 5 1 Introduction maintenance 24 5 2 Clean the product 24 5 3 Repl...

Page 3: ...a complete stop Set the product to OFF before you clear a blockage do maintenance or examine the product and if the product starts to vibrate abnormally Examine the product for damage before you start the product again Do not use the product to it is defective If an injury or accident occur get medical aid Do not install the mains cable in an area where the product cuts Follow the instructions to ...

Page 4: ...w the product when it is set to ON Use the park mode or set the product to OFF when persons especially children or animals are in the work area Refer to To set the product to OFF on page 23 Husqvarna recommends to set the product to operate when the work area has no activity The product can cause injury to animals at night in work area for example hedgehogs Refer to Operating mode Park on page 22 ...

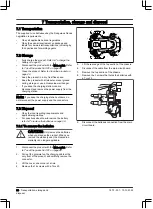
Page 5: ... when the Main switch is set to the 0 position CAUTION Do not lift the product when it is parked in the charging station It can cause damage to the charging station and or the product Push the STOP button and pull the product out of the charging station before you lift it 1 Push the STOP button to stop the product 2 Set the Main switch to the 0 position 3 Lift the product by the handle with the bl...

Page 6: ...wer The product has a battery power source and cuts grass automatically It continuously alternates between mowing and charging The movement pattern of the product can be set to random or systematic The virtual boundary specifies the work area where the product is allowed to operate The satellite receiver in the product senses when it is approaching the virtual boundary When the product hits an obs...

Page 7: ...Satellites 2 Satellite signals 3 Reference station1 4 Correction data 5 Charging station 6 Virtual boundary 7 Stay out zone 8 Work area 9 Mobile device2 10 Docking point 11 Transport path 1 Not included 2 Not included 1970 001 10 10 2022 Introduction 7 ...

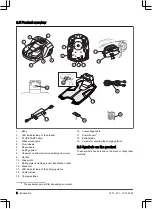
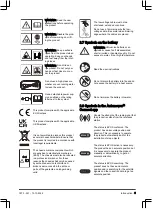
Page 8: ...rs 9 Handle 10 Main switch 11 Rating plate including product identification code 12 Blade disc 13 LED indicator lamp of the charging station 14 Contact strips 15 Charging station 16 Low voltage cable 17 Power supply 3 18 Extra blades 19 Screws for securing the charging station 2 6 Symbols on the product These symbols can be found on the product Study them carefully 3 The appearance may differ depe...

Page 9: ...r parts of the guarantee no longer being valid The low voltage cable must not be shortened extended or spliced Do not use a trimmer nearby the low voltage cable Be careful when trimming edges where the cables are placed 2 7 Symbols on the battery WARNING Lithium ion batteries can explode or cause fire if disassembled short circuited or handled roughly Do not expose to water fire or high temperatur...

Page 10: ...r s Manual to make it easier to use Text written in italics is a text that is in the Automower Connect app or is a reference to another section in the Operator s manual Text written in bold is one of the buttons on the product or in appDrive 10 Introduction 1970 001 10 10 2022 ...

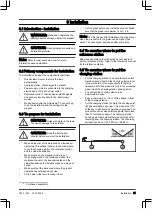
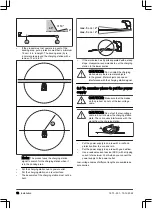
Page 11: ...out zones Make sure that the work area where the product operates has unimpeded sky view Fill in holes in the lawn to make it level Cut the grass before you install the product Make sure that the grass is maximum 10 cm 4 in Note The first weeks after installation the sound level when the product cuts the grass can be higher than usual The sound level decreases after some time 3 4 To examine where ...

Page 12: ...the lower section CAUTION Do not install the charging station where there are metal objects in the ground Metal objects can cause interference with the charging station signal 3 6 To examine where to put the power supply CAUTION Make sure that the blades on the product do not cut the low voltage cable CAUTION Do not put the low voltage cable in a coil or below the charging station plate The coil c...

Page 13: ...duct is 500 m 1640 ft The maximum distance decreases if there is objects between the reference station and product 3 7 1 Passages A passage is a section that has virtual boundary on each side and that connects 2 parts of the work area The passage must be a minimum of 2 m 6 5 ft wide to get a good cutting result Short passages can be as narrow as 1 m 3 3 ft A long narrow passage can have a negative...

Page 14: ...harging station in the selected area 2 Attach the charging station to the ground with the supplied screws 3 Connect the low voltage cable to the charging station 4 Put the power supply at a minimum height of 30 cm 12 in Refer to To examine where to put the power supply on page 12 min 30 cm 12 5 Connect the power supply cable to a 100 240V power outlet 6 Put the low voltage cable in the ground outs...

Page 15: ...t app to install objects on the map change the settings and operate the product Use the Automower Connect app on your mobile device 1 Set the product to ON Note The Bluetooth pairing operation mode of the product is enabled for 3 minutes If the pairing operation between the product and the mobile device is not completed in 3 minutes set the product to OFF and then set the product to ON 2 Log on to...

Page 16: ... install objects on the map on page 16 3 8 7 1 To install objects on the map The waypoints A are positions that makes the virtual boundaries and paths B The lines are straight between the waypoints Add a number of waypoints to make smooth curves You can adjust the positions of the waypoints in the app after the installation of the map B A CAUTION Do not lift and move the product between the waypoi...

Page 17: ...ke sure that you straddel the edge of the lawn and the stone path when you add a waypoint The product can straddel the edge if the height of the stone path is maximum 1 cm 0 4 in in relation to the lawn max 1 cm 0 4 Add the waypoint at the outer corner to install the virtual boundary around a corner Do not set waypoints that make a virtual boundary go across itself in the same work area Save the w...

Page 18: ...s the maintenance point Operate the product and add waypoints to make a path to the charging station Save the maintenance point to automatically connect the last waypoint to the docking point Set the corridor width A for the maintenance point The corridor width can be set to 2 5 m 6 6 16 4 ft A 3 9 Settings The product has factory settings but the settings can be adapted to each work area 3 9 1 Sc...

Page 19: ...of the Weather timer ECO mode and Spiral cutting 3 9 4 1 Spiral cutting If the product enters an area where it senses the grass is longer than average it can change the movement pattern to Spiral cutting This means that the product mows in a spiral pattern to faster cut the area with longer grass It is possible to set the intensity of the Spiral cutting Very low Low intensity means that Spiral cut...

Page 20: ...3 9 7 1 New loop signal The loop signal is randomly selected to create a unique link between the product and the charging station In rare cases there may be a need to generate a new signal for instance if 2 adjacent installations have a very similar signal 3 9 7 2 Change PIN code You can change the PIN code in the Automower Connect app Make a note of the new PIN code in Memo Refer to Introduction ...

Page 21: ...vice to help to rectify the fault If the product is disrupted in any way for example it is trapped or the battery is low a message is saved relating to the disruption and the time it happened If the same message is repeated several times this may indicate that an adjustment to the installation or the product is required Refer to Installation on page 11 3 9 10 Download firmware over the air Firmwar...

Page 22: ...ate the product to the right Use the center button E as a joystick to move and rotate the product in any direction A D B C E Note Walk 2 3 m 6 5 9 8 ft behind the product when you operate the product with appDrive 4 3 3 Select work area This function lets the product temporarily operate in a selected work area You can select a time limit for this function After that time period the product continu...

Page 23: ...Connect the product with Bluetooth short range in the app Note The product cannot be set to OFF if it is not connected to the app with Bluetooth 3 Set the Main switch to the 0 position 4 7 To charge the battery When the product is new or after long term storage the battery can be empty Charge the battery before you start the product 1 Set the Main switch to the 1 position 2 Put the product into th...

Page 24: ...ation CAUTION Do not use a high pressure washer to clean the product and the charging station Do not use solvents for cleaning 5 2 1 To clean the chassis and blade disc Examine the blade disc and blades weekly 1 Set the Main switch to the 0 position 2 Put the product onto its side 3 Make sure that the blades are not damaged and that the blades and blade disc can rotate freely 4 Clean the blade dis...

Page 25: ...damage to the battery If the operating time of the product is shorter than usual between charges this means that the battery is at the end of its life cycle Replace the battery to extend the operating time Note The battery life is related to the length of the season and how many hours a day the product operates A long season or many hours of operation a day means that the battery must be replaced ...

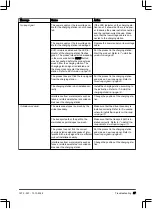
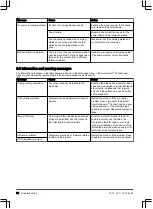
Page 26: ... the same message shows frequently Message Cause Action Cutting system blocked The blade disc is blocked by grass or other objects Examine the blade disc and remove the grass or other object The blade disc is in water Move the product and prevent the collec tion of water in the work area The grass is high and thick Adjust the cutting height to the height of the grass Adjust the schedule settings t...

Page 27: ...tion and make a new loop signal Refer to New loop signal on page 20 The charging station in not installed cor rectly Install the charging station according to the instruction Refer to To install the charging station on page 14 Interference from metal objects such as fences reinforcement steel or buried ca bles near the charging station Change the position of the charging sta tion Outside work area...

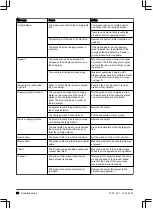
Page 28: ... and the contact plates on the charging station is not good The product made a number of tries to charge Put the product in the charging station and make sure that the charging plates and contact plates are connected An object prevents the product to enter the charging station Remove the object The charging station tilts or is bent Put the baseplate on level ground Stuck in charging station An obj...

Page 29: ...ontact plates Restart the product Clean the charging plates on the product and the contact plates on the charging station Temporary electronic or firmware prob lem in the product Restart the product If the problem stays speak to your approved servicing dealer Battery problem Temporary battery or firmware problem in the product Restart the product If the problem stays speak to your approved servici...

Page 30: ...ion of the reference station Refer to the Operator s manual for the Reference station Weak satellite signal to the product The satellite signal is temporary weak The product will start to operate when the satellite signal are good Examine if there is an object between the product and the sky that cause inter ference with the satellite signal Remove the object or do a new installation to not includ...

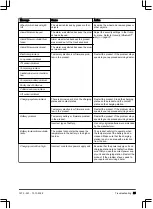
Page 31: ... the product If the problem stays speak to your approved servicing dealer Unexpected cutting height adj The cutting height adjustment cannot move Examine the cutting height adjustment and remove grass or other objects If the problem stays speak to your approved servicing dealer Limited cutting height range Cutting height problem Cutting height blocked Cutting system major imbal ance The product se...

Page 32: ...use Action Cutting system imbalance The product senses vibrations in the blade disc Examine the blades and screws for dam ages and wear Make sure that all blades are correctly installed and that there is only one blade attached in each position on the blade disc Connectivity problems Problem with the Automower Connect module Restart the product If the connection problem stays disconnect the produc...

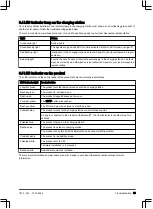
Page 33: ...rol panel of the product shows the current product status LED indicator light Product status Constant green The product cuts the lawn or moves out of the charging station Flashes green The product is in Pause mode Flashes red The product stopped because of an error Constant yellow The STOP button was pushed Flashes yellow The PIN code must be entered to start the product Constant blue The product ...

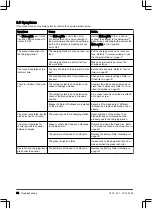
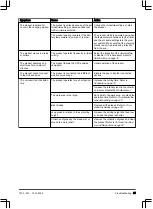
Page 34: ...n in the prod uct The cutting system is not in balance be cause of damaged blades Examine the blades and screws and re place them if necessary Refer to To re place the blades on page 25 The cutting system is not in balance be cause of too many blades in the same position Do a check that only one blade is attach ed to each screw Blades of different thickness are installed on the product Examine if ...

Page 35: ...he product follows the GPS assisted navigation Usual operation of the product The product cannot connect to the mobile device The product is connected to a different mobile device or app Disable the app in all other connected devices The cut result is not satisfac tory The product operates for a short period Increase the cutting time Refer to Schedule on page 18 Increase the intensity level in the...

Page 36: ...outdoors do not disconnect the power supply and the connectors 7 3 Disposal Obey the local recycling requirements and applicable regulations For questions about how to remove the battery refer to To remove the batteries on page 36 7 3 1 To remove the batteries CAUTION Only remove the batteries when you dispose the product When you remove the warranty seal the Husqvarna warranty is no longer applic...

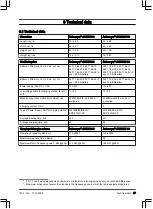
Page 37: ...DC V AC 100 240 100 240 Low voltage cable for charging station length m ft 10 33 10 33 Mean energy consumption at maximum use 23 kWh month in a 5000 m2 work area 23 kWh month in a 5000 m2 work area Charging current A DC 7 7 Type of Power Supply Unit for charging station5 FW7458 28 D XX Y ADP 200JR XX FW7458 28 D XX Y ADP 200JR XX Average mowing time min 210 210 Average charging time min 60 60 Char...

Page 38: ...undary 15 15 Working capacity m2 acre s 20 5000 1 25 5000 1 25 IP classification Automower 450X EPOS Automower 450XH EPOS Robotic lawn mower IPX4 IPX4 Charging station IPX1 IPX1 Power supply charging station IP44 IP44 Frequency Band Support Bluetooth Frequency range 2400 0 2483 5 MHz Automower Connect 2G GSM 850 MHz E GSM 900 MHz DCS 1800 MHz PCS 1900 MHz Automower Connect 4G Band 12 700 MHz Band ...

Page 39: ...n the product and other types of wireless systems such as remote controls radio transmitters hearing loops buried electric animal fencing or similar The products are made in England or the Czech Republic Refer to information on the rating plate Refer to Product overview on page 8 8 2 Registered trademarks The Bluetooth word mark and logos are registered trademarks owned by Bluetooth SIG inc and an...

Page 40: ...he warranty Damage caused by water seepage from using a high pressure washer or from being submerged under water for example when heavy rain forms pools of water Damage caused by lightning Damage caused by improper battery storage or battery handling Damage caused by using a battery that is not a Husqvarna original battery Damage caused by not using Husqvarna original spare parts and accessories s...

Page 41: ...is subject to the following two conditions this device may not cause harmful interference and this device must accept any interference received including interference that may cause undesired operation Note This equipment has been tested and found to comply with the limits for a Class B digital device pursuant to part 15 of the FCC Rules These limits are designed to provide reasonable protection a...

Page 42: ...42 Applicable to US CA market 1970 001 10 10 2022 ...

Page 43: ...1970 001 10 10 2022 Applicable to US CA market 43 ...

Page 44: ...www husqvarna com AUTOMOWER is a trademark owned by Husqvarna AB Copyright 2022 HUSQVARNA All rights reserved Original instructions 1143191 95 2022 10 13 ...

Reviews: