background image


English


532 44 55-38

Operator’s Manual

          Owner's Manual

CRT900L

Gasoline containing up to 10% ethanol (E10) is accept-

able for use in this machine.  The use of any gasoline ex-

ceeding 10% ethanol (E10) will void the product warranty.
Vous pouvez utiliser de l’essence contenant jusqu’à 

10 % d’éthanol (E10) avec cet appareil.  L’utilisation 

d’essence contenant plus de 10 % d’éthanol annulera 

la garantie du produit.

Please read the operator's manual carefully and make sure 

you understand the instructions before using the machine.

Lisez très attentivement et soyez certain de comprende 

ces instructions avant d’utiliser cette machine.

Summary of Contents for CRT900L

Page 1: ...rranty Vous pouvez utiliser de l essence contenant jusqu à 10 d éthanol E10 avec cet appareil L utilisation d essence contenant plus de 10 d éthanol annulera la garantie du produit Please read the operator s manual carefully and make sure you understand the instructions before using the machine Lisez très attentivement et soyez certain de comprende ces instructions avant d utiliser cette machine ...

Page 2: ...e the equipment without proper instruction Keep the area of operation clear of all persons par ticularly small children and pets PREPARATION Thoroughly inspect the area where the equipment is to be used and remove all foreign objects Disengage all clutches and shift into neutral before starting the engine motor Donotoperatetheequipmentwithoutwearingadequate outergarments Wearfootwearthatwillimprov...

Page 3: ...USTION ENGINE AND SHOULD NOT BE USED ON OR NEAR ANY UNIMPROVED FOREST COVERED BRUSH COVERED OR GRASS COVERED LAND UNLESS THE ENGINE S EXHAUST SYSTEM IS EQUIPPED WITH A SPARK ARRESTER MEETING APPLICABLE LOCAL LAWS IF ANY IFASPARKARRESTERISUSED ITSHOULDBEMAINTAINED IN EFFECTIVE WORKING ORDER BY THE OPERATOR IN THE STATE OF CALIFORNIA A SPARK ARRESTER IS REQUIRED BY LAW SECTION 4442 OF THE CALIFORNIA...

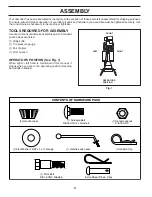
Page 4: ... been assembled at the factory with exception of those parts left unassembled for shipping purposes To ensure safe and proper operation of your tiller all parts and hardware you assemble must be tightened securely Use the correct tools as necessary to insure proper tightness FRONT OPERATOR S POSITION LEFT RIGHT Fig 1 1 Hairpin Clip 1 Carriage Bolt 3 8 16 UNC x 1 Grade 5 1 Center Locknut 3 8 16 UNC...

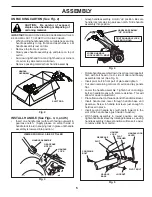
Page 5: ...NDLE ASSEMBLY Fig 3 HANDLE ASSEMBLY GEARCASE NOTCH HANDLE LOCK VIEWED FROM R H SIDE OF TILLER HANDLE ASSEMBLY UP POSITION LOOSEN HANDLE LOCK LEVER TO MOVE TIGHTEN HANDLE LOCK LEVER TO HOLD handles_34 CARRIAGE BOLT SLOT GEARCASE HANDLE LOCK FLAT WASHER HANDLE LOCK LEVER PIVOT BOLT LOCKNUT HANDLE BASE Fig 5 Rotate handle assembly down Insert rear carriage bolt first with bolt head on L H side of til...

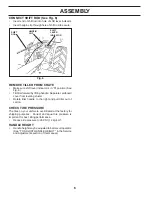
Page 6: ...FT ROD See Fig 6 Insert end of shift rod into hole of shift lever indicator Insert hairpin clip through hole of shift rod to secure Fig 6 CHECK TIRE PRESSURE The tires on your unit were overinflated at the factory for shipping purposes Correct and equal tire pressure is important for best tilling performance Reduce tire pressure to 20 PSI 1 4 kg cm2 HANDLE HEIGHT Handle height may be adjusted to b...

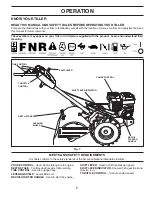
Page 7: ...ENTS Our tillers conform to the safety standards of the American National Standards Institute CHOKE CONTROL Used when starting a cold engine DEPTH STAKE Controls depth at which tiller will dig TINE CONTROL Used to engage tines LEVELING SHIELD Levels tilled soil RECOIL STARTER HANDLE Used to start the engine SHIFT LEVER Used to shift transmission gears SHIFT LEVER INDICATOR Shows which gear the tra...

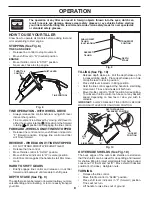
Page 8: ...and oil or attempting to start engine STOPPING See Fig 8 TINES AND DRIVE Release tine control to stop movement Move shift lever to N neutral position ENGINE Move throttle control to STOP position Never use choke to stop engine TINE OPERATION WITH WHEEL DRIVE Always release tine control before moving shift lever into another position Tine movement is achieved by moving shift lever to either the cou...

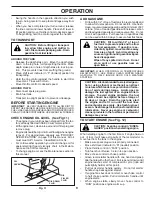
Page 9: ... or longer Drain the gas tank start the engine and let it run until the fuel lines and carburetor are empty Use fresh fuel next season SeeStorageInstructionsforadditional information Never use engine or carburetor cleaner products in the fuel tank or permanent damage may occur Swing the handle in the opposite direction you wish to turn being careful to keep feet and legs away from tines When you h...

Page 10: ...o it Soilconditionsareimportantforpropertilling Tineswill notreadilypenetratedry hardsoilwhichmaycontribute to excessive bounce and difficult handling of your tiller Hard soil should be moistened before tilling however extremely wet soil will ball up or clump during tilling Wait until the soil is less wet in order to achieve the best results When tilling in the fall remove vines and long grass to ...

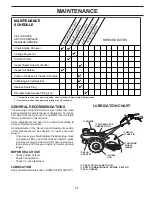
Page 11: ...evel Check tine operation Check for loose fasteners LUBRICATION Keep unit well lubricated See LUBRICATION CHART c SAE 30 OR 10W 30 MOTOR OIL d REFER TO MAINTENANCE ENGINE SECTION e EP 1 GREASE LUBRICATION CHART c WHEEL HUB d ENGINE c IDLER BRACKET c LEVELING SHIELD HINGES c DEPTH STAKE PIN e RH GEAR CASE GREASE FITTIG MAINTENANCE SCHEDULE FILL IN DATES AS YOU COMPLETE REGULAR SERVICE Check Engine ...

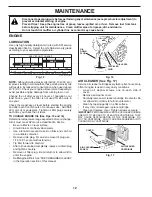
Page 12: ... grade according to your expected temperature NOTE Although multi viscosity oils 5W 30 10W 30 etc improve starting in cold weather these multi viscosity oils will result in increased oil consumption when used above 40 F 4 C Check your engine oil level more frequently to avoid possible engine damage from running low on oil Change the oil after every 25 hours of operation or at least once a year if ...

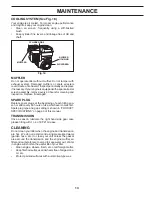
Page 13: ...lling sea son or after every 50 hours of use whichever comes first Spark plug type and gap setting is shown in PRODUCT SPECIFICATIONS on page 3 of this manual TRANSMISSION Once a season lubricate the right hand side gear case grease fitting with 1 oz of EP 1 Grease CLEANING Do not clean your tiller when the engine and transmission are hot We do not recommend using pressurized water garden hose etc...

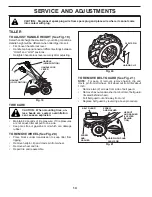
Page 14: ...ND CLEVIS PIN TO REMOVE BELT GUARD See Fig 21 NOTE For ease of removal remove hairpin clip and clevis pin from left wheel Pull wheel out from tiller about 1 inch Remove two 2 screws from side of belt guard Remove hex nut and washer from bottom of belt guard located behind wheel Pull belt guard out and away from unit Replace belt guard by reversing above procedure TIRE CARE CAUTION When mounting ti...

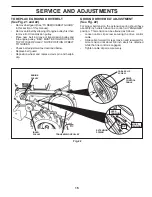
Page 15: ...BELT MUST BE IN GROOVE ON TOP OF IDLER PULLEY NOTE POSITION OF BELT TO GUIDES Check belt adjustment as described below Replace belt guard Reposition wheel and replace clevis pin and hairpin clip Fig 22 GROUND DRIVE BELT ADJUSTMENT See Fig 22 For proper belt tension the extension spring should have about 5 8 inch stretch when tine control is in ENGAGED position This tension can be attained as follo...

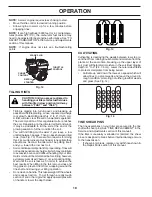
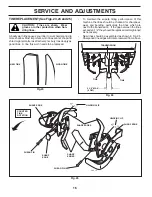
Page 16: ...te rearward from above Fig 25 TINEREPLACEMENT SeeFigs 23 24and25 CAUTION Tines are sharp Wear gloves or other protection when han dling tines A badly worn tine causes your tiller to work harder and dig more shallow Most important worn tines cannot chop and shred organic matter as effectively nor bury it as deeply as good tines A tine this worn needs to be replaced NEW TINE WORN TINE Fig 23 tine_3 ...

Page 17: ...uretor does need adjustment contact your nearest authorized service center department IMPORTANT NEVER TAMPER WITH THE ENGINE GOVERNOR WHICHISFACTORYSETFORPROPERENGINE SPEED OVERSPEEDINGTHEENGINEABOVETHEFACTORY HIGH SPEED SETTING CAN BE DANGEROUS IF YOU THINK THE ENGINE GOVERNED HIGH SPEED NEEDS ADJUSTING CONTACTYOURNEARESTAUTHORIZEDSERVICECENTER DEPARTMENT WHICH HAS THE PROPER EQUIPMENT AND EXPERI...

Page 18: ...y starting the engine and let it run until the fuel lines and carburetor are empty Never use engine or carburetor cleaner products in the fuel tank or permanent Use fresh fuel next season NOTE Fuel stablizer is an acceptable alternative in minimizing the formation of fuel gum deposits during storage Add stabilizer to gasoline in fuel tank or storage container Always follow the mix ratio found on s...

Page 19: ...ank and clean carburetor 6 Stale or dirty fuel 6 Empty fuel tank and refill tank with fresh clean gasoline 7 Water in fuel 7 Empty fuel tank and carburetor and refill tank with fresh clean gasoline 8 Clogged fuel tank 8 Remove fuel tank and clean 9 Spark plug wire loose 9 Connect and tighten spark plug wire 10 Dirty engine air screen 10 Clean engine air screen 11 Dirty clogged muffler 11 Clean rep...

Page 20: ...UDQW Q PRVW FDVHV WKHVH LWHPV DUH 127 PDQXIDFWXUHG E XVTYDUQD LQ ZKLFK FDVH WKH PD EH FRYHUHG VHSDUDWHO E WKHLU UHVSHFWLYH PDQXIDFWXUHU V ZDUUDQWLHV LI RQH LV SURYLGHG DQG LQFOXGHG ZLWK WKH SURGXFW DW WKH WLPH RI SXUFKDVH 7KH IROORZLQJ WUDQVPLVVLRQ WUDQVD OH PDQXIDFWXUHUV DQD GUR HDU 7XII 7RUT SURYLGH D ZDUUDQW IRU WKH WUDQVPLVVLRQ WUDQVD OH WR WKH XOWLPDWH SXUFKDVHU RU WR XVTYDUQD XVTYDUQD ZLOO D...

Page 21: ...RU PRGLILHG FXWWLQJ VKLHOGV JXDUGV RU VDIHW GHYLFHV P Q UHPRYHG GDPDJHG DLU ILOWHU H FHVVLYH GLUW DEUDVLYHV VDOW ZDWHU PRLVWXUH FRUURVLRQ UXVW YDUQLVK VWDOH IXHO RU DQ DGYHUVH UHDFWLRQ GXH WR LQFRUUHFW VWRUDJH SURFHGXUHV Q DLOXUHV GXH WR LPSURSHU VHW XS SUH GHOLYHU VHUYLFH RU UHSDLU VHUYLFH E DQ RQH RWKHU WKDQ DQ DXWKRUL HG XVTYDUQD VHUYLFLQJ GHDOHU GXULQJ WKH ZDUUDQW SHULRG R LUW FRQWDPLQDWHG JUH...

Page 22: ...Q SHQGDEOH RPSRQHQWV HDUV 12 55 17 12 55 17 6QRZ 7KURZHUV QJLQH 5HVLGHQWLDO HUR 7XUQ 0RZHUV 0 3URGXFW RPSRQHQW 5HVLGHQWLDO HUR 7XUQ 0RZHUV 5 2QO QJLQH 2WKHU 1RQ SHQGDEOH RPSRQHQWV HDUV GD V GD V 7LOOHUV QJLQH DWWHU HDU 3UR UDWHG 12 55 17 12 55 17 2WKHU 1RQ SHQGDEOH RPSRQHQWV HDUV 12 55 17 12 55 17 7LOOHU 7LQHV 12 55 17 12 55 17 RYHULQJ 7ULPPHUV QJLQH 2WKHU 1RQ SHQGDEOH RPSRQHQWV HDUV HDU GD V RQVX...

Page 23: ... G OO RWKHU 3UHVVXUH DVKHUV 3 3 3 3DUWV FFHVVRULHV LI SXUFKDVHG FFHVVRULHV H J JUDVV FDWFKHU EXPSHU JXDUG DFFHVVRULHV HWF HDU 12 55 17 12 55 17 3DUWV H J EHOWV EODGHV HWF GD V 12 55 17 12 55 17 3DUWV FFHVVRULHV LI UHSODFHG LQ DUUDQW 6HUYLFH 5HSODFHPHQW SDUWV DQG RU DFFHVVRULHV SURYLGHG XQGHU WKLV LPLWHG DUUDQW DUH ZDUUDQWHG RQO IRU WKH 1 RI WKH ZDUUDQW SHULRG DSSOLFDEOH WR WKH SDUW RU DFFHVVRU WKD...

Reviews: