
12
ENGINE
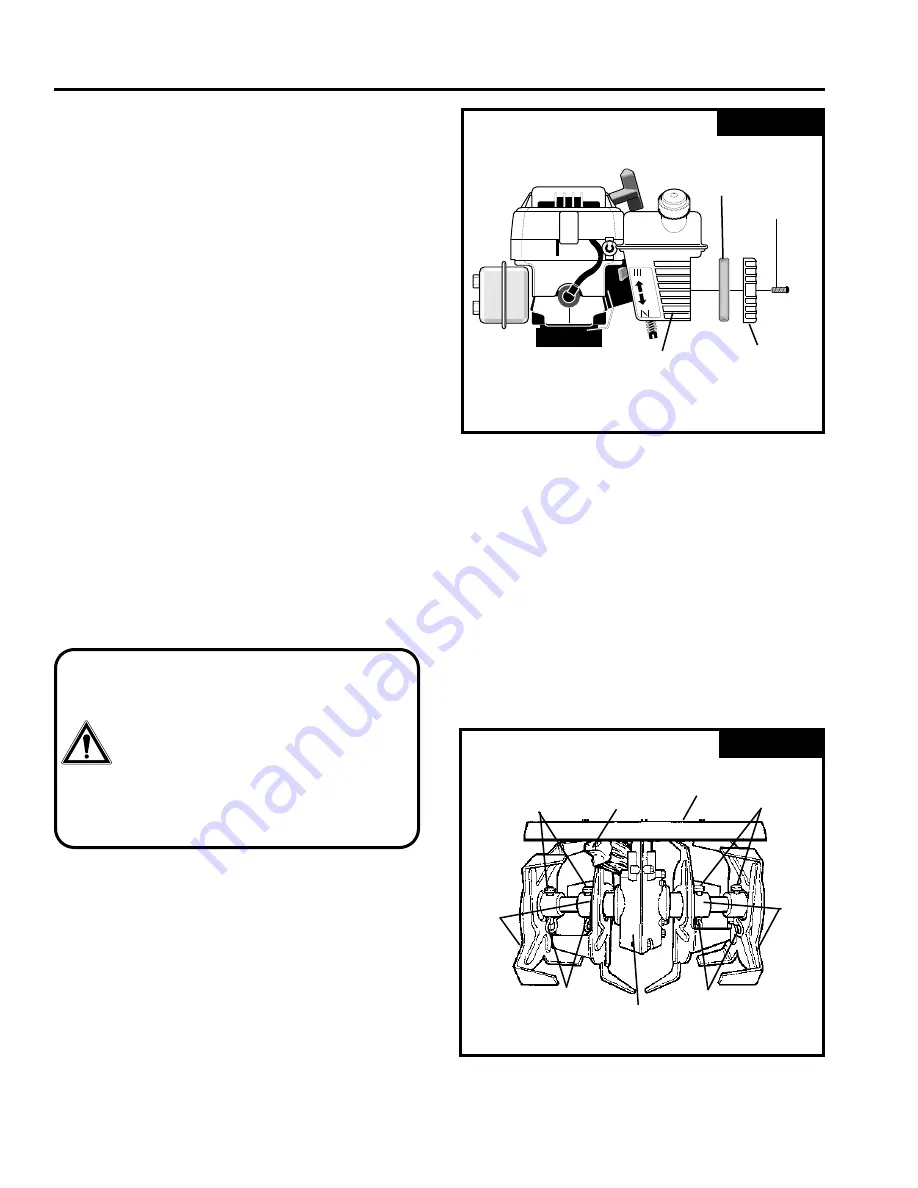
AIR CLEANER
The air cleaner filter should be cleaned and reoiled after 3
months or 25 hours of operation. Clean more often under dusty
conditions.
IMPORTANT:
The engine can be worn out in a very
short period of time if dirt or grit is allowed to
enter the engine.
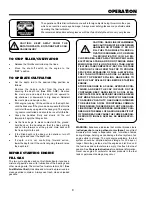
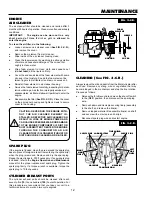
To clean the air filter, do the following:
●
Loosen screws on air cleaner cover (See FIG. 2-C.R.)
and remove the cover.
●
Remove foam element from air cleaner.
●
Wipe inside of the air cleaner housing clean.
●
Clean the foam element by washing in a strong solution
of water and household detergent. Then rinse thor
oughly in clean water.
●
Wrap foam element in clean cloth and squeeze out
(do not twist) all the liquid until dry.
●
Cover the ends and side of the foam element with same
oil used in fuel mixture. Knead the foam element be
tween fingers to distribute oil and remove excess oil.
●
Reinstall foam element in air cleaner housing.
●
Service the foam element carefully, inspecting for deterio
ration or damage. A defective, improperly serviced, or
misassembled air filter will allow dirt particles to enter the
engine.
●
Reassemble the filter (See FIG. 2-C.R.). Place the cover
on the air cleaner housing and tighten screws to secure
cover to the housing.
SPARK PLUG
If the engine is flooded, clean the area around the spark plug
base to prevent foreign material from entering the cylinder(s)
when the plug is removed. Remove and dry the spark plug.
Regap the electrodes to .030 if necessary. If a new spark plug
is needed, refer to the Engine Operation and Maintenance
manual for the proper replacement spark plug. Tighten the
spark plug firmly. If a torque wrench is available, torque the
spark plug to 15 foot-pounds.
CYLINDER EXHAUST PORTS
The cylinder exhaust ports should be cleaned after each
seventy-five (75) to one hundred (100) hours of operation. For
this procedure we recommend that you take your unit to a
technician trained to work on two cycle engines.
OFF
ON
C
H
O
K
E
OFF
FULL
HOUSING
COVER
SCREWS
FOAM
ELEMENT
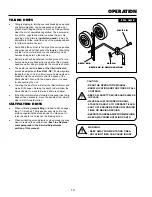
HAIRPINS
HAIRPINS
CLEVIS PINS
LEFT
SIDE
TINES
TRANSMISSION
TINE SHIELD
LODGED ITEM
CLEVIS PINS
RIGHT
SIDE
TINES
FIG. 2-C.R.
FIG. 3-C.R.
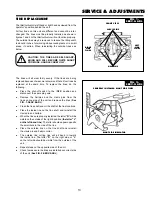
CLEANING (See FIG. 3-C.R.)
Always remove the dirt and debris from the tiller/clutivator after
each use. Remove any string, wire or vegetation that may
become lodged in the mechanism and stop the tine rotation.
Proceed as follows:
●
Release the throttle control and move the shut-off switch
to the (OFF) position, then disconnect the spark plug
wire.
●
Remove hairpin and clevis pin securing tine(s) assembly
to the shaft and remove the tine(s).
●
Remove lodged material. Reassemble tine(s) on shaft
and secure with a clevis pin and hairpin.
●
Reconnect spark plug wire and restart engine.
MAINTENANCE
CAUTION: NEVER RUN THE ENGINE WITH-
OUT THE AIR CLEANER ELEMENT IN-
STALLED. A DEFECTIVE AIR CLEANER CAN
RESULT IN LOSS OF ENGINE POWER AND
CAN CAUSE EXCESSIVE WEAR OR DAMAGE
TO THE ENGINE COMPONENTS IF DIRT OR
DUST IS PERMITTED TO ENTER THE ENGINE
THROUGH THE CARBURETOR. AN AIR
CLEANER THAT IS CLOGGED WITH DUST OR
DIRT SHOULD BE CLEANED AND RE-OILED.


