background image

8

The operation of this tiller/cultivator can result in foreign objects being thrown into the eyes,
which can result in severe eye damage.  Always wear safety glasses or eye shields while
operating the tiller/cultivator.
We recommend standard safety glasses or Wide Vision Safety Mask for over your glasses.

CAUTION: KEEP AWAY FROM THE
ROTATING PARTS.   ROTATING PARTS   CAN
CAUSE INJURY.

CAUTION:  GASOLINE IS FLAMMABLE
AND CAUTION MUST BE USED WHEN
HANDLING OR STORING IT. DO NOT
FILL FUEL TANK WHILE TILLER/CUL-
TIVATOR IS RUNNING, HOT, OR WHEN
TILLER/CULTIVATOR IS IN AN EN-

CLOSED AREA. KEEP AWAY FROM OPEN FLAME,
ELECTRICAL SPARK, AND DO NOT SMOKE WHILE
MIXING FUEL OR FILLING THE FUEL TANK. NEVER
FILL FUEL TANK COMPLETELY; BUT FILL THE TANK
TO WITHIN 1/2 INCH FROM THE TOP TO PROVIDE
SPACE FOR EXPANSION OF FUEL. ALWAYS FILL
FUEL TANK OUTDOORS AND USE A FUNNEL OR
SPOUT TO PREVENT SPILLING. MAKE SURE TO
WIPE UP ANY SPILLED FUEL BEFORE STARTING
ENGINE.

STORE GASOLINE IN A CLEAN, APPROVED CON-
TAINER, AND KEEP THE CAP IN PLACE ON THE
CONTAINER. KEEP GASOLINE IN A COOL, WELL
VENTILATED PLACE; NEVER IN THE HOUSE. NEVER
BUY MORE THAN A 30 DAY SUPPLY OF GASOLINE
TO ASSURE VOLATILITY. GASOLINE IS INTENDED
TO BE USED AS A FUEL FOR INTERNAL COMBUS-
TION ENGINES; THEREFORE, DO NOT USE GASO-
LINE FOR ANY OTHER PURPOSE. SINCE MANY CHIL-
DREN LIKE THE SMELL OF GASOLINE, KEEP IT OUT
OF THEIR REACH BECAUSE THE FUMES ARE DAN-
GEROUS TO INHALE, AS WELL AS BEING EXPLO-
SIVE.

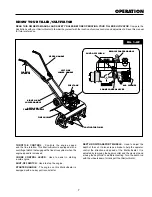
TO STOP TILLER/CULTIVATOR

Release the throttle control to stop the tines.

Move the shut-off switch on the engine to the
"OFF" position.

TO OPERATE CULTIVATOR

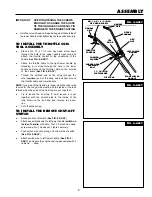
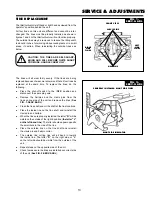
Set the depth rod to the desired tilling position as
follows:

Remove the hairpin cotter from the clevis pin
securing the depth rod (See FIG. 1-OP). Remove
the clevis pin and adjust the depth rod upward to
dig shallower or downward to dig deeper. Reinstall
the clevis pin and hairpin cotter.

With engine running, tilt the unit back on the depth bar
until the tines are off the ground and  squeeze the throttle
control all the way up against the hand grip. The engine
 is governor controlled and should be run at full throttle.

Grasp the handles firmly and slowly tilt the unit
forward to begin the tilling action.

As the tines begin to make contact with the ground,
hold back on the handles so that the tines will dig
and not ride forward over the ground. Hold back until
the tines dig into the soil.

If the tilled depth is too deep or too shallow, turn off
the engine and reset the depth rod.

If depth rod is not controlling forward action,
lower the depth rod. If the unit is not going  forward, raise
the depth rod.

BEFORE STARTING ENGINE
FILL GAS

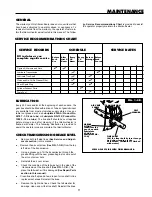
The two cycle engine used on this tiller/cultivator requires a
mixture of gasoline and oil for lubrication of the bearings and
other moving parts. The correct fuel mixture ratio is 24:1 (See
Fuel Mixture Chart
). Gasoline and oil must be pre-mixed in a
clean gasoline container. Always use fresh, clean unleaded
gasoline.

OPERATION

WARNING: Experience indicates that alcohol blended fuels
(called gasohol or using ethanol or methanol) can attract
moisture which leads to separation  and  formation of acids
during storage. Acidic gas can damage the fuel system of an
engine while in storage. To avoid engine problems, the fuel
system should be emptied before storage for 30 days or
longer. Drain the gas tank, start the engine and let it run until
the fuel lines and carburetor are empty. Use fresh fuel next
season. See Storage Instructions for additional information.
Never use engine or carburetor cleaner products in the fuel
tank or permanent damage may occur.

Summary of Contents for CT16

Page 1: ...CT16 Owner s Manual 601 00 18 54 Reference No 337411 05 03 95 8 1 1996 Spare Parts Piéces Dètachées ...

Page 2: ...ossing gravel drives walks or roads Stay alert for hidden hazards or traffic Exercise caution to avoid slipping or falling Never operate the tiller cultivator without proper guards plates or other safety protective devices in place Never operate the tiller cultivator at high transport speeds on slippery surfaces Look behind and use care when backing Never allow bystanders near the tiller cultivato...

Page 3: ...he engine exhaust from this product contains chemicals known to the State of California to cause cancer birth defects or other reproductive harm SAFETY RULES 2 TABLE OF CONTENTS 3 OWNER S INFORMATION 3 CONTENTS OF PARTS BAG 3 ASSEMBLY 4 5 OPERATION 6 9 MAINTENANCE 10 11 SERVICE AND ADJUSTMENTS 12 13 STORAGE 14 TROUBLESHOOTING 15 REPAIR PARTS 16 21 WARRANTY Back Cover CONTENTS OF SHIPPING CARTON 1 ...

Page 4: ...on into the mounting channel between the tine shield and the engine casting Align the holes in the handle with the engine casting and the tine shield then push the mounting screws completely through the engine casting tine shield and handle Install a spacer onto the mounting screws and secure the lower handle sections using two locknuts previously removed See FIG 3 ASSY Finger tighten the locknuts...

Page 5: ...strap is rough while the other side is smooth The rough side must be on the inside of the loop formed when the ends of the tie strap are put together Try to loosen the tie strap If it will loosen it is put together with the smooth side to the inside of the loop Remove the tie strap and reverse the direc tion Cut off excess strap TEE KNOB 11 32 INCH FLATWASHER HEX NUT NO 10 X 1 1 2 INCH HEX HEAD SC...

Page 6: ...HEELS Used to adjust the depth of the cut It also acts as a brake to help the operator control the direction and speed of the tiller cultivator It is adjusted by removing the hairpin cotter and the clevis pin and moving the depth rod to a different setting Turn the depth rod with the wheels down to transport the tiller cultivator KNOW YOUR TILLER CULTIVATOR READ THIS OWNER S MANUAL AND SAFETY RULE...

Page 7: ... clevis pin securing the depth rod See FIG 1 OP Remove the clevis pin and adjust the depth rod upward to dig shallower or downward to dig deeper Reinstall the clevis pin and hairpin cotter With engine running tilt the unit back on the depth bar until the tines are off the ground and squeeze the throttle control all the way up against the hand grip The engine is governor controlled and should be ru...

Page 8: ...THE TILLER CULTIVATOR WILL PROPEL IT SELF IF THE ENGINE SPEED IS ADVANCED FROM IDLE GASOLINE AND OIL MIXTURE Mix gasoline and oil as follows Pour 1 U S quart of fresh clean unleaded automo tive gasoline into a gallon gasoline container Add 5 oz of clean high quality two cycle oil into the gasoline container IMPORTANT DO NOT USE OUTBOARD MOTOR OIL OR MULTI VISCOSITY OILS SUCH AS 10W 30 OR 10W 40 DI...

Page 9: ...he operator control the speed of the tiller cultivator Also with the wheels down it is used for transporting the unit Lowering the depth rod will slow the tiller cultivator and make it till deeper Raising the depth rod will allow the tiller cultivator to move faster and till more shallow If the tiller cultivator stops forward motionand tries to dig deeper than necessary move the handles from side ...

Page 10: ...ssist the operator properly maintain the tiller cultivator CHECK TRANSMISSION GREASE LEVEL Remove both left side tines See Service and Adjust ments section in this manual Remove the air vent screw See FIG 1 C R from the top left side of the transmission Using a grease gun fill the transmission through the grease fitting until the new grease begins to come out of the air vent screw hole Reinstall t...

Page 11: ...s to 030 if necessary If a new spark plug is needed refer to the Engine Operation and Maintenance manual for the proper replacement spark plug Tighten the spark plug firmly If a torque wrench is available torque the spark plug to 15 foot pounds CYLINDER EXHAUST PORTS The cylinder exhaust ports should be cleaned after each seventy five 75 to one hundred 100 hours of operation For this procedure we ...

Page 12: ...on and disconnect the spark plug wire Remove the hairpins and the clevis pins from the tines on one side of the unit and remove the tines See FIG 1 SERV ADJ Clean the tine shaft and oil the shaft at the tine locations Place the inside tine on the tine shaft and reinstall the clevis pin and hairpin When the tines are properly installed the letter R will be visible on the outside of the right hand t...

Page 13: ... mixture adjusting screw slowly counterclock wise until the engine starts to sputter Note this location c Turn the mixture adjusting screw clockwise until it is halfway between the first position where the engine faltered and the second position where the engine started to sputter The idle speed may need to be adjusted after making the mixture adjustment If the tines do not turn when the engine is...

Page 14: ... and oil the tine shaft and reinstall the tines SeeService Adjustmentssectioninthismanual Loosen the tee knobs that secure the upper handle to the lower handle Carefully fold the upper handle down making sure the throttle is not kinked Tighten the tee knobs The cross piece of the upper handle between the lower handles can now be used as a carry handle or can be hooked over a wall hook to store the...

Page 15: ...ual Check the tines for proper installation See the Tine Replacement paragraph in the Service Adjustment section of this manual Stale fuel mixture Too much oil in mixture Dirt in fuel tank or out of fuel Carburetor out of adjustment Fouled spark plug Plugged air cleaner Debris interferring with throttle linkage Plugged air cleaner Too much oil in fuel mixture Carburetor out of adjustment Foreign o...

Reviews: